Good morning fine people

Last Saturday I went into my local GW store (Mt Gravatt) to order my copy of the new 6th ed 40k rule book.  Gokan showed me a limited release Collectors Bundle that I could have if I parted with $466AUD of my hard earned.  I wasnt sure if it was a good idea, but I went with it anyways cos I knew GW would do something special for it.  It is 40k 6th ed after all…  Anyways, this morning I went into GW Mt Gravatt to pick up my order.  All I can say is WOW!  so much AWESOME in this box its not funny… so let me walk you through it…

This is the box that it all arrived in… sealed with a nice purity seal…

upon opening the box, this is what I found… nice touch GW

a hand signed certificate of thanks from John Laughlin, Global Head of Sales

and thats when the AWSOME started flowing… proper!

nice

yep

very nice… going straight into the pool room…

this is my favourite item in the whole box of stuff… post card sized covers of every 40k rule book since 1st edition… very classy…

what we really all came for, the rule book…

very nice case… sort of feels like leather…

surprise!

the cover of the limited edition rule book

the numbered edition

So over all I am extremely pleased with what GW have turned out here.  Very classy, and full of so much WIN!  I was told by Adam, that apperently there were only 20 of these sold in Australia, and when I came in last Saturday and ordered mine, as I was leaving the shop, they got an email saying that they’d all been sold…  So I must have ordered one of the final copies available in Australia…  yay me.

Ok, I’m off to read the rules now, and look at the sure to be amazing artwork and painted models in the new rule book.  Bye for now

Thanks for looking

Regards

John

Hello fine people,

Did a bit of work on the LR this afternoon.  Thought I’d share it with you, its far from complete but its now starting to take shape and the picture will give you a good sense of the direction that I’m taking with it.  I’m eager to get this model painted so that I can move on and start work back on the second Titan which has been lingering way to long on my painting desk.  I did however pick up a piece that I’d been waiting for to complete the project this afternoon.  So we should see some progress on this shortly.

Ok, here is the WIP shot of the LR.  Hope you enjoy

Thanks for looking

Comments welcome as usual

John

Two posts in one day!!!

I just had to share this with you.  I’m feeling pretty pleased with myself at the moment, I applied that vinyl Carcharadons stencil that I got from Maybe Jane earlier on in the week.  Heres the result.

Ok, so here is how I did it…

I firstly cut out the stencil so it would fit on the model in a position that I was happy with

I then removed the backing paper being careful not to remove the clear plastic cover and firmly applied the back of the stencil to the Landraider (the bit closest to the weapon mount)

I then hit the stencil with this heat gun, to help it better conform to the models contours

As you can see, the stencil became quite soft and pliable after it was warmed up a bit.

After getting the basic shape pressed into the stencil, I then carefully removed the clear plastic from the top of the stencil… I then warmed up the vinyl once again, and used a blunt pointed object to help the stencil conform to the contours of the Landraider.

I then masked it up a bit more to stop overspray getting on the tank

And this is the final result!  Really pleased with the outcome.

I then added a few more decals to the model to finish it off.  I’ll probably do some more work on this tomorrow.  I’m really motivated to see this Landraider painted.  I think its going to look fantastic.

Thanks for looking

Comments?

Just a quick update with a few pics… Enjoy

Hey there, just a quick post on some progress on 4 Rhinos and a Landraider I’m painting for my Iron Hands.  So, the pics

This one is of the mask that I made for the top doors for the Rhino… it is to display the tactical squad markings.  I first made a template out of plasticard, then used it to cut out four arrows.  I then fixed these to the top of the doors, and airbrushed white on.

what it looked like finished…

I then did a bit of modulation with a light grey on the hull, and applied the decals.  That milky discolouration you can see is just the clear coat that I put over the decal to bond it to the mini better.  Once the mini is complete it helps make the decal look like a stencil.


Just a really quick post.  I picked this up today from Maybe Jane.

Its a stencil that I’ve had made because I want to add the chapter badge to the side of Tyberous’s Landraider.  In order to do that, I couldn’t use a decal, as the ones on the sheet from FW are not large enough.

This is roughly where I am going to place it on the side of the hull.  I’m really looking forward to see how this will turn out.

I’ve used Maybe Jane to make me stencils before that I’ve mentioned in a previous posts.  Here are some pictures to refresh your memory.  The whole process was really quick, I just emailed Tegan the picture of what I wanted a stencil made of and the quantity. It was ready really quickly and inexpensively, very professional, she’s very friendly, helpful and knows her stuff.  Check out her FB page

I am really pleased with these stencils they are going to add a lot of interest to the Landraider.  I’m hoping that I’ll be able to finish up the prep stage by the weekend and get the painting started.

Thanks for looking

Comments?

Cheers, John

is just a very quick update, I’ve now more or less finished the detailing of the Landraider, just a few minor fixes to make then its off to be undercoated.  Enjoy!

Hey All,  this is just a really quick update.  Ok, the pictures…

So this is the edging that I mentioned in my last post.  I’ve got to gap fill it, then put the rivets in after that.  I’m really happy with how its coming along.  The actual kit though is seriously crap.  It’ll need a lot of work to get it looking ok, which is a bit disappointing, especially considering they took down for sale because they were having problems with the mould

This is what I used to apply the edge

ok, thats it for now

comments?

Firstly, thats very much for everyone who’s visited my new blog, like my FB page and left words of encouragement and support.  Very much appreciated.  I get a real kick out of publishing my work because it pushes me to get better, and I hope it inspires you to try new things and think about your hobby differently then you did before.

Ok, welcome to my 1st post.  Its going to be a bit of a long one (I think) covering what might seem like some pretty small aspects of detail, but to me its many small things on a model that in the end will add up to a result greater than the sum of its parts.  So this model for those that haven’t seen it before is a Pre-Heresy Landraider kit produced by Forge World.  Its going to be the ride for the Carcharadons army Commander Tyberous and his retinue of Lightening Claw equipped Terminators, and maybe a Chaplain in Terminator armour.

Although I already have two Landraider Redeemers in my army, I originally wanted to have two Pre-Heresy LR’s that were going to be converted into Redeemers.  However when I was making this army, FW had removed the kit for sale telling me that there was something wrong with the mould and it’d be back sometime in the future.

So I brought one a week or two ago, with the intention of painting it up to be Tyberous personal Landraider.  So I’m going to bling it up a bit to reflect that.  I’ve got some pretty cool ideas floating around in my head about what I’m going to do with this kit, so I’m really looking forward to seeing it evolve.

So the 1st area to get attention is the weapon systems.  The kit comes with the standard Landraider fit out, twin las cannons and twin linked heavy bolters. As I want to make this either a Redeemer or Crusader, I need to give it Hurricane Bolters in the sponsons, or Flamestorm cannons, and a twin linked Assault cannon.

As I wanted to keep with the theme of Tyberous and his retinue (they are heavily converted) I want to make the Landraider look like its firstly a very old relic of the chapter, and secondly that its fits the character or the Tyberous and his retinue.

To do this, I’ve used the Flamestorm cannons from the Grey Knight Redeemer, as they look more characterful and baroque than the stand kit ones, and I wanted the Assault Cannon to look older, and sort of an earlier model of the current kit one.

We’ll start with the Flamestorm Cannons.

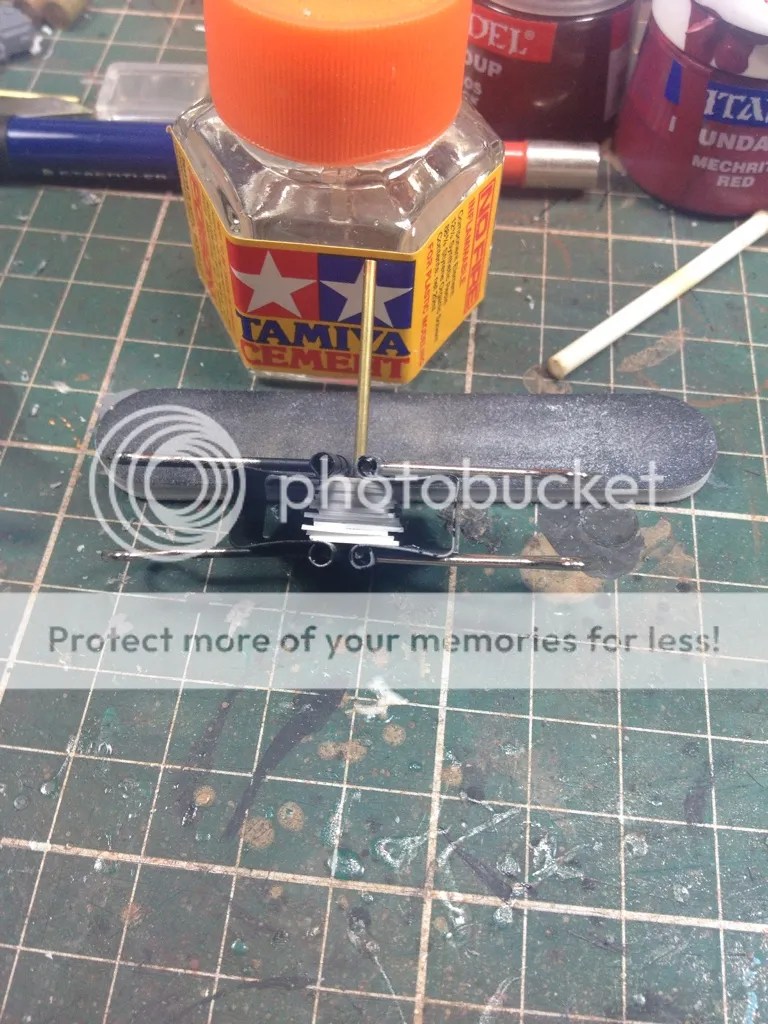
I wanted to magnetise them, so I could use either weapon system.  To do this I had to fill in where the Las cannons would have gone with yellow miliput.

From there, I cut the back off the Flamestorms and inserted rare earth magnets into the back of them

I have a very simple method for getting the “poles” of the magnets always right.  I simple have two small styrene sticks made up with a magnet glued to each end with opposite poles attached.  I have then marked on of the sticks.  This marked stick is the one I use to insert magnets that will be on either the body or hull of the particular model.  The other stick is the one I use to insert the magnet into what ever it is that attaches to the body or hull of the particular model.  I have lots of different sized magnets from 2mm to 4mm to 8mm depending on the application.

After I had done both cannons, I then marked up the sponsons and did a small pilot hole.  This is important because if you dont, the miliput can crack out.

Then it was just a matter of putting the other magnets in and its done.

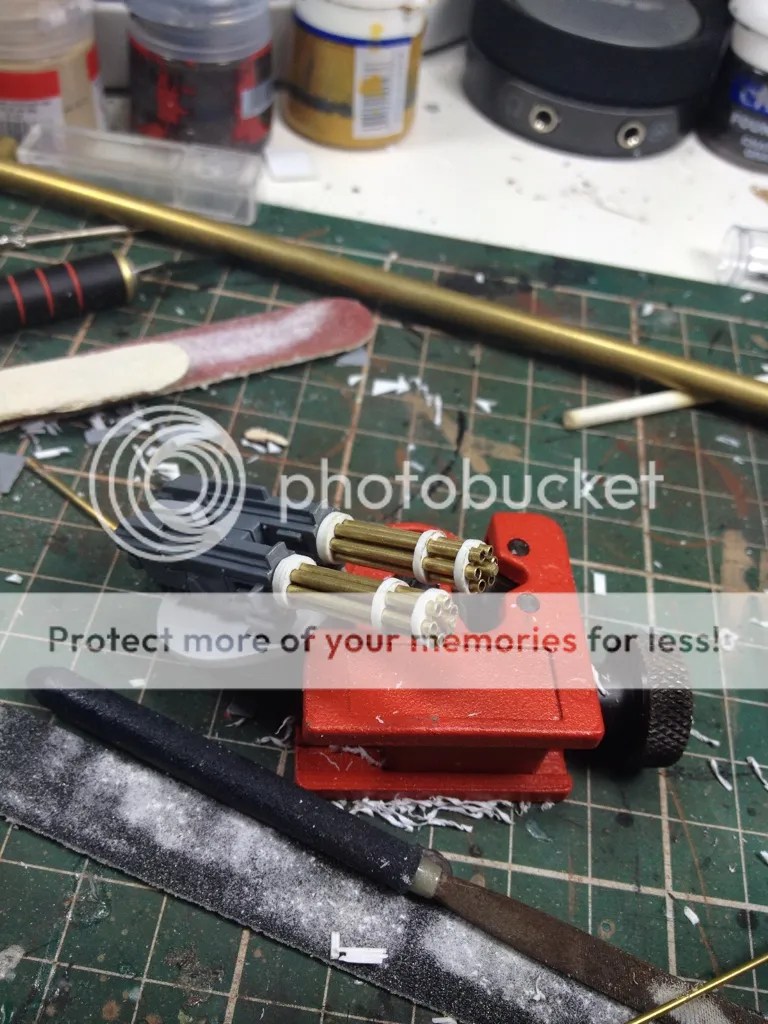
Ok, next up was the Assault cannon… this was a bit of a leap for me, as its very technical and I had to be extremely precise.  I did some research 1st and looked at modern day mini guns.  Then I went to my local hobby store and got some 1.5mm brass tube and a few other bits and pieces.

I then cut the barrels to what I thought would be a nice size and did a quick mock up of what I wanted it to look like

Pleased with its proportions, I then went and started creating the disks that hold the barrels in place.  This was by far the most difficult aspect of the job.

I basically got a whole bunch of styrene sheet, glued some of it together into a sort of sandwich, drilled a hole through the middle, stuck a piece of the 1.5mm tube through it, roughly cut off the edges to make it sort of round, then put it on my cordless drill and made that into a lathe of sorts… and used that to make it round.

Then using my mock up as a guide, drilled 6 x 1.5mm holes in each disk and started inserting the brass tube

As you can see, they are not perfectly round nor did they get away undamaged.  However once all the barrels are in, they have turned out quite nicely.

Ok, thats it for now.  Thanks for looking

Comments welcome

John

Fair-well to Wargamer AU

Posted: June 12, 2012 in Wargamer AU

Well, I’ve announced that I will no longer be updating my diaries on Wargamer AU.  Its a great place, and I’ve made lots of new friends, acquaintances and learned a lot too.  However, I want to have my own page, so I just decided to set it up and start blogging…  seemed like a good idea at the time.

This is a screen shot taken after I updated all of my diaries letting everyone know that I’m moving.  Be interesting to see if anything comes of this.