So, that time of the year has rolled around again where I’ve made the epic journey upto Townsville for the annual ADFWGA fund raiser. Do you remember last years post?
I’ve not really participated in that many tournaments in 2013, in fact, I’ve not even played that many games. I’m more about 30k or social playing 40k these days. However, the ADFWGA put on a great show, and its for a very good cause. This year the 40k tournament was 1750pts and I took my Iron Hands. I didn’t use the new mini dex however.
I also ran the painting workshop, which this year was focused on batch painting. I believe we raised $500. Also, one of the guys who attended won an airbrush set up in the raffle at the end of the comp!
So I’ll let the pictures do the talking…
So all the models and paint for the painting tutorial were generously donated by Battle station Ipswich. Roughly about $700 worth. Extremely generous
The painting workshop in full swing. There were many skill levels and painting backgrounds represented. Everyone learned some new skills and had a good time. It was a seriously long day though. I was exhausted! Having only gotten back from my trip to Europe 3 day prior didn’t help either… Next year I’ll stick to painting sides of tanks!
The calm before the storm. One thing I really like about the ADFWGA comps is how well they are organised. They are by far and away the bench mark for tournaments in Australia. No other events even come close to touching these comps.
The scenery is always very high quality too. The tables have a great admin area on them to put your army, books etc. They even have a table to follow so you dont forget any pre-game admin, like warlord traits etc. Very helpful, especially for people like me who don’t play that often anymore…
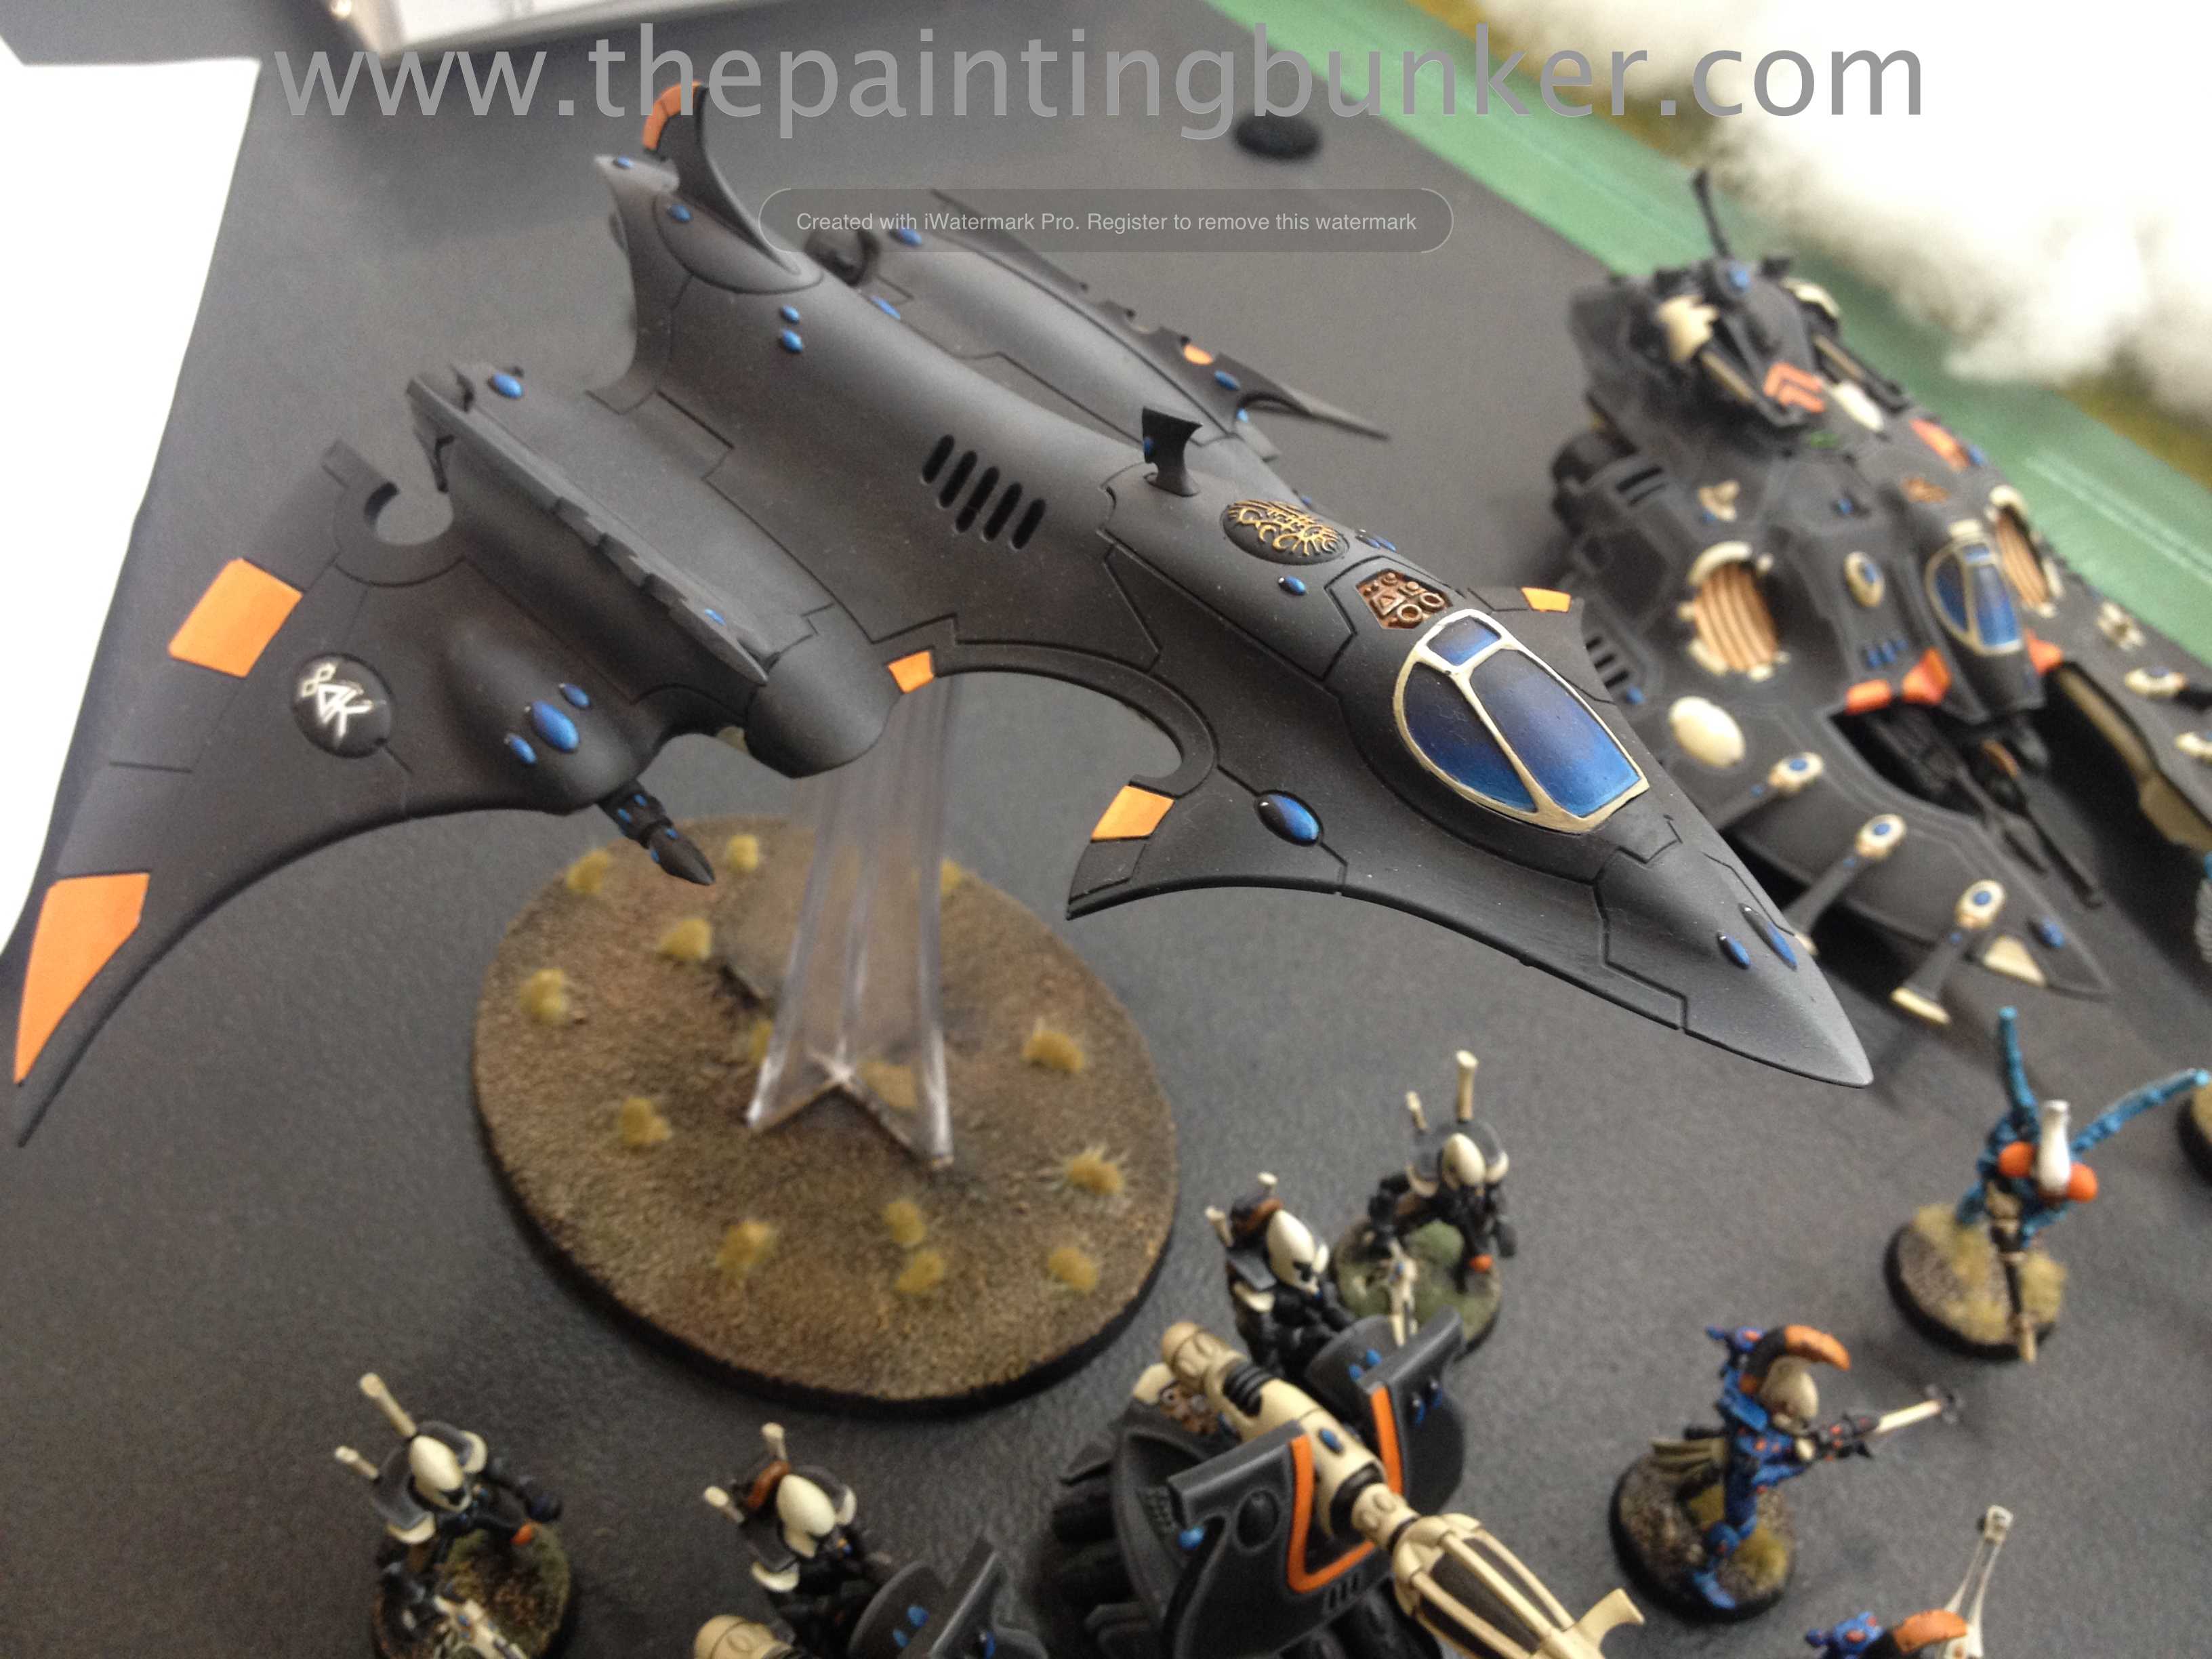
As usual, the armies are all really interesting and high quality. This one was one of the more interesting ones. Its and Eldar Exodite army. Tones of converting and custom work were put into this army to get it looking right. Not only that, but the paint job was excellent too. Sadly the owner didn’t manage to get it finished in time, so they were ineligible for a prize etc. Pity. Pardon my crappy iPhone photos.
This was an army I actually played against. I was really impressed with the paint job. It was well thought out and skilfully executed. I was genuinely shocked that it didn’t get a better painting score, or even a place for that matter.
Lots of nice blending and freehand work. But yeah, Eldar. My least favourite army to play against…
So overall I came 6th. Which I was seriously surprised at. I only won two games, and drew the other three. My army list was just a very basic marine one. I did however have A LOT of stand off fire power. Which worked quite well actually, however I didn’t really have anything that could deliver the killing blow. No heavy hitters that could get up into the enemies grill.
The Iron Hands also got second place for the painting comp too. Which again, seriously surprised me. The Iron Hands are quite an old army now, and I’ve come along way technically and creatively since I first painted them. So to get that sort of score was pretty overwhelming. I wish I’d actually taken the World Eaters and played them as CSM. But I just didn’t have the time to paint what I wanted… And my Iron Hands army is MASSIVE, so lots of different choices available to me.
So overall the weekend was a great success. The ADFWGA raised over $12,000 for Soldier on and many good games were had. A big improvement on last years efforts, raising $10,000.
Well, I’ve been promising one for some time. Today is the day that it finally arrives! A 1,000 point 30k game between the traitorous World Eaters against the brutal Iron Hands.
So some background.
On New Years day I got a call from a good friend of mine. He lives in Townsville (about 1,600km north of Brisbane). It turns out he is on holidays at Noosa (about 80km north of Brisbane) and was wondering if he could drop in for a catch up, seeing as he was down this way. I was thrilled that he’d contacted me and eagerly invited him over. Keepy is a very accomplished modeller himself having won several painting awards and competitions (one of which I was a judge for) Below are some of his very impressive models.
As you can see, Keepy is a great painter and his conversions are skilfully executed. I really like his work. Hopefully we’ll see some more models from him shortly (hint hint)
If you think Keepy should also have a WordPress blog to share the awesomeness, you can effect a partition and cast your vote below. I’ll make sure he gets it.
So, knowing that Keepy was heading my way, I asked him if he had an army with him so we could have a game. Everyone takes an army with them on holiday right?, right? Sadly he didn’t but he suggested that we have a game of 30k using my World Eaters and Iron Hands. I thought this was the best idea I’d heard in 2014 (keep in mind it was about 8hrs old at this stage)
With this news, and knowing that Keepy would be about 1 to 1 1/2 hrs way I thought it would be a good idea to document this epic clash for all time in this battle report. Below is the sorted tale of the clash, names and dates have been altered to protect the innocent.
Disclaimer:
All characters appearing in this work are fictitious. Any resemblance to real persons, living or dead, is purely coincidental.
The armies
World Eaters consisted of
HQ
Legion Praetor with an Iron Halo, Paragon Blade, Plasma Pistol and Digital Lasers – Using the Rite of War “Pride of the Legion” (because I don’t yet have painted any actually legitimate Troops choices… )
Elites
Contemptor Dreadnought with two power fists, built in heavy flamers
Troops
Terminator Squad (5) with 4 power fists and a heavy flamer
Rampager Squad (9)
Heavy Support
Heavy Support Squad(5) with 4 plasma cannons
The Iron Hands force consisted of
HQ
Legion Centurion with the Forge Lord Upgrade
Elites
Dreadnought Tallon (2) both with Multi Meltas, power fists and heavy flamers
Troops
Legion Tactical Squad (15)
Legion Tactical Squad (15)
Heavy Support
Heavy support squad (5) with 5 missile launchers
Fast Attack
Legion Javelin Attack Speeder with a Multi Melta
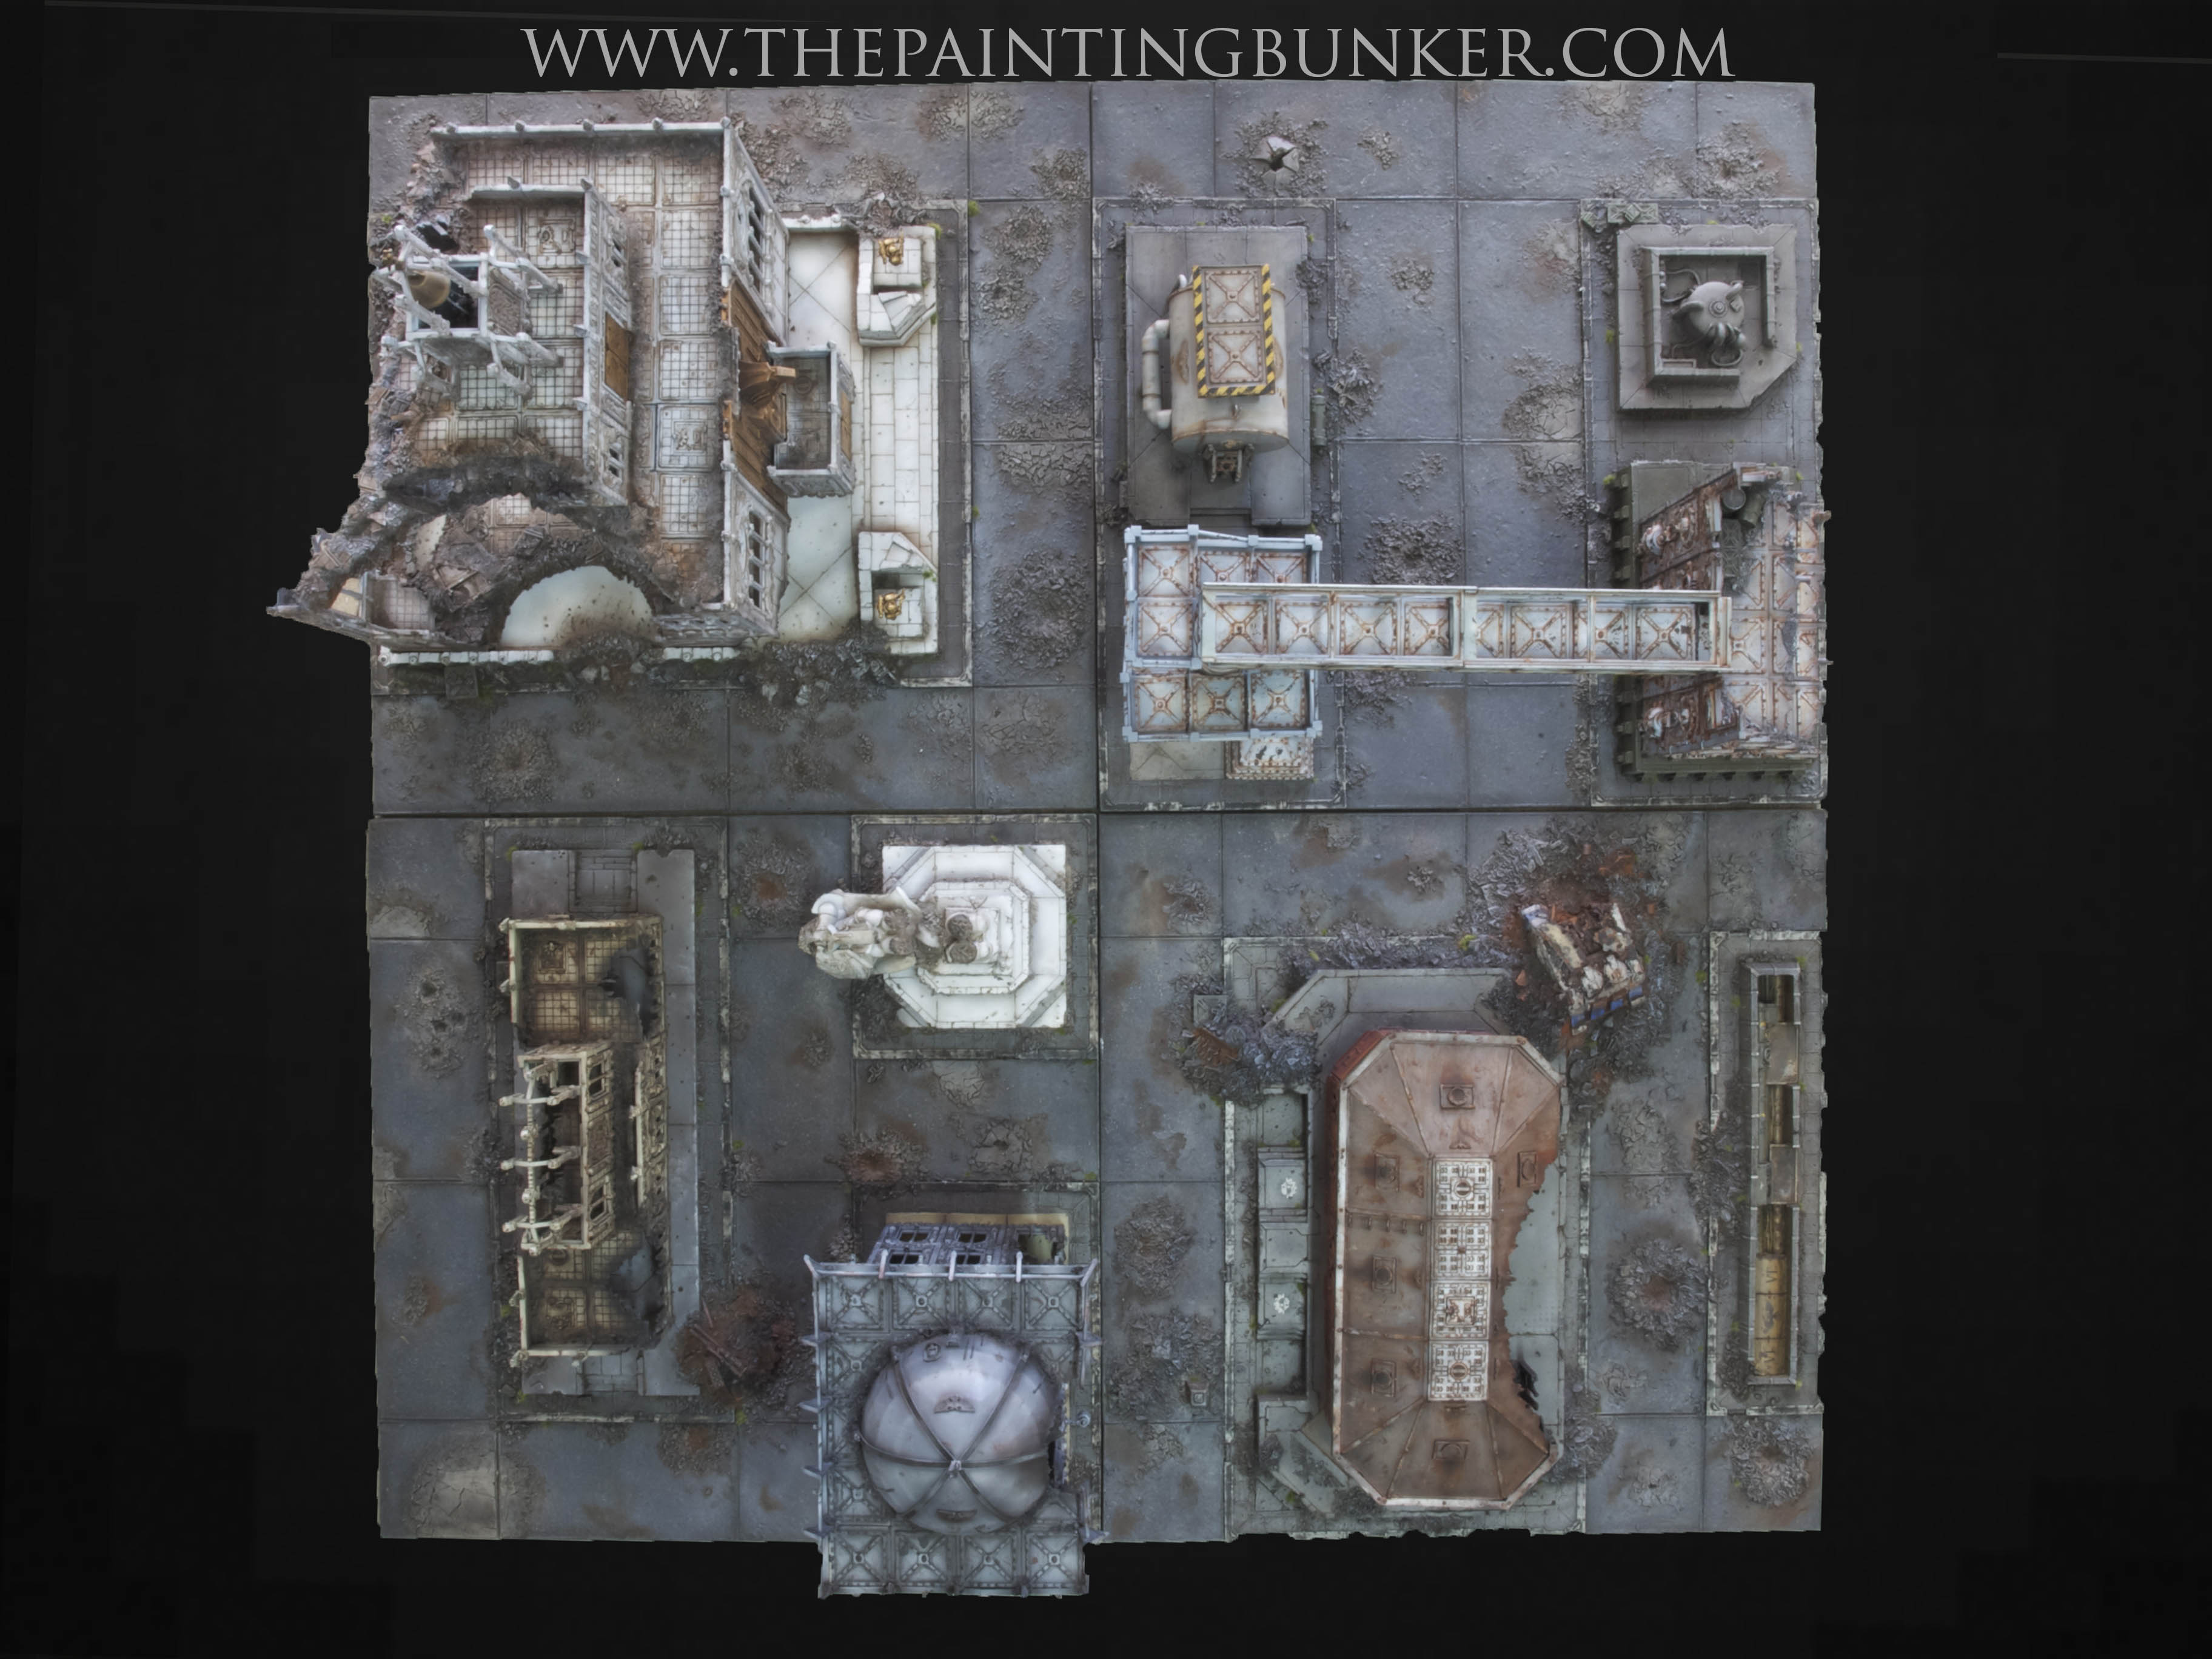
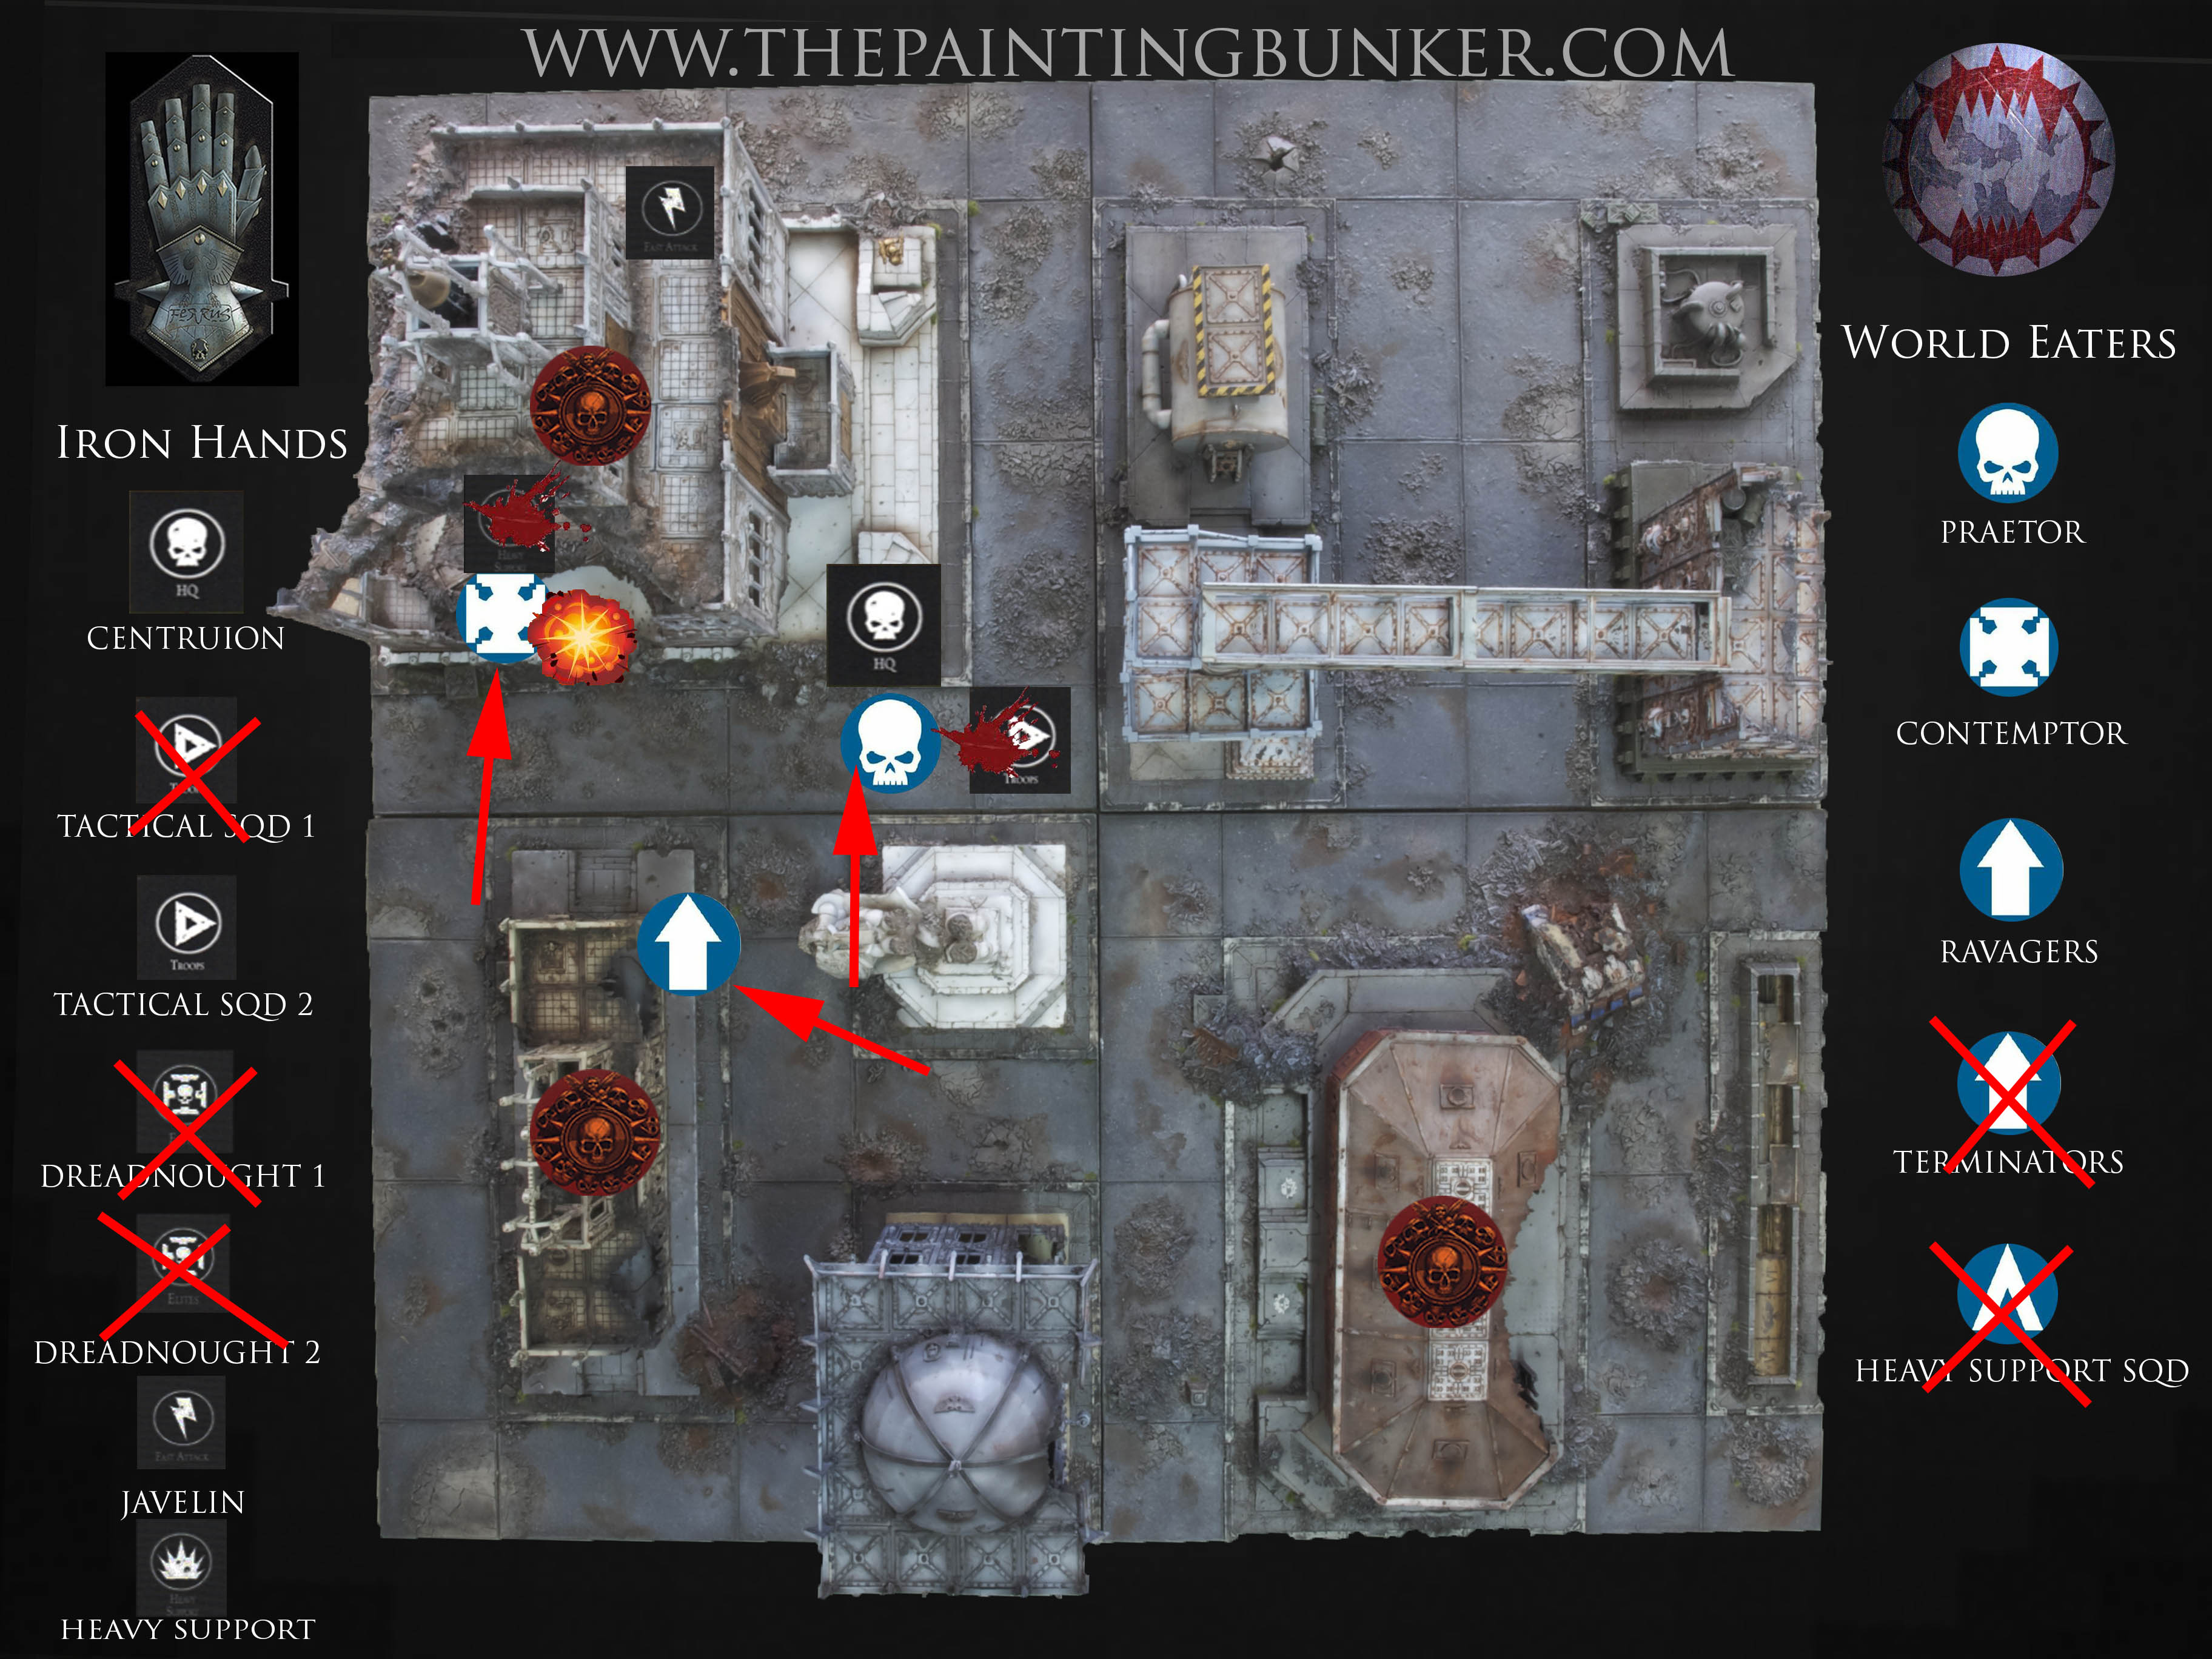
The Battle Field that this epic conflict would be fought over
Being only 1,000pts we oped for a 4 x 4 table. Being such complex terrain it would give us plenty of opportunities to manoeuvre.
We began the pre game admin, rolling for mission, deployment and warlord traits. During this phase, my dice rolling luck was true to form. Rolling three ones in row when determining who got to choose sides, who deployed first, and warlord traits. (the last one wasn’t so bad though)
So for the mission, we rolled a five (well Keepy did, I could only roll ones, remember) This mission is an objective mission, each worth three points. Anyone unit can claim or deny an objective and each enemy unit totally destroyed or broken at the end of the game is worth a VP. First Blood and Slay the Warlord are in effect too.
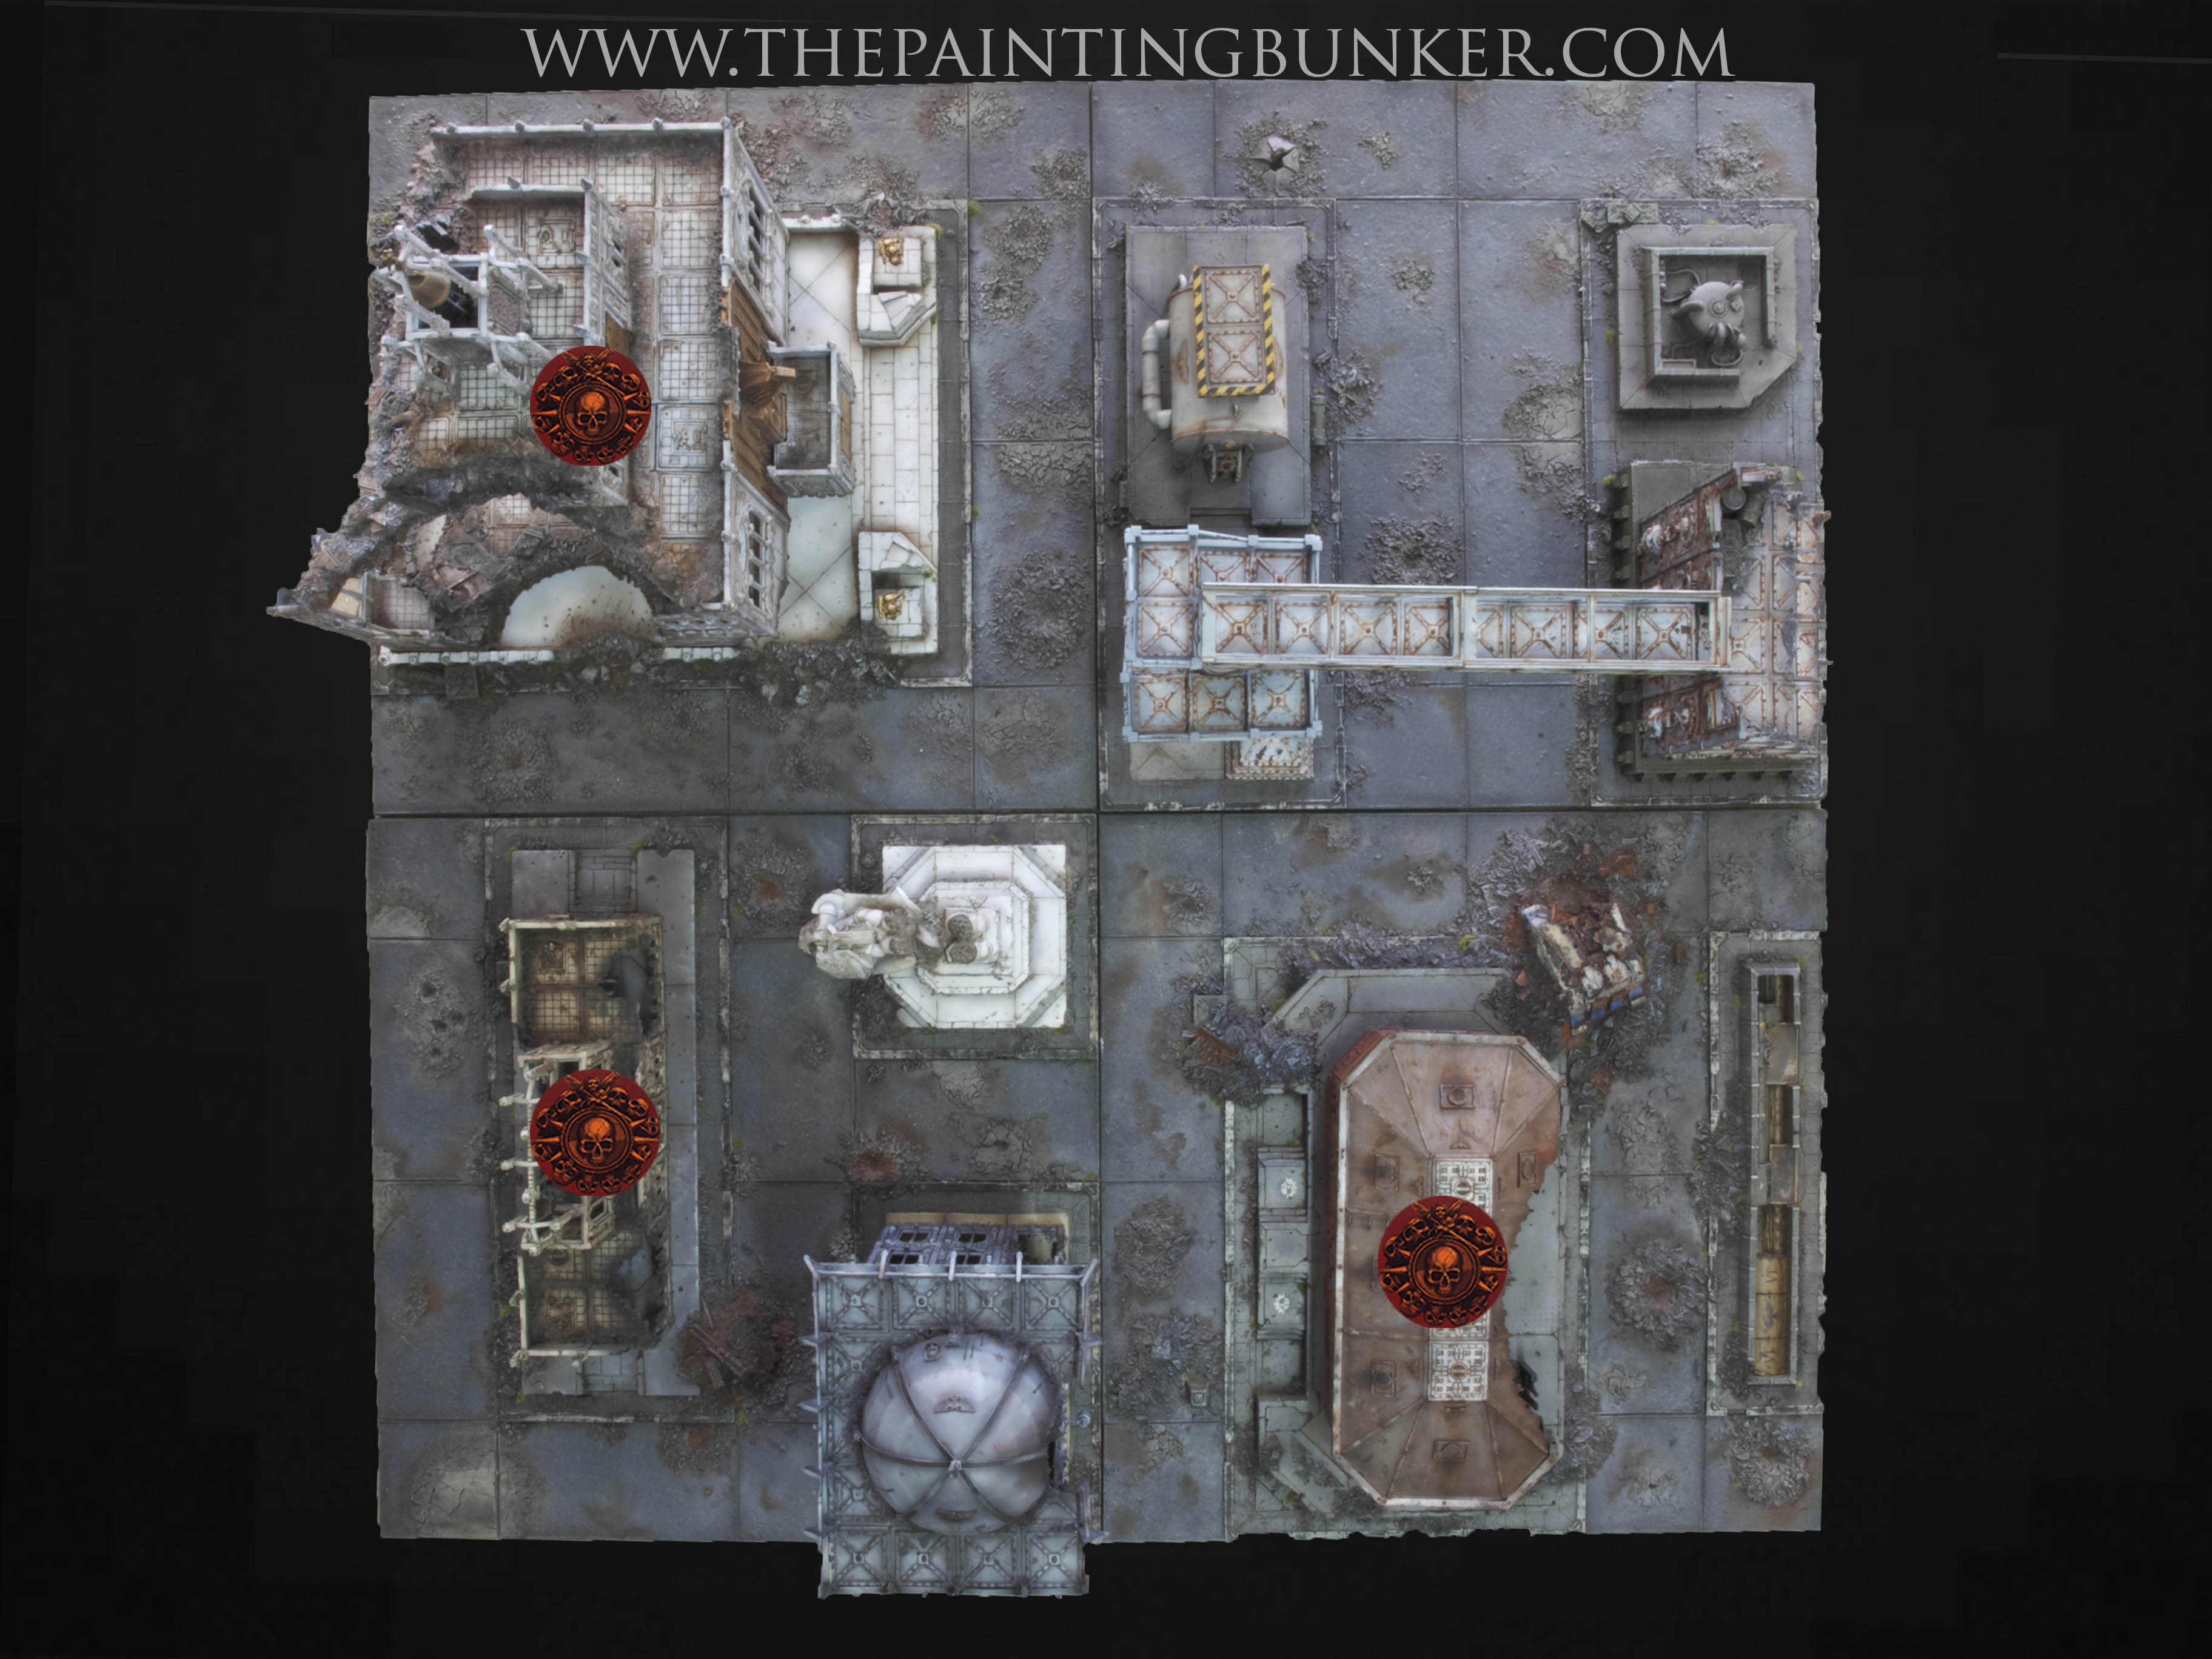
For the deployment type, keepy rolled a three. Search and Destroy. The map looks like this…
For the World Eaters warlord trait I quite appropriately got Bloody-handed. This meant my Warlord and any unit he joins cause Fear – nice
The Iron Hands Warlord trait was Void Walker. The Warlord has Adamantine Will and allows one unit of infantry to deep strike…
We then placed out D3 +2 objectives. I was in charge of the roll. Predictably, I rolled a 1. So we had three objectives to deploy. When determining who would deploy the first objective, Keepy won the roll off. Because I rolled a one…
The objectives had to be placed on the ground floor of a building, and 12′ from a table edge and each other. We had to fudge this a little to get it to work right, but you get the idea.
So, as I mentioned Keepy won the roll for choosing the deployment zone and who deploys first. Keepy chose the top left corner, so that meant I got the bottom right. Keepy also chose to go first. He figured getting the first opportunity to inflict causalities on my small, elite force would be a good plan.
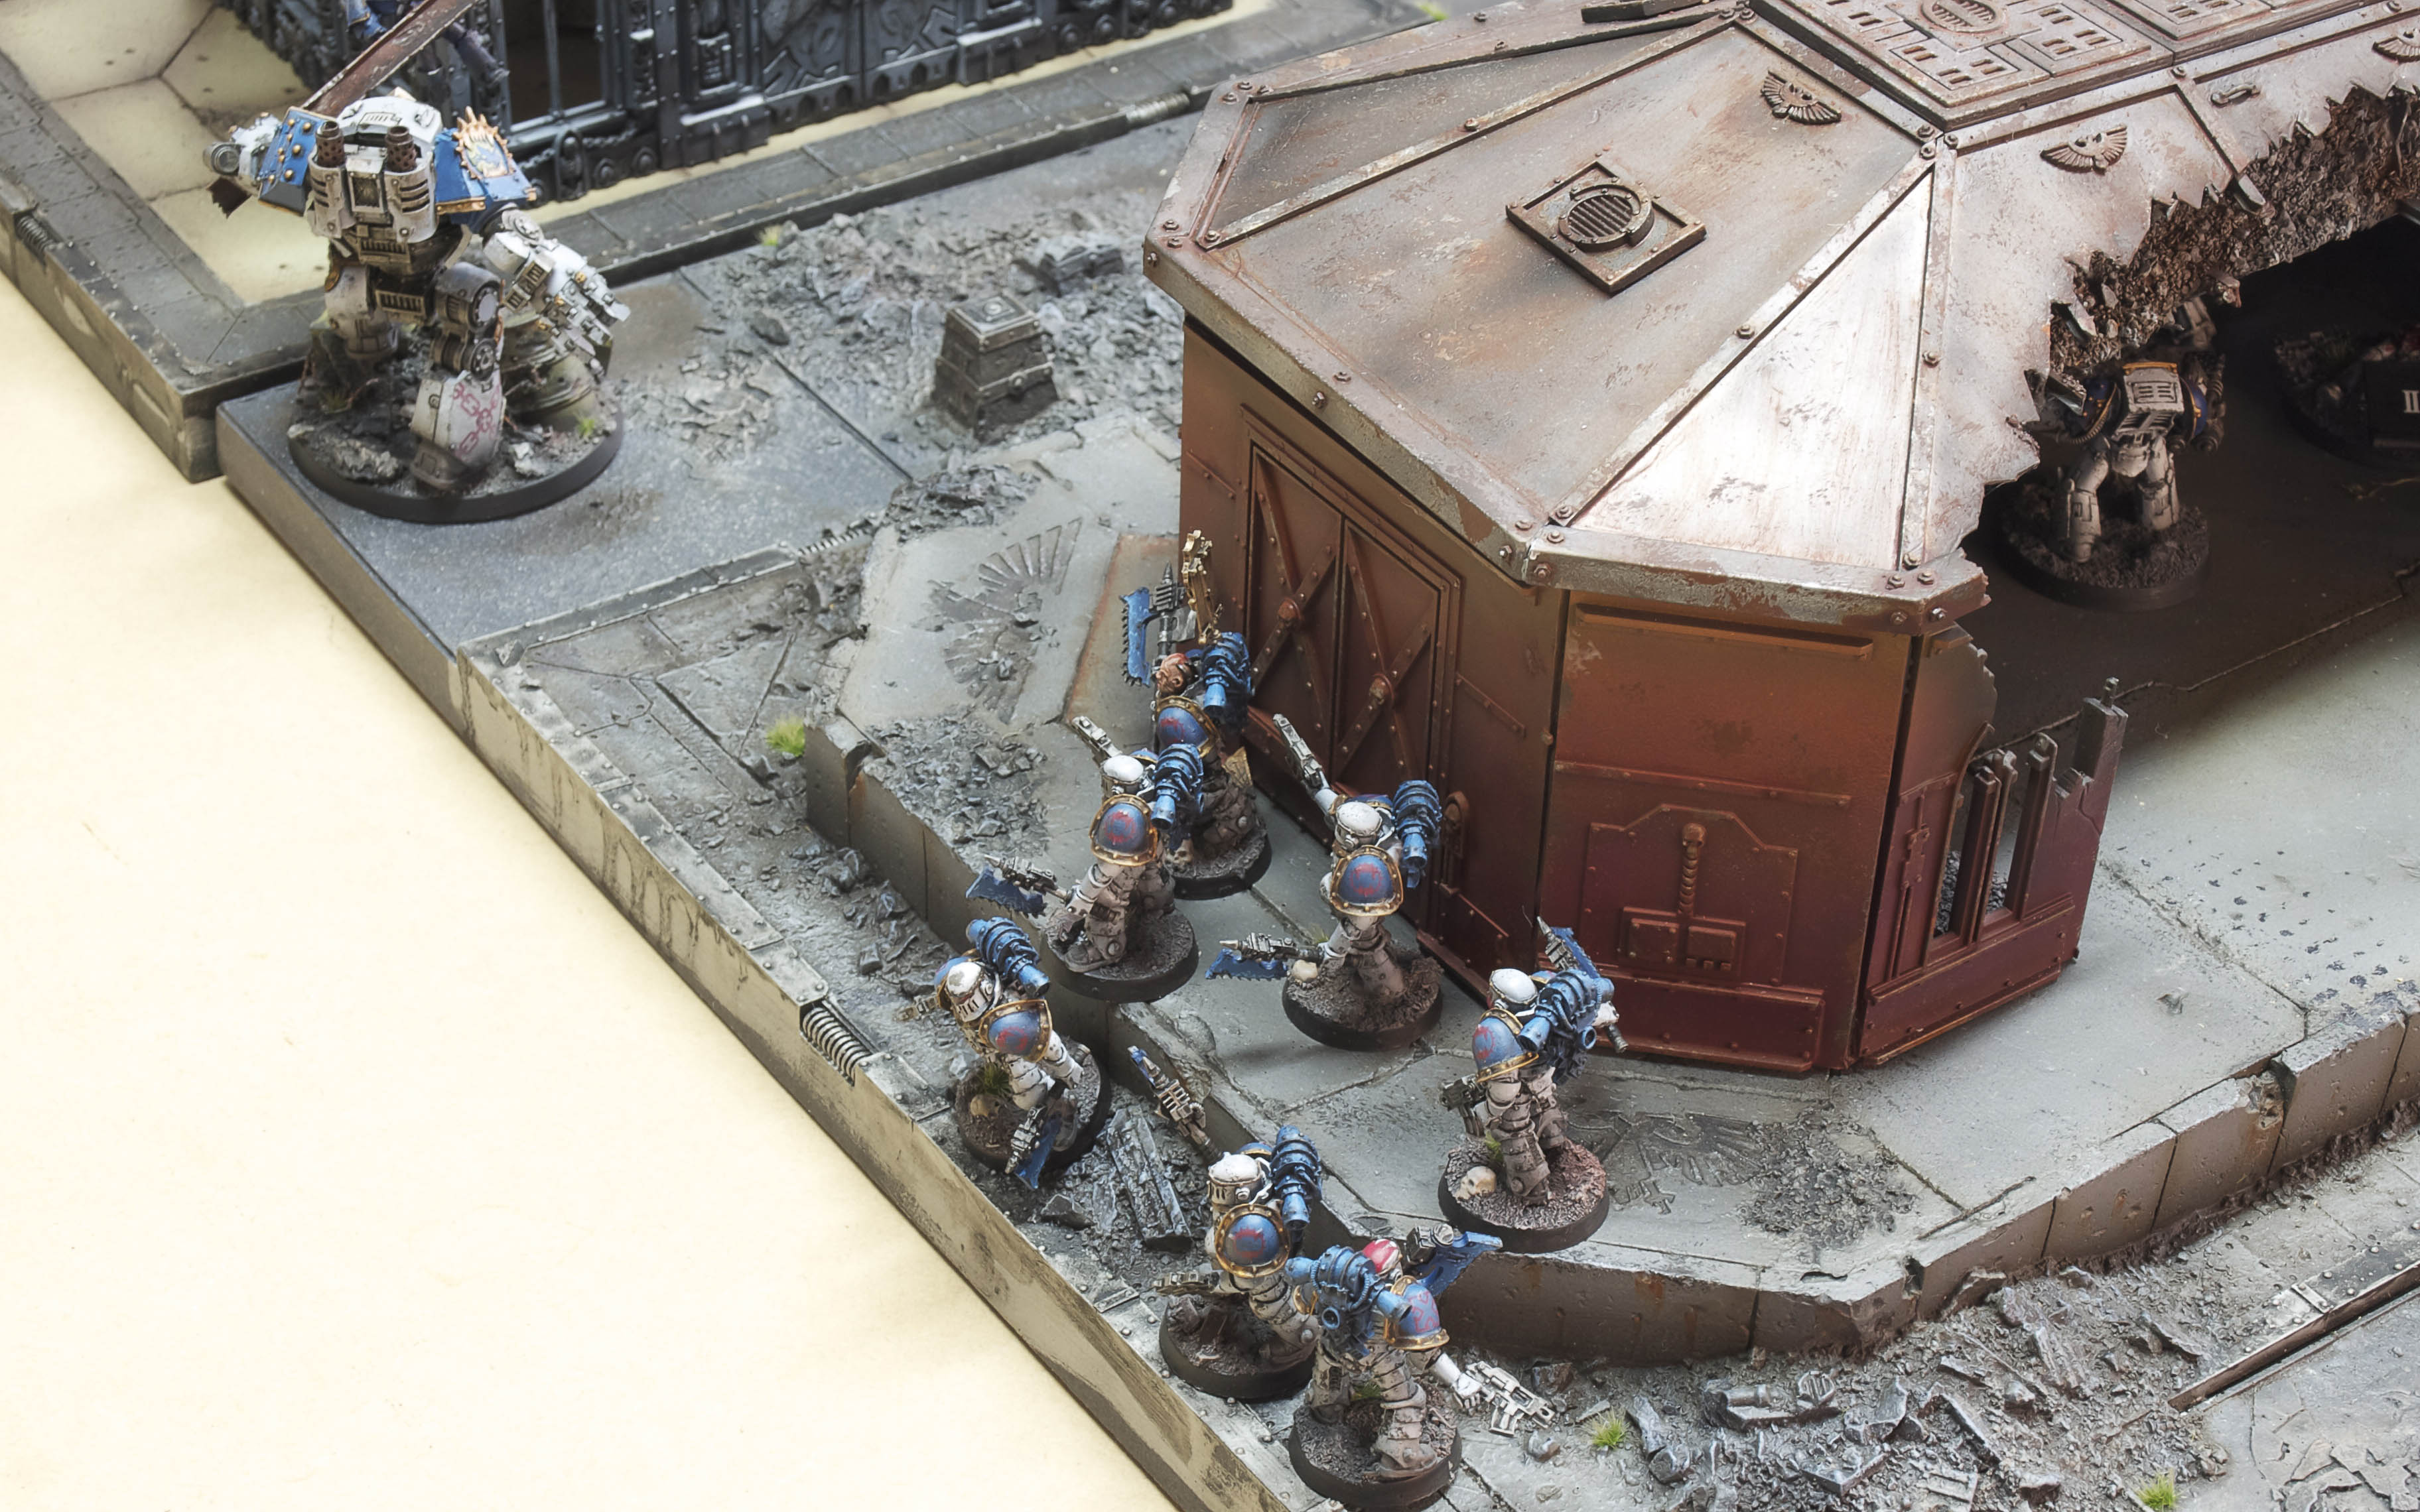
Keepy, as I’d predicted, deployed quite aggressively. His force had a much larger foot print on the table than mine and he used it to this advantage. Seeking to dominate the centre of the board to restrict my freedom of movement. He placed his heavy weapons on top of the Cathedral so he could employ them at maximum range, probably at my heavy weapons. I was very anxious about the missile launchers. They had very good observation and fields of fire, and really dominated the ground. They were my number one high value target. If I could eliminate them it would mean my units wouldn’t have to worry about being picked off as they moved towards taking the objective in the bottom left hand board.
My scheme of manoeuvre was to secure the objective in my deployment zone with the Terminators and Heavy Weapons. The heavy weapons would keep his forces at a distance and the Terminators would be used in the close fight if it went pear shaped. Meanwhile, the Contemptor, Praetor and his Rampagers would move up the flank to secure the unclaimed objective. I had to watch his dreadnoughts though. They were both armed with Multi Meltas. This would spell disaster for my Contemptor if I got too close. Which was exactly what I was going to have to do at some point. My only real plan to combat this was to try and separate the two dreadnoughts so that only one could take a shot, and with any luck… miss.
Iron Hands Deployment
Those pesky missile launchers on top of the Cathedral. Worrying
His Forge Lord guarding the objective, supported by a Tactical Squad
The Heavy Support Squad and Terminators secure the building with their heavy weapons and strong defensive ability. The building providing superior cover and concealment
The Praetor and his Rampagers remain out of sight for the expected first turn barrage. The Contemptor leading the way up the flank.
I roll to steal the initiative…. miraculously I roll a 6! The World Eaters seize the initiative and get first turn! This has really put a spanner in the works for Keepy!
First Turn – World Eaters
Sticking with my plan, I moved the Contemptor up the flank along with the Praetor and his Rampagers. Due to the Contemptors fleet special rule, I managed to get him a full 12″ up the flank. Sadly, the Praetor and his Rampagers had to move through some difficult terrain and even with their run, only managed 6″ This got them almost to the other side of the street though. In the shooting phase, there was really one one thing to do. Smoke those missile launchers! The Devastators let rip, wounding four Iron Hands, and killing three. This then caused a break test… which they failed! Not only did they fail, but they ran back 10″. In their panicked state they actually ran off the edge of the Cathedral and the two remaining had to take an impact test. Amazingly, they both lived!
My shooting phase couldn’t have gone any better if I’d planned it that way. I was feeling pretty content with myself. I’d managed to neutralise my number one high value target in the first shooting phase and my out flanking manoeuvre was running smoothly.
First Turn – Iron Hands
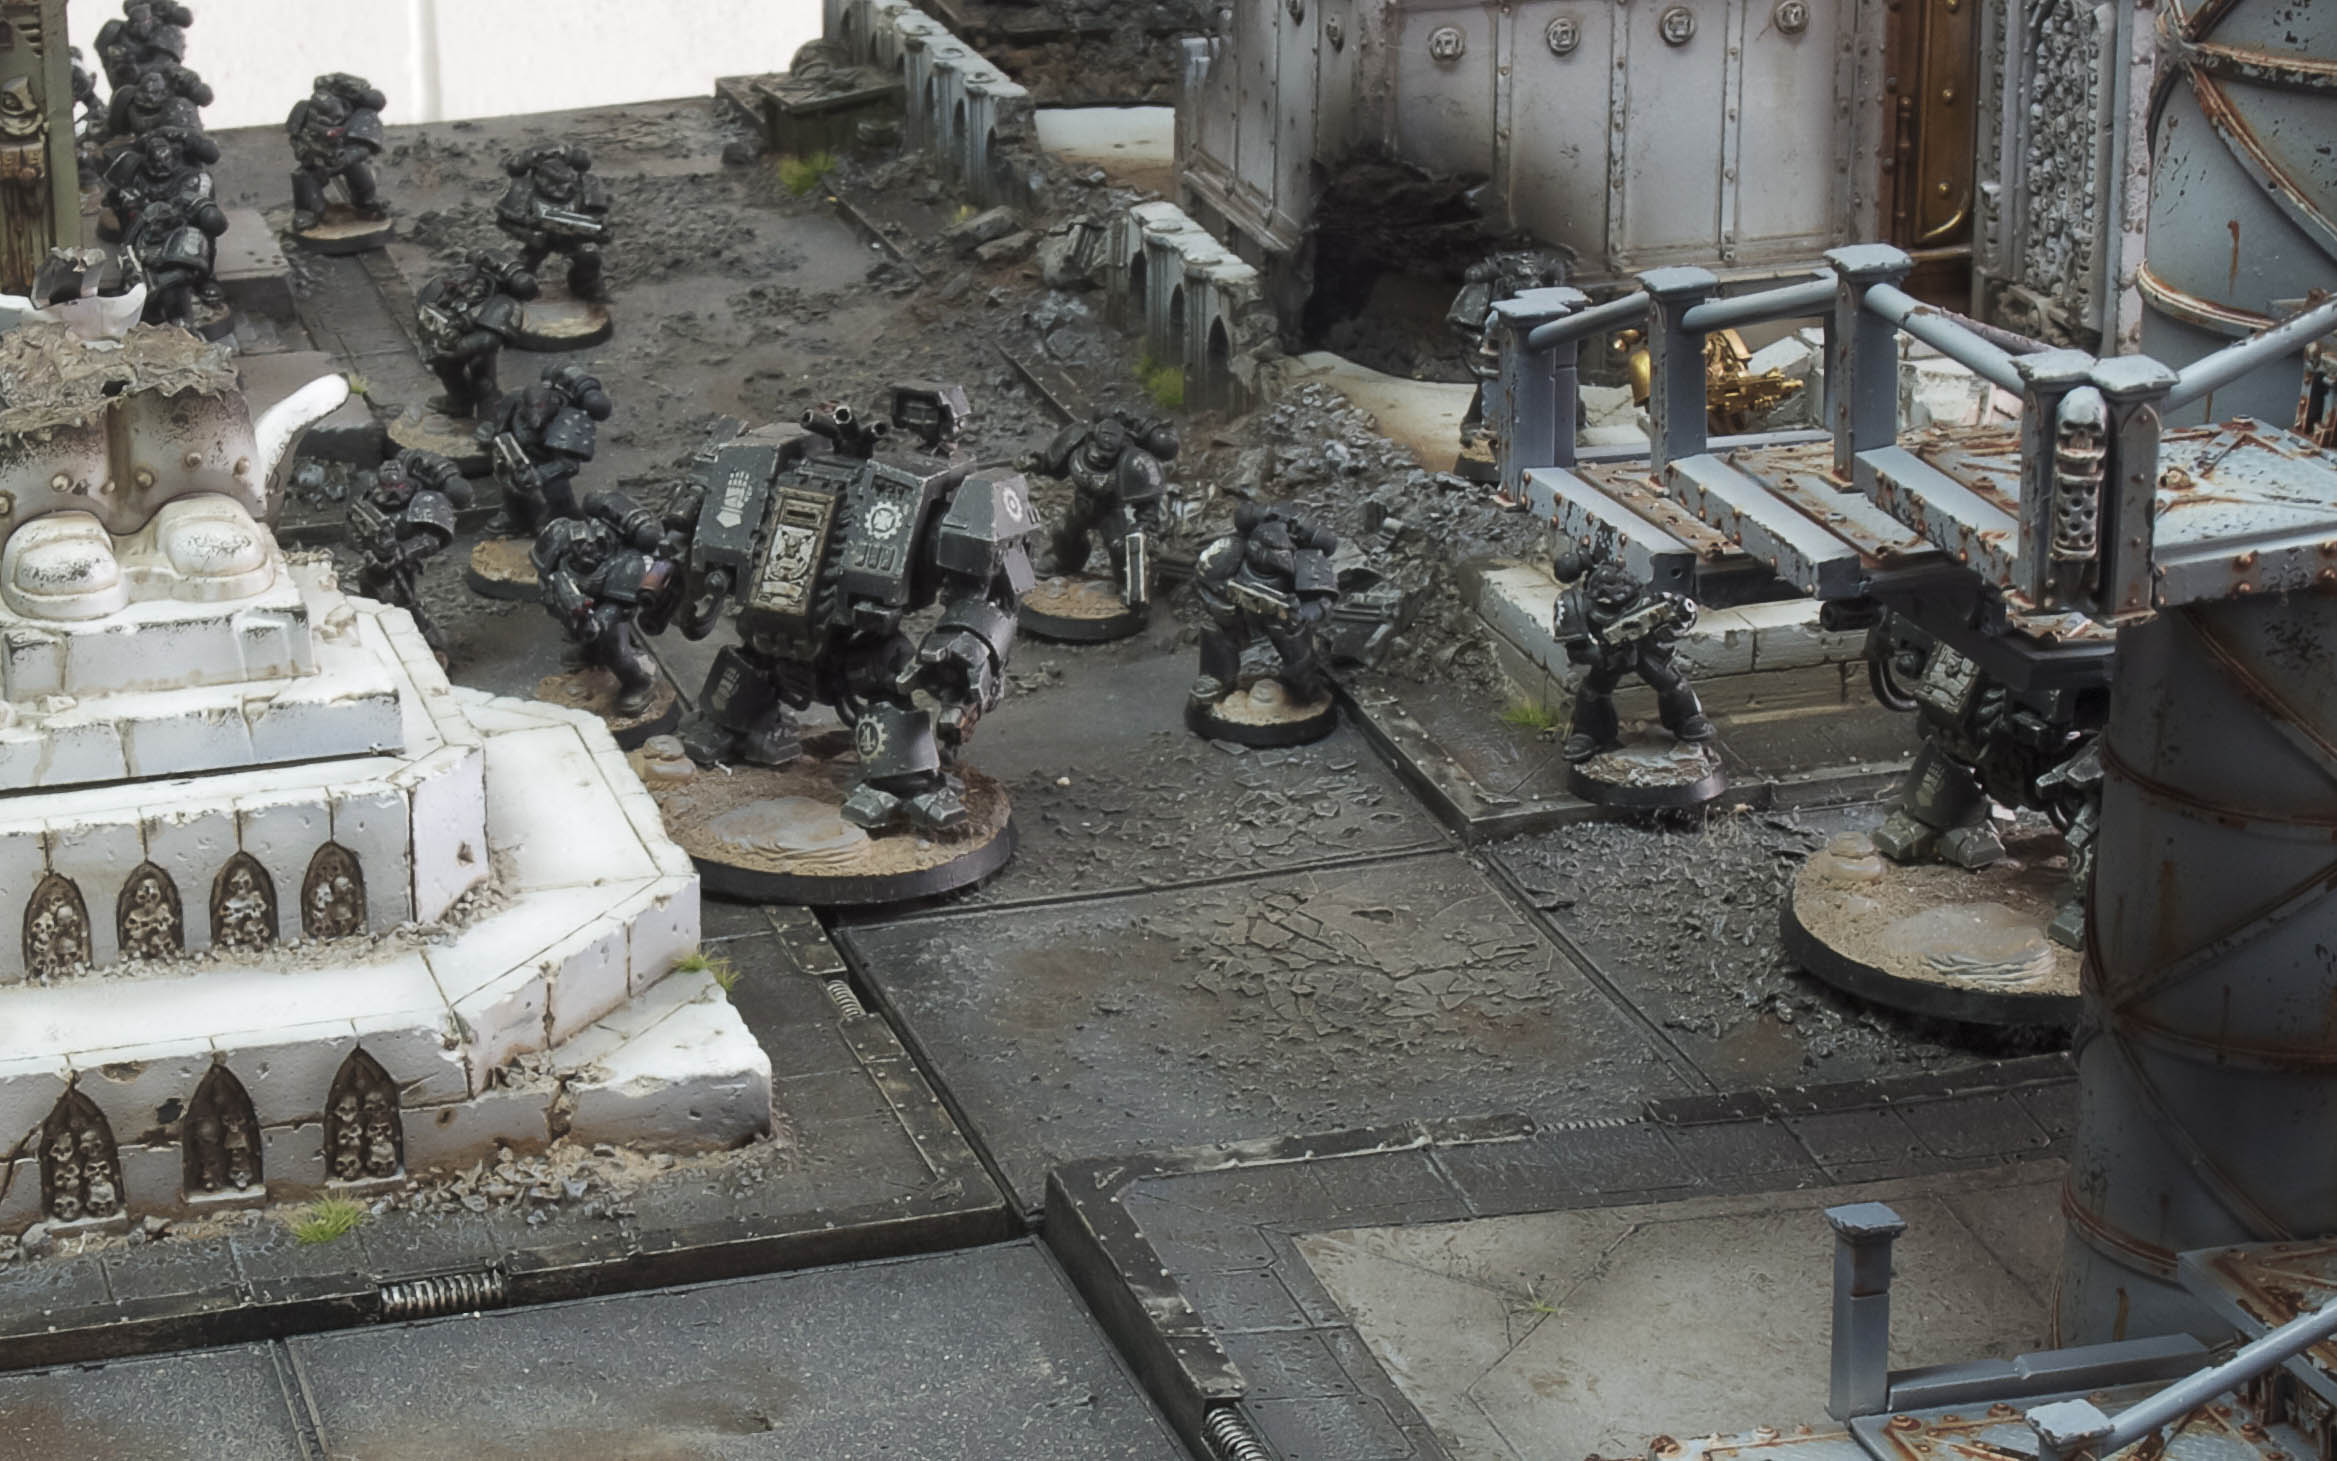
The Iron Hands were not worried about their heavy weapons retreating at the surprise attack from the distant building. They continued their relentless, methodical march towards the objective directly ahead. After the devastators retreated, the Javelin moved up to take a better look at what caused the casualties. Spotting the threat they opened up with their twin linked cyclone missile launcher, killing one. Reading the battlefield, the Tactical squad open up where the enemy devastators are located, but fail to inflict any causalities. Then the Dreadnought sees an enemy devastator in a window and fires his multi melta, turning one heavy weapon gunner into bubbling pool of ceramite and dissolving, unrecognisable tissue.
The enemy devastators were buoyed by their recent kill of their counterparts and passed their moral test.
The Iron Hands move up to dominate the ground
The Contemptor leads the way up the flank, with the Praetor and his Rampagers closely behind.
Victory Points at the end of Turn one
Iron Hands :- 3 World Eaters :- 3
Second Turn – World Eaters
Again, the Contemptor, along with the Praetor and Rampagers continue their swift out flanking manoeuvre. This is now beginning to shape the enemies forces. A distinct split is forming between the two Tactical Squad and Dreadnought battle groups as they go in opposite directions.
The devastators see another high value target present itself in the exact same sport where previously there stood an enemy devastator squad. Taking their opportunity, they shoot. Hitting the Javelin in its propulsion system. Halting the skimmer.
Second Turn – Iron Hands
The implacable advance towards the centre of the board continues. With both Tactical squads, and one of the Dreadnoughts moving towards the forward objective. The other Dreadnought, sees an outflanking Contemptor Dreadnought moving through the buildings. Taking careful aim, he takes his shot. The shot hits home, however the weapon systems effectiveness is reduced because of the range. However he’s seen what the treacherous World Eaters are up to now. He won’t let them succeed at their plan. The devastators, now regrouped, move up the flank to offer support, they too see the outflanking Contemptor. They both make snap shots, missing wildly
Tactical Squad 1 open fire again on the enemy devastators, however they inflict no causalities. Tactical Squad 2 see other, immense figures moving around behind the Devastators and take shots at the brooding Terminator squad. Their shots bounce of the tactical dreadnought armour. Despite the crew of the Javelin having no propulsion system, they are still in the fight and take it to the enemy devastators, killing the Sergeant. Not perturbed, the maddened enemy devastators continue to fight.
The Iron Hands implacable march towards their objective
The World Eaters taking advantage of the cover, and the enemies lack of ranged weapons to move unhindered up the flank.
Victory Points at the end of Turn two
Iron Hands :- 3 World Eaters :- 3
Third Turn – World Eaters
Sensing they need to act, the Terminators move out to face their advancing foe. Knowing that the Praetor and the Rampagers will be moving up from the flank into striking distance as well. To support their advance, the two remaining devastators incinerate three enemy line Astartes. Knowing the trap is now set, the Praetor and his Rampagers also take the opportunity to move up the street within striking distance of the enemies flank. The Contemptor now knows its time for him to run the gauntlet. One last advance before he can come to grips with the enemy…
Third Turn – Iron Hands
Now seeing the exact trajectory of the enemy Contemptors maneouve, the ancient Iron Hands Dreadnought moves up to the intersect his route. He wants to see close up the effect of his multi melta on the berserk World Eater Contemptor. Seeing the crazed Rampagers, lead by their fearsome Praetor, Tactical Squad 1 plant their feet into the ground, preparing to unleash a fury of disciplined bolter fire on their foe before they can close the gap between them.
Tactical Squad 2 see the hulking Terminators stepping out of the building and advancing towards them. Not to let the challenge go unheeded, they too brace themselves and prepare to rain unrelenting bolter fire on the traitor filth. To support his brothers, the Second Dreadnought moves to outflank the traitor Terminator Astartes, knowing that they’ll be able to take some punishment before being brought down.
Waiting until the last moment, the Dreadnought takes a shot at the Contemptor. However the World Eater, having centuries of experience behind him knew what the old enemy warrior was planning and stepped out of the way at the last second. Sending the super heated blast of air wide. The Dreadnought was now virtually defenceless against the Contemptor directly in front of him.
Tactical Squad 1 unleash a fury of bolter fire upon the running madmen Rampagers. The deafening sound of the bolter fire reverberating off the buildings. Were it any other foe other than an Astartes, non would have stood after the torrent. However, these were Astartes, driven mad by the Nails. Overwhelmed by their desire to close with the Iron Hands, injuries that would cripple even an Astartes, were simply shrugged off. Only two enemy warriors fell after the storm of bolts. The Iron Hands prepared to receive the inevitable charge that would now follow…
Over at the objective the Terminators stepped out of the building and were greeted with massed bolter fire from the Iron Hands. It was like stepping out into a blizzard. However the tactical dreadnought armour weathered the storm, protecting its occupants. The outflanking Dreadnought took aim with his multi melta at what appeared to be the Terminator squads leader. The super heated air dissolved the armour protecting the warrior inside, causing his flesh to bubble, boil and then liquify.
The Javelin opened fire once again in his duel to the death with the enemy devastators, however their cover saved them for what would have otherwise been fatal impacts.
The World Eaters Terminators weather a storm of bolter fire as they move out of the building
The insane Rampagers shrug off mortal wounds so they can get to grip with their foe
Victory Points at the end of Turn three
Iron Hands :- 3 World Eaters :- 3
Fourth Turn – World Eaters
They had all ran the gauntlet and survived. All what was left to do was for-fill the promise of the Nails and close with the Iron Hands in close combat. The Contemptor, Praetor, Rampagers and Terminators all move into assault range. The devastators fired a salvo at the crippled Javelin, however they fail to damage it.
The Contemptor charges at his forsaken enemy. The enemy dreadnought lets off one last shot with his multi melta before the Contemptor can close in. The shot hits the Contemptor square in the chest, however in a flurry of blue haze and sparks, the Contemptors Atomantic shielding foils the shot. The Contemptor grabs his foe with one massive gauntlet, and with the other smashes down into the loyalists sarcophagus. The fury of the blow is delivered with such force it passes straight through the armoured sarcophagus and into the Dreadnoughts power cell, causing a catastrophic failure. In a blinding flash the old warrior explodes in a shower of scarcely recognisable fragments. The World Eater hardly looses any momentum, the buzz of the Nails deafening in his head. Seeing his next victims across the street, he continues his advance.
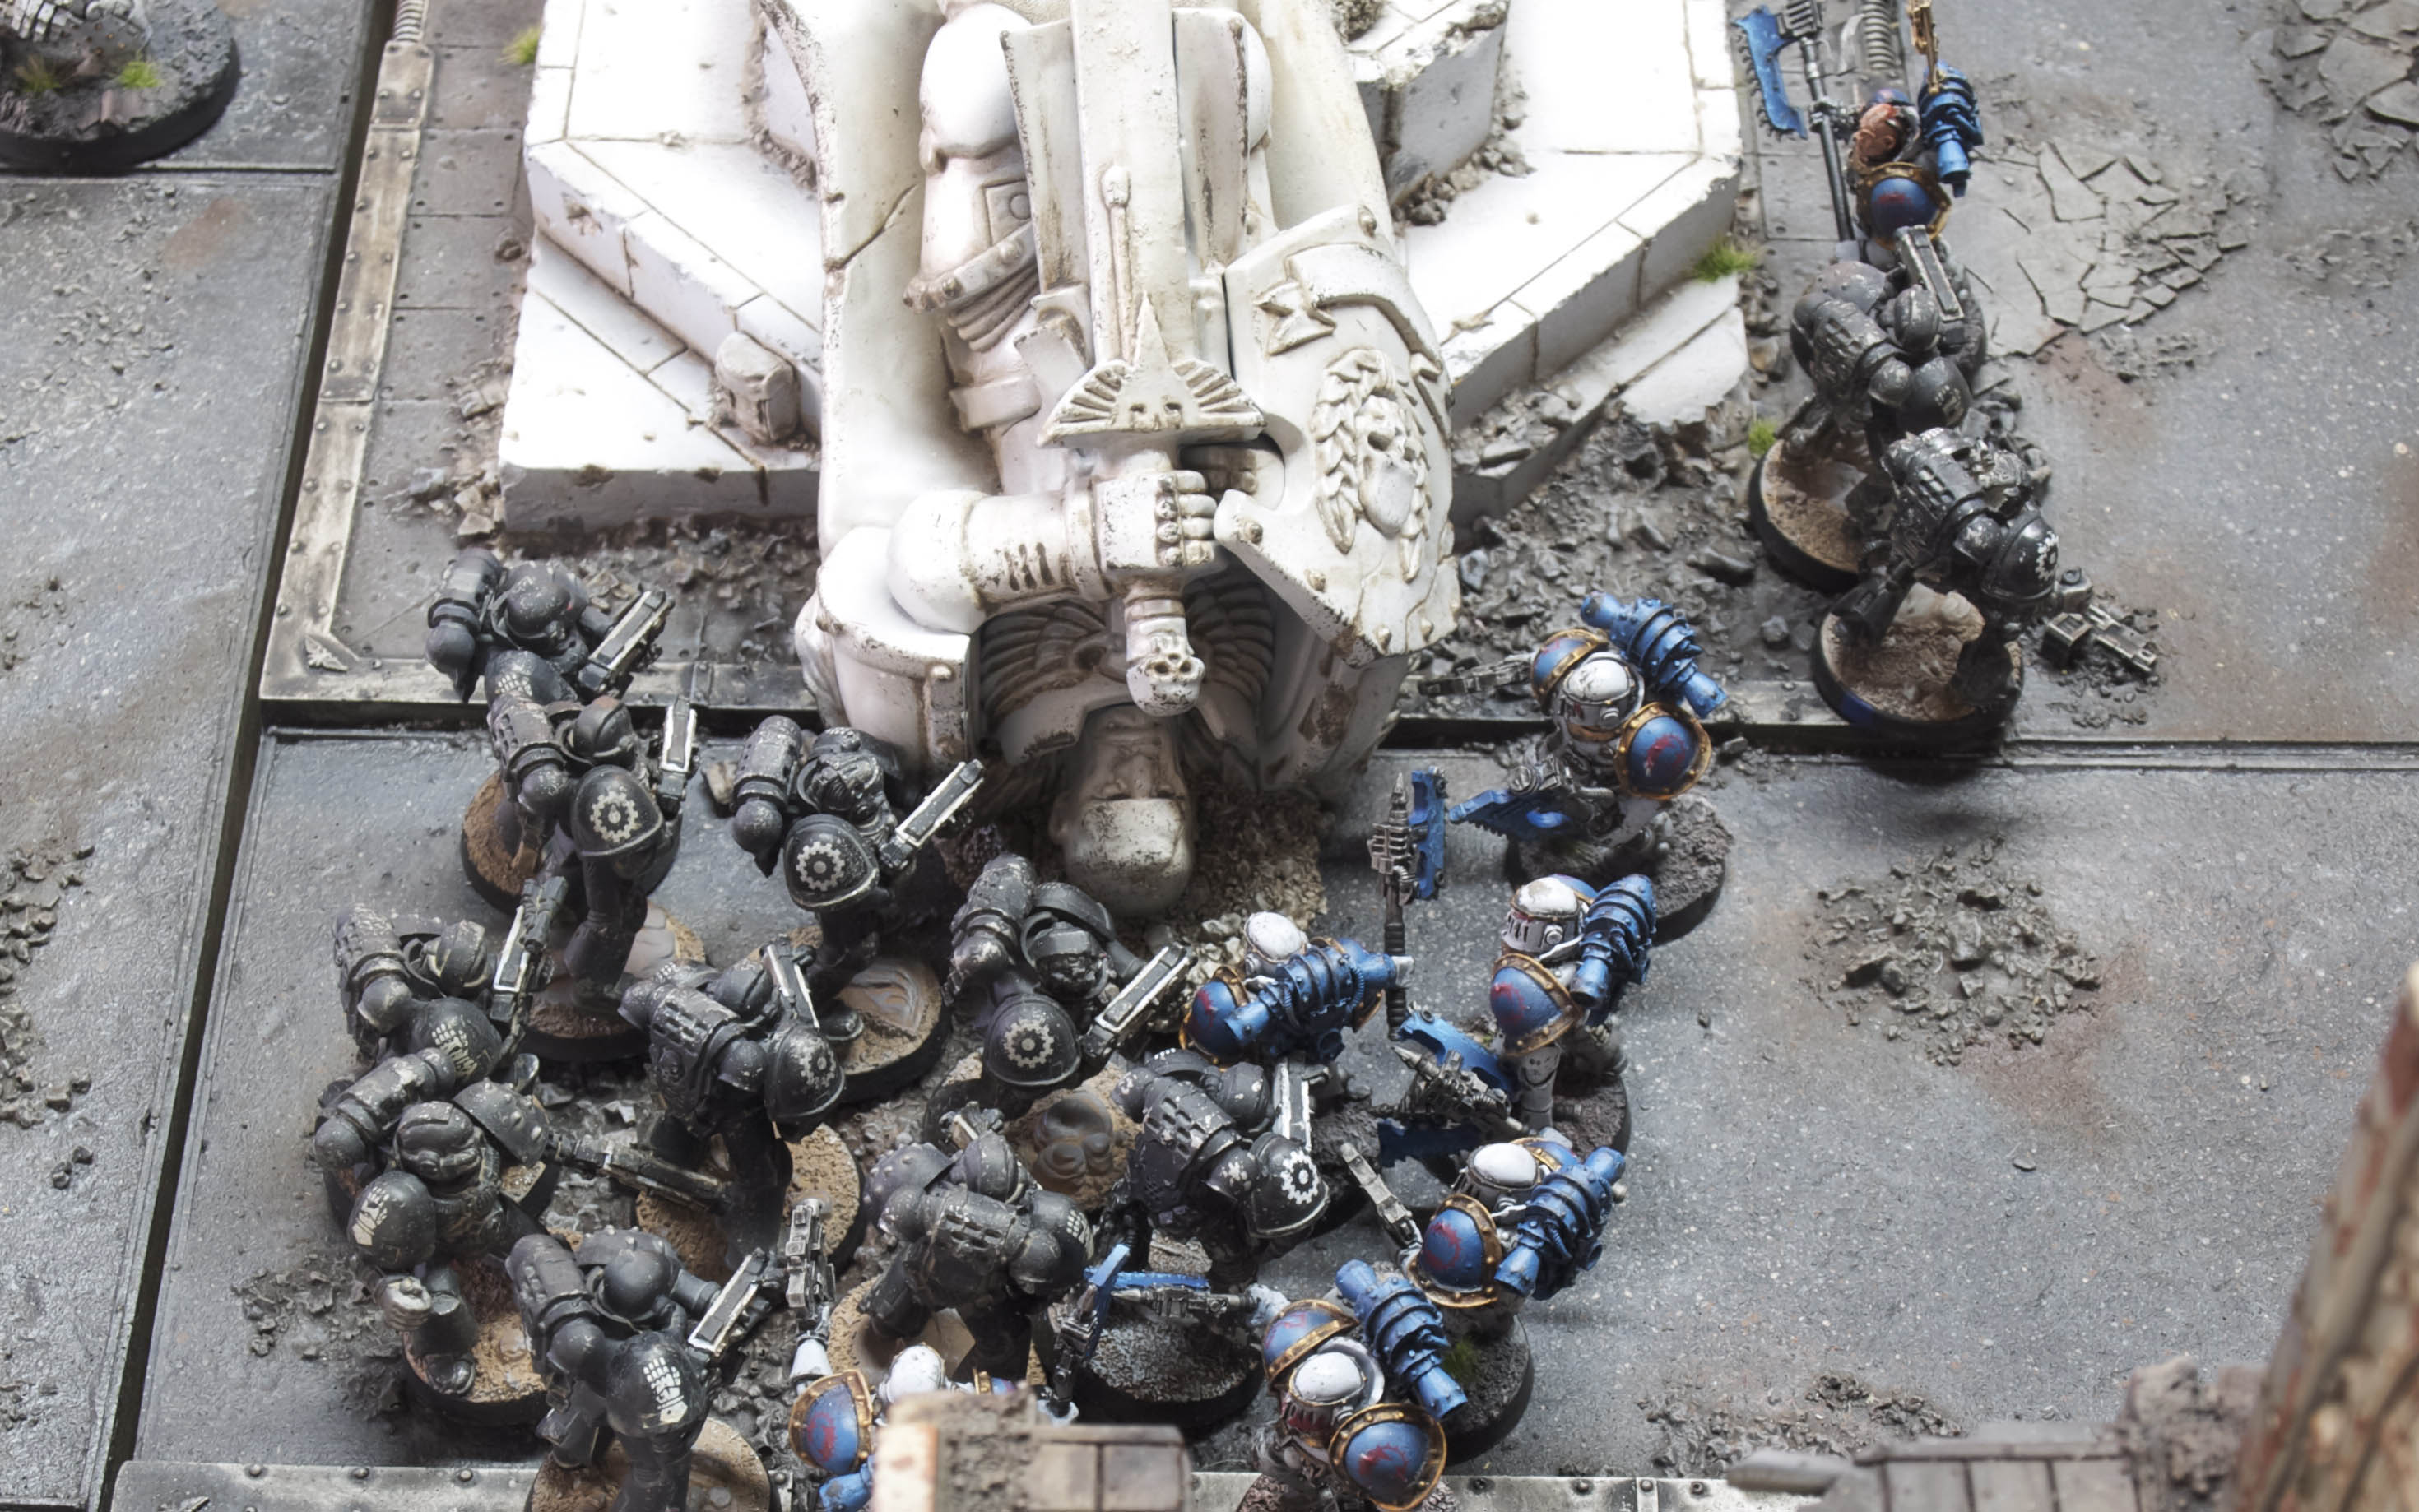
The Bloody Handed Praetor’s lets out a blood chilling war cry as he and his Rampagers charge the prone Iron Hands. The Iron Hands loose their mettle and fail the Fear test. In the ensuing combat, four of the Iron Hands fall, however still outnumbering their combatants, remain in the fight.
Driven mad by the felling of their squad sergeant, the Terminators charge their assailant. With preternatural speed, the Terminators easily dodged the clumsy swings of the Dreadnoughts power fist. With enhanced strength, the Terminators pound the Dreadnought, mercilessly dismembering it. The power plant fails, exploding so violently it kills one of the World Eater Terminators. Without so much as a moment to pause at the loss of their brother, the remaining three Terminators move towards the Tactical Squad eager to enact their revenge….
Turn Four – Iron Hands
Having seen the shear violence inflicted by the World Eater Terminators that ended a revered warriors service to the Emperor, the Tactical Squad move into assault range of the foul World Eaters, with the Forge Father adding his weight to the fight. Meanwhile, the Javelin lets off another salvo at the Devastators. This time the shots are true, killing the remaining heretics.
The Iron Hands devastators know their fate now. However in seemingly futile defiance fire a salvo of krak missiles at the insane machine. The shots hit, however bounce off the impenetrable hide of the blasted Contemptor.
The Tactical squad charge the Terminators. With blinding anger at killing a servant of the Emperor that had been given the greatest honour by the Machine Cult of Mars, interned in a Dreadnought chassis. They attack with uncharacteristic ferocity no doubt imbued by the desecration of felling the Dreadnought and the scale of the heretics betrayal. The traitor Terminators are wiped out in the uncontained rage and fury of the assault from the Iron Hands.
The Praetor and his Rampagers are now fully overcome by the white hot rage of the Nails. With terrifying ferocity that only insane men can muster, the Iron Hands Squad is butchered to a man. The Rampagers pausing to collect the skulls of the fallen Iron Hands as trophies worthy of their deeds. The Praeator breaks off from his Rampagers, ordering them to move up to the objective. He wants his own trophy, that of the Forge Lords.
Brutal street hand to hand combat
Victory Points at the end of Turn Four
Iron Hands :- 2 World Eaters :- 3
Fifth Turn – World Eaters
The Praetor issues a challenge as he charges towards the Forge Lord and Tactical Squad. Meant for the Forge Lord, the Tactical Squad Sergeant steps in and accepts instead. Foolishly wanting to demonstrate his combat prowess while he has the Forge Lords attention. The Praetor, laughing like a lunatic, accepts and in one stroke, almost imperceptible to the human eye, the Praetor cleaves the Iron Hand Sergeant in half from head to groin.
The Contemptor charges into the doomed Devastators. In a final act of defiance, the marines let off one more salvo. One of the krak missiles hits home, glancing off the Contemptors leg. Not enough though to stop charging behemoth. The Contemptor picks up the insolent marine, and snaps his spine and throws the rag doll corpse of the Astartes against the wall. The other Devastator marine fights on.
The Rampagers, resist their urge to kill, and move to take the objective.
Fifth Turn – Iron Hands
Sickened by the sight of seeing their Brother Sergeant cleft in two by the Praetor, the remaining Tactical marines attack in force, many of their number die at the hands of the madman, however in their rage, they inflict several wounds on the butcher. The Forge Lord fails to land a blow.
The Contemptor, almost annoyed, swipes the final Devastator marine out of his way. Sending the marine flying across the Cathedral, landing in an indignant, lifeless mockery of ceramite and flesh slumped in the corner. The Contemptor move towards the Objective.
A die is rolled at the end of turn Five. The games does not end, continuing for another round.
The Praetor kills at will. However he is outnumbered and takes several wounds himself.
Victory Points at the end of Turn Five
Iron Hands :- 2 World Eaters :- 7
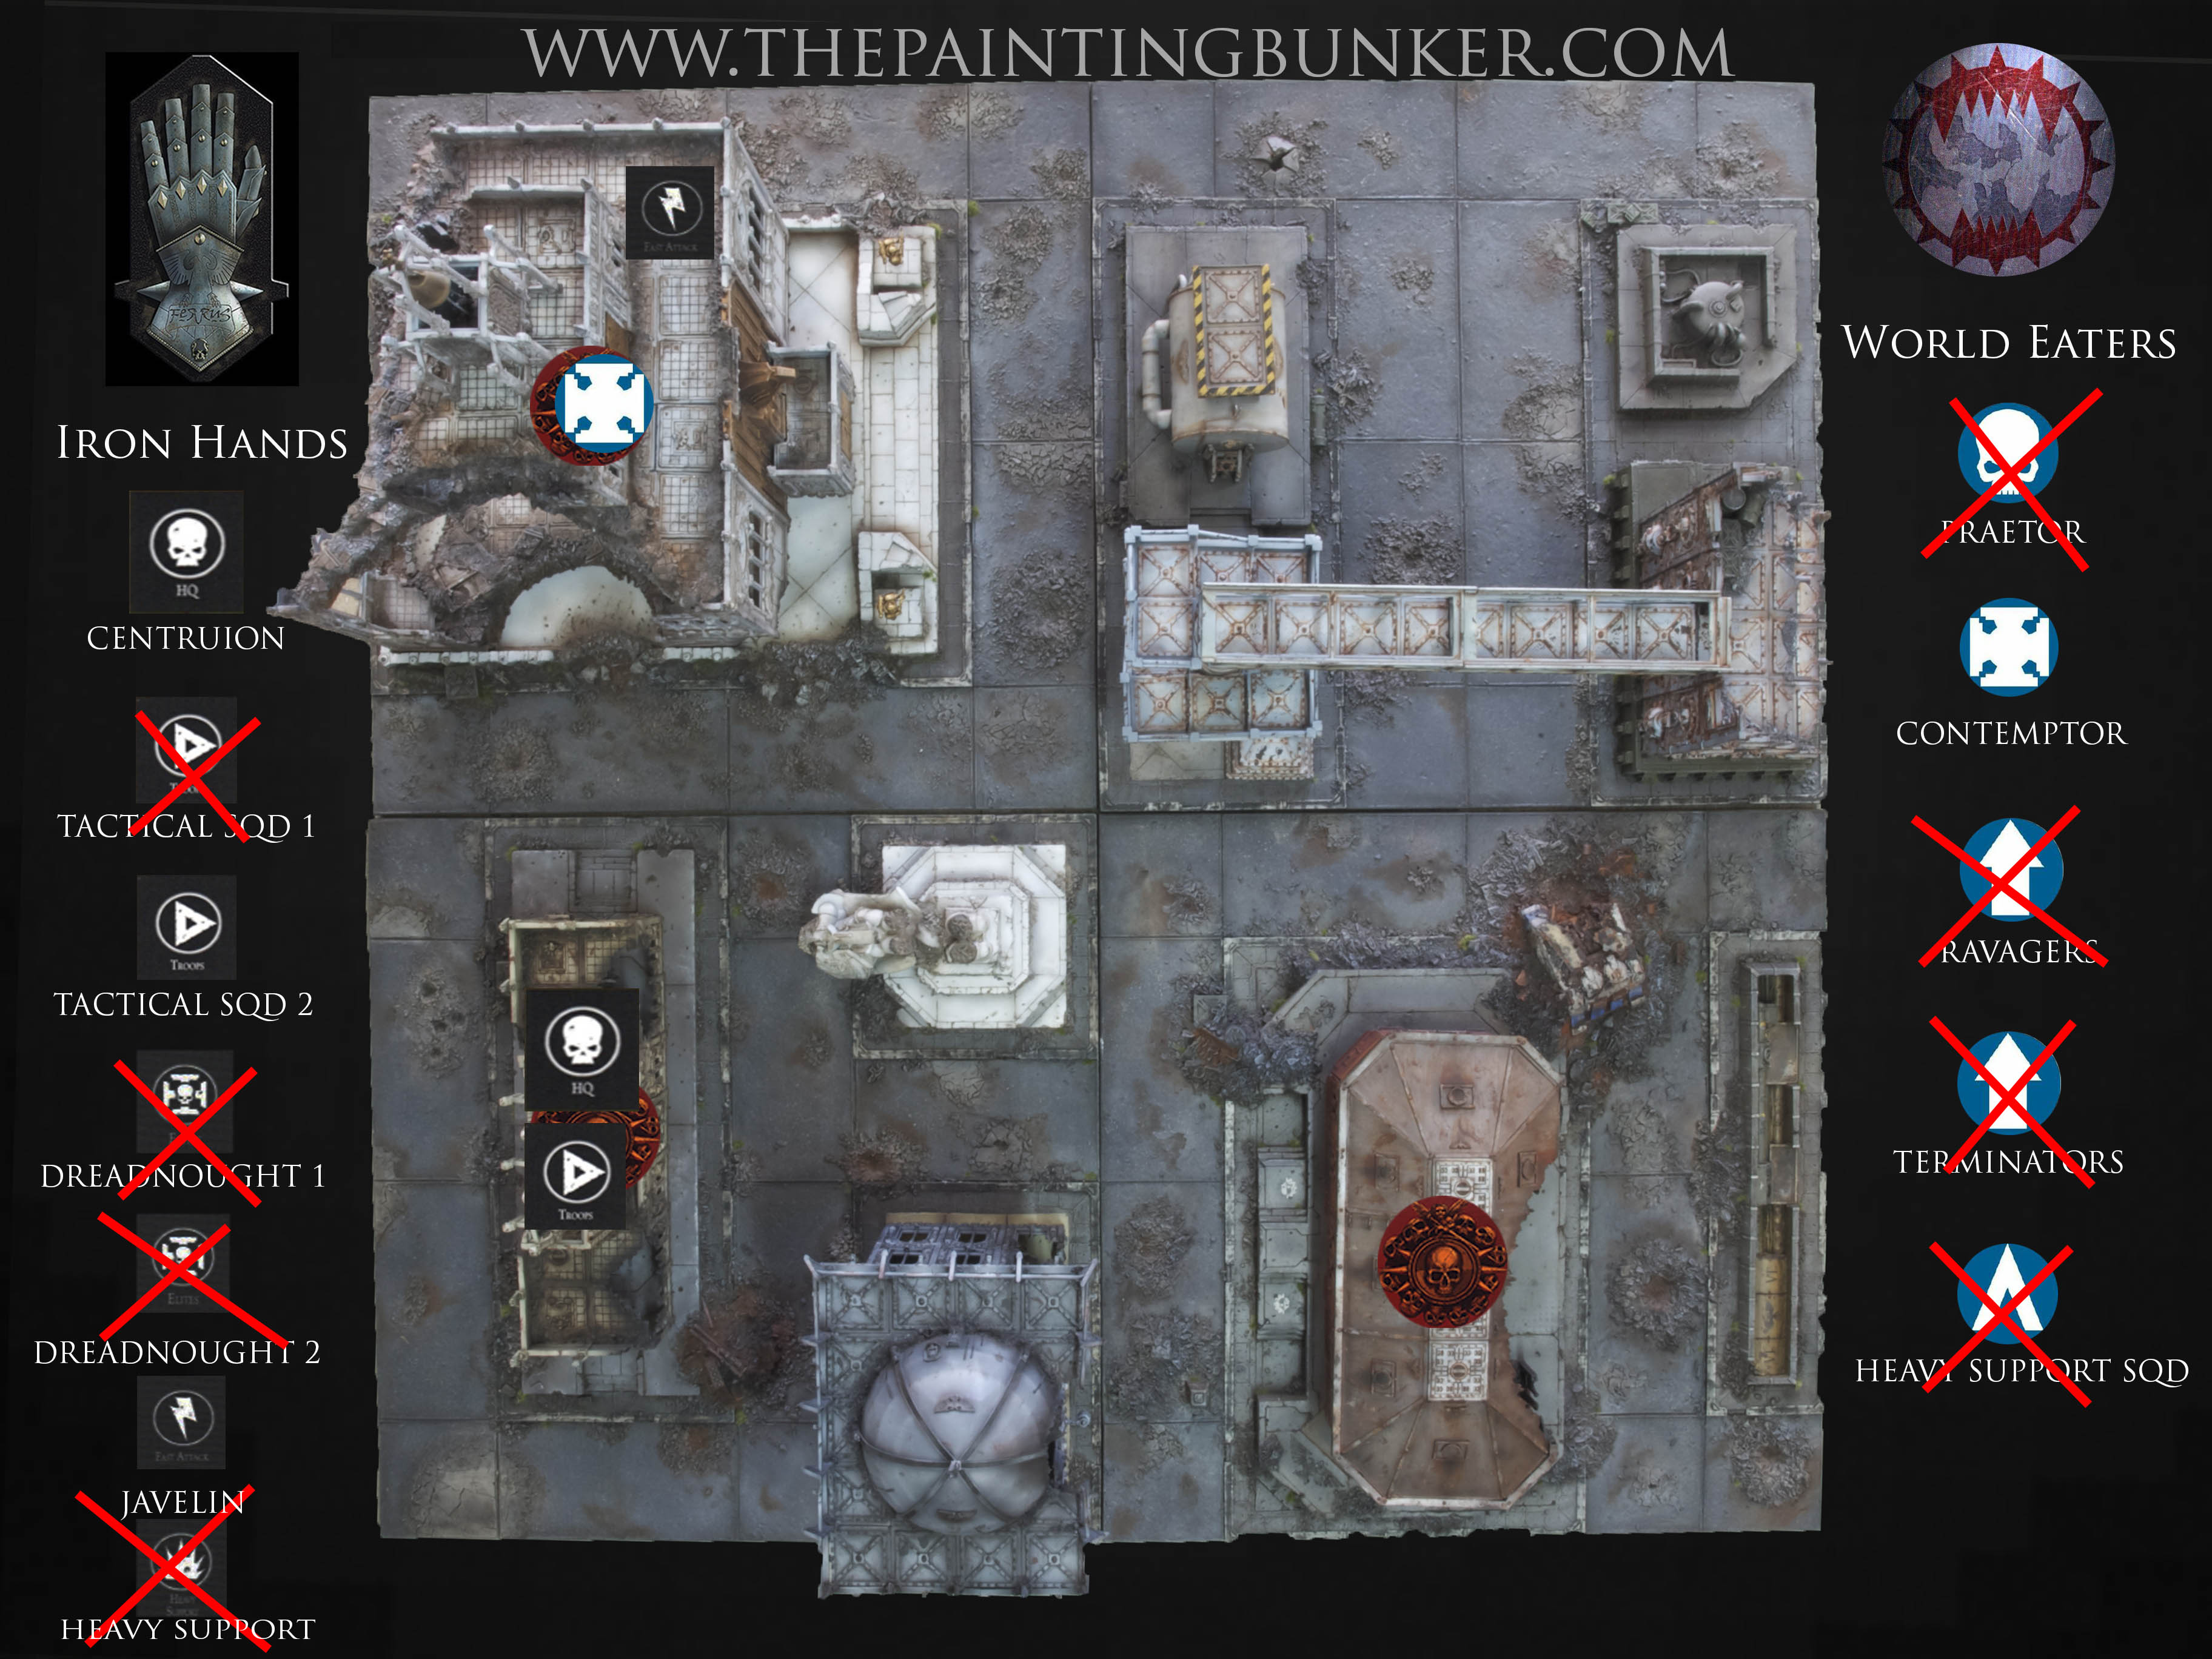
Sixth Turn – World Eaters
The Praetor lashes out, killing more Iron Hands. The Forge Lord and the Praetor are now face to face. In the struggle, the wounded Praetor stumbles. The Forge Lord sees his chance, and with his cybernetically grafted servo arm, grabs the Praetor and with a sharp snap crushes the life out of the heretic. Seeing their opportunity the Tactical Marines follow up towards the objective being held by the Rampagers…
Sixth Turn – Iron Hands
It was now do or die for the Iron Hands. Take the objective being held by the World Eater Rampagers or die trying. The Iron Hands charge in, killing one Rampager in the initial combat , however the Rampagers wont be shifted so easily.
A die is rolled at the end of turn Six. The games does not end, continuing for another round.
Victory Points at the end of Turn Six
Iron Hands :- 4 World Eaters :- 8
Seventh Turn – World Eaters
The desperate close combat continues over the third objective. This time the Rampagers are outnumbered and out classed. The remnants of the Tactical Squad, bolstered by the Forge Father, bring a heavy toll to the Rampagers. Killing two. Outnumbered, and now being outclassed by superior force, the heretics fail their moral check and break. They’re unable to make a clean break and are slew by the Iron Hands sweeping advance. The victorious Iron Hands follow up on the objective and consolidate their position.
Seventh Turn – Iron Hands
The remaining Iron Hands consolidate on the Objective and secure a Draw.
In a desperate last attempt to secure victory, the Iron Hands charge the remaining World Eaters holding the Objective. Their efforts pay off, they kill two. The remaining heretics fail their leadership test and are wiped out in the sweeping advance.
Victory Points at the end of Turn Seven
Iron Hands :- 8 World Eaters :- 8
Result :- A Draw!
Final wash up
What an epic game. Not only did it go for 7 turns, but it also was full of twists and turns no one could have anticipated. Who would have thought the humble Iron Hands Tactical Squad could have done so much damage? Finishing off a Terminator Squad, a Praetor & finally the remnants of the Rampagers. I have to admit, this is one of the things I really love about Horus Hersey games. The infantryman is king. Because of the way the points cost are structured, it favours vast infantry armies. If I had more models painted, I would have taken two 20 man Tactical Squads, each with an apothecary and a Master of the Signal. Tough as.
The other thing I like about Horus Heresy games is there is no meta game. There really is only one army list. It’s vast, and allows all sorts of army types to be produced, however it still is just one list. That both sides use. This to me combines my two favourite things in wargaming. Space Marines and tactics. Plus the models are simply fantastic. It is now very clear to me that GW and FW are going after very different markets and producing models to suit. FW design team reminds me of where GW was 15 yrs ago. Doing really cool wargaming models, not toys.
So, I hope you’ve enjoyed reading and seeing my first battle report. It’s been quite an effort to be honest. So you may not see one for quite some time. Make the most of it. I really enjoyed producing this battle report however. It was also really great fun actually playing the game with Keepy. It was a good game, and an awesome day. Thanks mate.
Just another very quick post of a recently finished project that I’ve not had the time to photograph properly. I really like this model, and its also great in the game too, however it has been taken down by a few very lucky shots in the few games that I have used it….
This model is often criticised for being difficult to assemble. I didn’t really have any dramas putting it together personally it just takes a little patience and a heat gun on hand as you are gluing it together. I’ve now assembled two of these and I’m very happy with how they’ve both turned out.
I’m anxiously awaiting the release of the next book from Forge World detailing the Istvaan V Massacre…
So ever since I did the post on How to paint World Eater Space Marines I have a lot of positive feed back, in fact its been a very popular post. One question that I’ve continually had was “how did you paint the face?” So I thought I’d do a quick tutorial on how to paint faces to a good table top standard. Believe it or not, its not that hard and with a little patience and practice you’ll dramatically improve the presentiment of any miniature where flesh tones are present.
So lets take a look at the process.
Step 1.
For the tutorial I’ll be using the old Citadel range of paints. I do like the new range, however I’m buying to replace them with the new ones as I go so I’ve still got a fair few of the old range on hand. But if you use the Citadel conversion chart if you don’t have any of the old paints you should be golden.
The paints & materials I’ve used are
Abaddon Black – Undercoat and detail
Tallarn Flesh – Base coat and component for highlights
Dwarf Flesh – For highlighting
Red Gore – A component colour for the lips
Ogryn Flesh – Base coat wash
Devlen Mud – Shading
White Scar – Eyes etc
W & N No 1 Brush
Marines Head – I like mounting pieces on tooth pics for ease of handling
Step 2. Undercoat
I’ve used Abaddon Black applied with an Air Brush, or use a spray can. This is important and many of the small details on the face can be erased or compromised if you don’t apply the paint thinly enough. I’m not saying it can’t be done with a brush, but it just makes your job harder if you do.
Step 3. Base coat
Again I’ve applied Tallarn Flesh with an air brush for the same reason that I applied Abaddon Black with an air brush, so as not to compromise any of the fine detail on the face.
Step 4. Wash
Using my W & N no 1 brush I applied a liberal amount of wash. Don’t be scared to do this as you’ll find that when the medium dries (evaporates) all that will be left is the pigment in the recesses. You want that to create definition.
Step 5. Re-apply the base coat
This is where you need to be mindful of a few things. The first one is paint viscosity, and the second one is your brush condition. Let me explain. Where a lot of people fall down when painting flesh is that the paint has already started to dry when its being applied. This makes the paint lumpy and has an inconsistent appearance in its application. In some climates where the air is dry (< 30% humidity) you may need to use a wet pallet. Or just do what I do and take a blob of paint out of the bottle (I live in a humid climate), put it on my pallet and mix in a bit of paint thinner. This is really important, especially for skin tones, the reason is that our skin is sort of translucent and when we paint it to re-create that effect, we need to simulate this and the best way to do that is to make the paint thin. I’ll get into more detail on this later, but for now, just make sure that your paint it thinned down a little so it flows better.
The second point you need to be aware of is your brush condition. There are two aspects of this, the first is that your brush is set up to facilitate capillary action, and the second one is that the tip of the brush is the right shape. Many painters don’t use their brush the way its meant to be used, and that is having a nice amount of paint on the whole brush (bristles) and then shape the brush tip so that it makes a nice fine point for painting. A lot of guys I see dip the tip of their brush in the paint and use only that part. This seriously limits the full capability of the brush and you are doing yourself a big disservice. To help your brush facilitate capillary action, just make sure that before you dip it in paint (thinned down I hope) that you first dip your paint brush in some clean paint thinners first. Remove the excess with a tissue or something then dip the paint brush in your thinned paint, using the same tissue shape the bristles so that you have a nice point.
You can now pick out the raised areas of the face with the Tallarn Flesh. Before you do this take a few moments to consider where you’d like the paint to go by studying the face and its contours. By having a plan of where you’d like the paint to do will dramatically improve your results.
Step 6. First Highlight
Mixing about 70% Tallarn Flesh with 30% Dwarf Flesh, begin highlighting the areas of the face that would naturally catch the light. So areas like the ears, nose, chin, cheeks, brow. Again, make sure you follow the points I make in Step 5 about paint viscosity and having your brush set up properly. Paint viscosity is important for the next three stages. As I mentioned before, skin is sort of translucent, so when you paint flesh tones, try and make your paint go on in very thin layers so that the edge of each layer of paint isn’t too contrasted against the previous one, and allows its colour to be blended with the previous colour that was applied.
Step 7. Second Highlight
Mixing about 30% Tallarn Flesh with 70% Dwarf Flesh, begin refining the highlighting of the previous areas of the face that you worked on in Step 6. Again, make sure you follow the points I make in Step 5 about paint viscosity and having your brush set up properly.
Step 8. Final Highlight
With straight Dwarf Flesh go and pick out the final areas where you want attention to be drawn to. Tip of the nose, ears, brow and top of the cheeks.
Step 9. Lips
With a a mixture of about 60% Tallarn Flesh, and 40% Red Gore, apply a small amount to the lower lip. This is very subtle but crucial to achieving a more realistic effect.
Step 10. Eye Shading
Place a small amount of Devlan Mud in each of the eye areas and a small amount under the bottom lip. Again a subtle but crucial step.
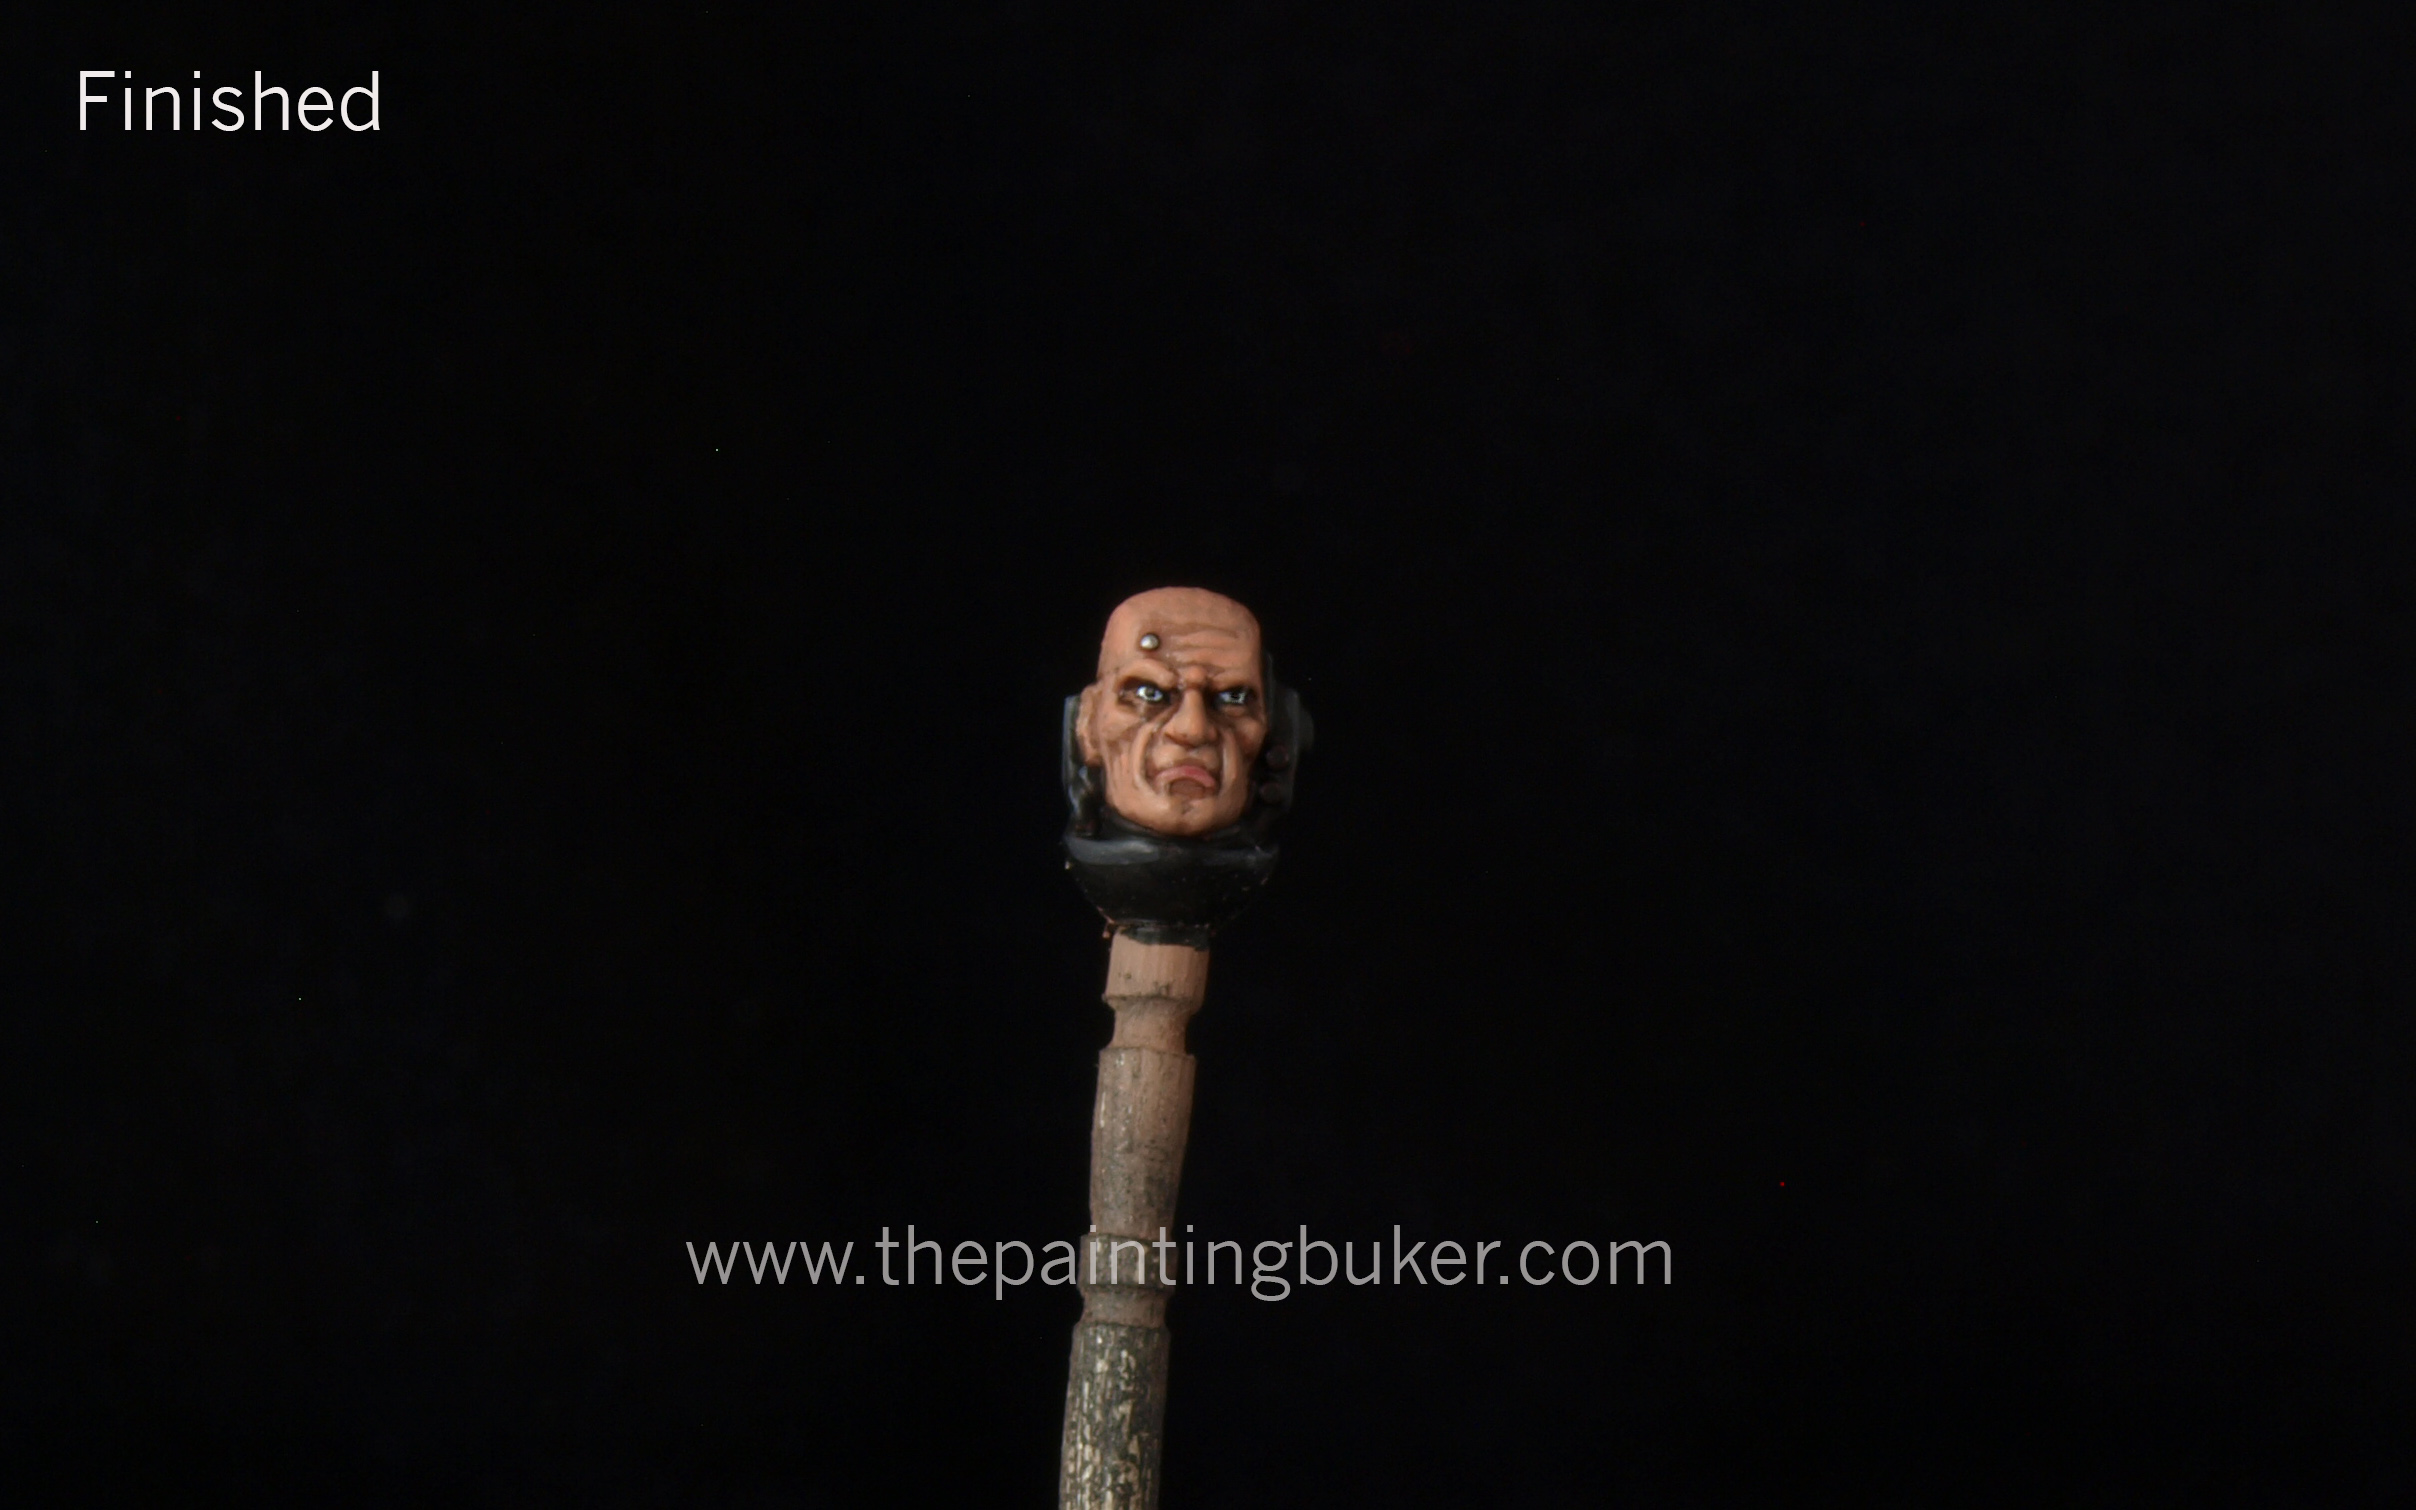
Step 11. Pick out Details
Paint the actual eyes black in readiness for the white to be applied, paint around the collar, neck brace etc and the small stud on his forehead. Highlight the collar etc as you would normally.
Step 12. Finished
Paint in the eyes with white, followed by a small dot of back. This may take several attempts to get right. Pick out the service stud with your choice of silver and finish up any other details you’d like attention paid to.
So there you have it. It’s doubtful that you’ll win a Golden Daemon trophy with this scheme, but it will with any luck improve the quality of your table top miniatures.
A few points to remember about painting flesh. The first is no matter what tone of flesh you are wanting to achieve, always start with a warm flesh tone. For example, if you look at the picture below of my Iron Hands Librarian, you’ll see he’s quite pale. I still used Tallarn Flesh as the base colour, I just used a mixture of grey and bone to dull down the warmth of Tallarn Flesh. This is a convention to be mindful of when painting flesh tones. It seems that our eye is programmed to see flesh tones in a certain way and we accept simulations of flesh tones better when they have a warm base to start with.
Thats me for now. Hope you’ve found this helpful, and until next time chat later.
So I knocked this out this morning in a spurt of painting enthusiasm. The truth be told, he’s been sitting on my painting table (we’ll in a dust proof box on a shelf next to my painting table) for close to 18 months now. I’ve had this idea for how I wanted him to look for some time as his original purpose was to be apart of the “Death Knell” Apoc 40k formation for Space Marines. Basically it consists of 5 x 5 man squads of TH/SS Terminators with a Lysander proxy, a Contemptor Dreadnought in a Lucious droppod and a Librarian in Terminator Armour with a Storm Shield. It’s a pretty bad ass formation and really puts a dampener on your opponents day when it rocks up. (To announce its arrival you use a orbital bombardment to “clear” the area where all the Terminators arrive)
For some reason I just never got around to painting him, and then when I finished my new storm shield after re-tooling the pattern from the original I did close to two years ago I got inspired to finish it off. To be honest, I’m glad I did because its come out much better than I’d expected. I even tried my hand at doing NMN with an airbrush on the Librarians Force Sword.
As you can see, I removed the models force stave? and replaced it with a massive force sword from the Grey Knight plastic kit I think, and I exchanged his “talk to the hand” hand with a storm shield. In game terms this seems to be the most popular load out for this type of character when he’s rolling in his Terminator armour. The pose actually looks quite good, better than I was expecting.
The pictures are not to a standard that I’m completely happy with because I’m having trouble with my camera at the moment and need to sit down and figure out whats going on but I haven’t been bothered to. So I’ll have to look into it in the next week or so because its really getting on my nerves. Pro tip, don’t let people fool around with your camera.
Ok, thats it for me now. It’s coming up to Easter and over the holidays myself and Aaron from Forlorn Hope will be getting together for some hardcore, ungreased, man dollie action and taking the Cityscape board out for its madien voyage. The plan is to have a 1950 point game on it with my Carcharodons V his Tyranids or Death Korps of Krieg (or both on separate occasions) So my intention is to bring you a full battle report detailing blow by blow action with pictures accompanying that will melt your brain. I’m really looking forward to this and it should be a lot of fun.
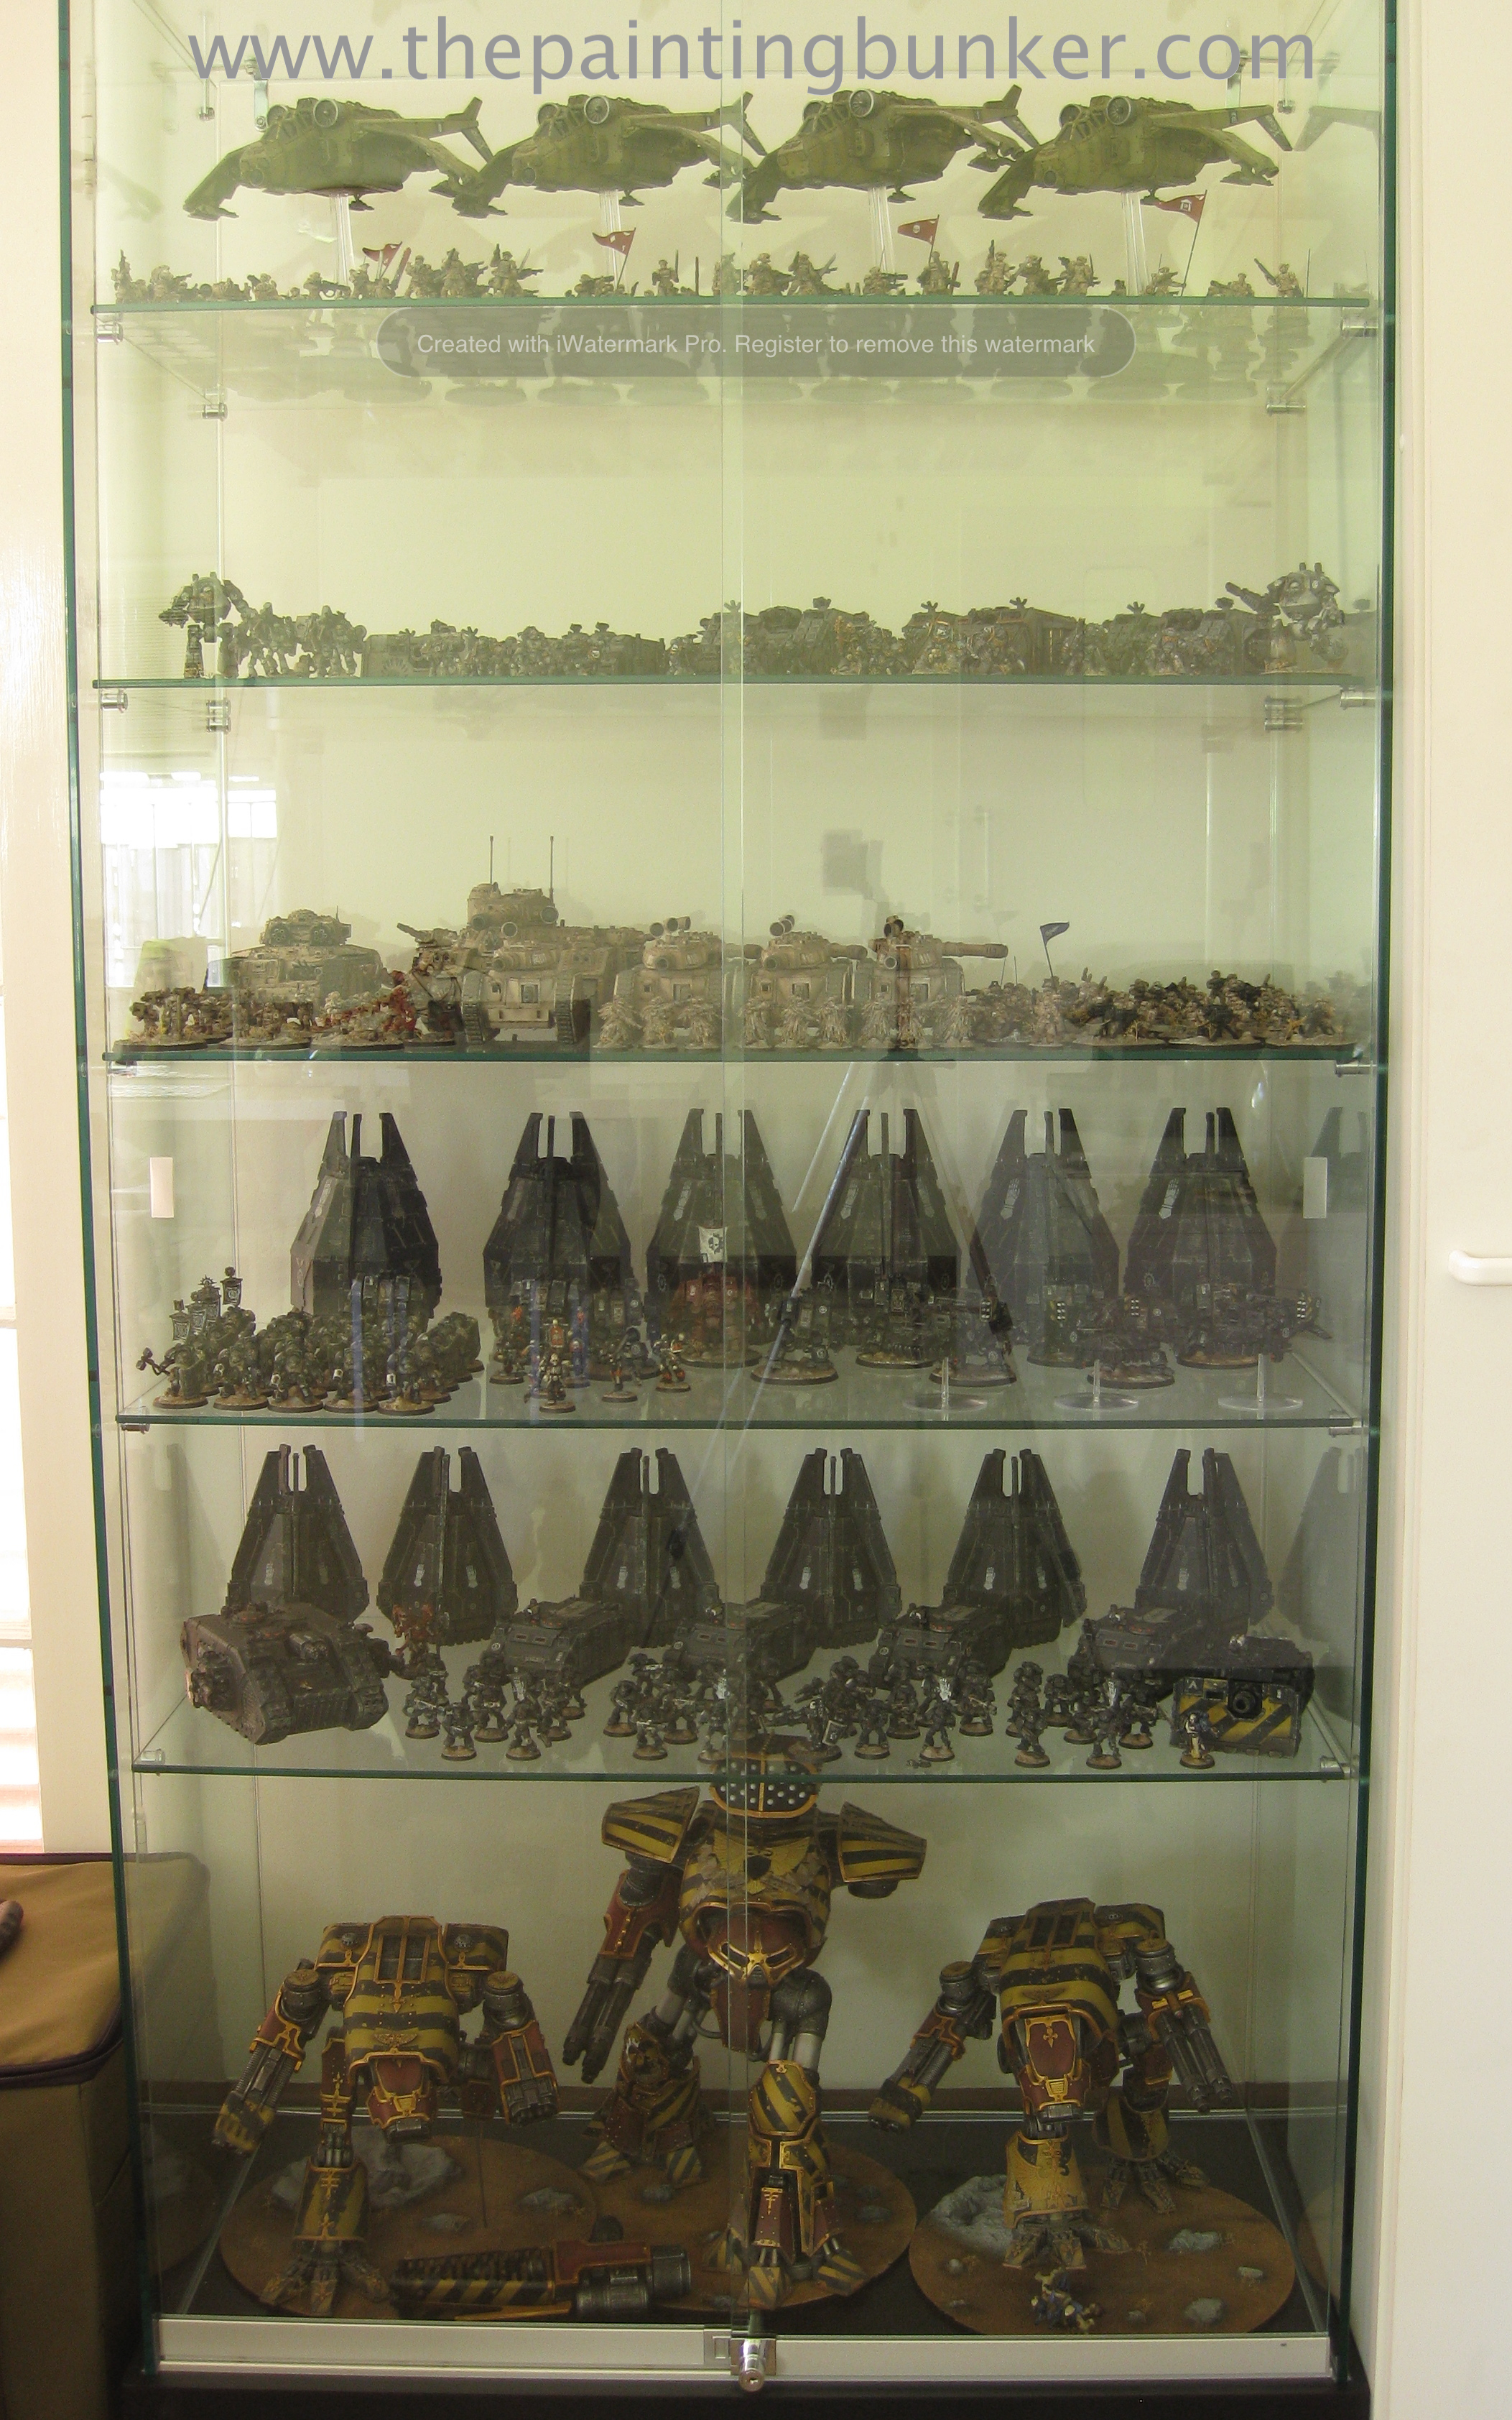
So, I finally did it, I went and brought a display cabinet for my 40k Armies yesterday. I did quite a lot of research on what was the best choice, best value for money option, and after many months (seriously) I brought a 1800 x 900 x 450 commercial 6mm toughened glass display cabinet. I got it from the very helpful guys are Absoe Business Equipment in West End, and it set me back $750. It was unassembled and I had to use my Ute to get it home from (about 10 min drive from where I live) It came in two packages and the largest one weighed about 100kgs… so yeah, it was a bit of a struggle getting it off the Ute by myself, but I managed and then set about assembling it. Being commercial quality its built to last (a key reason why I chose it) all the fittings are robust and the base is seriously strong, with 4 castors on it too so it can be pushed around if I decided to relocate it. The glass doors slide on ball bearing runners and also are lockable too. So lets look at the pictures shall we?
All my models (less unpainted, which isnt many) fit only just, don’t know how many it is or how many points it all add up to, but its a lot. Maybe someone could work it out if you get bored?
The God Machines. You many not be aware, but where I live we’ve been getting some pretty extreme weather lately and as a result the Reavers Melta Cannon fell off. I haven’t reattached it yet as I’m considering getting another Turbo Laser Blaster for it.
So we have here most of Support Company (Snipers, DFSW, Anti-Armour & Mortars) Accompanied by a Leman Russ Tank Company, Baneblade and Macharius (I have both Turrets)
The Light Infantry Company with Vendettas and the rest of Support Company (Recon & Pioneers)
The good old Carcharodons
Iron Hands with Drop Pods and Rhinos
The dreaded Hextad of The Ancients Apoc Formation, along with Landspeeders and Terminators (Who I use in Apoc as the Death-knell formation) and some Legion of the Damned
So thats it, man cave review done. I’m pretty happy to see all the models all on display at one place at one time.
As an aside, I’ve been working on the Forge World Realm of Battle Cityscape boards over the past few days, so with any luck I should have an update on them shortly.
So, CanCon 2013 has come and gone. It’s been a big weekend, having not been to this event in over 12 years. In some regards glad its over and happy to be home. So lets break it down blow by blow. Firstly, let me just quickly explain what CanCon is for those of you who are not familiar with it. CanCon is a 3 day Wargaming, Roleplaying, Card Game, Board Game convention that is held over the Australia Day long weekend in Canberra each year. It’s been going for something like 30 years and is a big event on the calendar of practically every person who’s into gaming. Virtually every wargame in every scale you can think of is represented at CanCon in one form or another, and this year I participated in the Warhammer 40,000 event.
For 40k CanCon 2013 it was a 1850pt event with no comp, and 40k approved Imperial Armour units were allowed. It’s 8 games over the three days, with 3 games on the Saturday, 3 games on the Sunday and two games on Monday, one in the morning and two in the afternoon. The first two games on Saturday are random draw and the rest of the games are seeded after that based on battle points alone. At the end of the event your battle points are modified by up to 20% for sportsmanship and painting respectively, and then the winner and other places are determined.
CanCon attracts some of the best 40k players in Australia and this year of the 130 players, 30 were ranked in the top 100 players according to RankingsHQ, of those 30, 8 were in the top 20. So the competition was pretty stiff, and the stakes were high for the more competitive players because a strong final placing in CanCon almost assures an invite to the High Lords of Terra comp held later on in the year.
So, lets look at my list first. Now, I consider my list actually a fluffy list, meaning its based on a theme I believe would be very consistent with how I perceive a Space Marine army would fight. It’s a bit of a ‘one trick pony’ but that one trick is pretty nasty indeed. It’s a full drop pod list that works on the basis that Marines would send their form of artillery in first to suppress the enemy, then once this is achieved they would launch the assault proper with massed infantry to neutralise and seize the objective(s), with close air support to maintain air superiority. I don’t see Marines using tanks and static formations to get into protracted symmetrical conflicts. They turn up to the fight, smash their opponent in the face with a brick, then run off with his wallet, putting the boot in just to be sure he doesn’t give chase.
The only slight deviation I took from this idea is that I would have preferred to used a Storm Eagle for the close air support however I didn’t have one painted so I had to use Imperial Guard Allies to achieve this aspect of my list.
So, how did it play out?
Game 1. Chaos Space Marines – Minor Win
This was an interesting army as it featured many 1st ed CSM models in the list. So I really enjoyed looking at it, brought back a lot of memories.
Game 2. Eldar – Major Win
This was a fun game, it was a nicely themed army with Wraith Guard and Wraith Lords en mass.
Game 3. Dark Eldar – Major Win
My opponent actually ended up finishing quite highly in the overall placings (6th overall), getting highest score for Xenos for a non placing army. However during this game, he didn’t appreciate the impact of putting his army so close together in the deployment zone.
Game 4. Orks – Major Win
This was a great looking Ork army with many interesting conversions. Sadly though, the orks really copped a pasting from the Deathwind’s and I got extremely lucky with a few rolls that went in my favour which spelt the end of for the Orks
Game 5. Chaos Space Marines – Minor Win
This was a very interesting game. At first things were really going my way, what I didn’t destroy with shooting, ran off the board after breaking in close combat. Then came the two Hell Drakes. These two managed to kill all but 3 of my marines by turn 5. Before their arrival I had around 30 on the board. If it wasn’t for Lysander getting the warlord trait allowing him to be a scoring unit things wouldn’t have been as rosy. Still a very hard fought game.
Game 6. Grey Knights – Minor Win
This army had Cotez with 5 x 10 man GK squads with 4 psycannons in each. He also had a squad of 10 hench man. This was a very tough game. Even though I managed to kill all but 3 of the Grey Knights by the end of the game I still only managed a minor win.
Game 7. Necrons – Major Loss
Yeah, Necrons… nuff said
Game 8. Imperial Guard with Grey Knight Allies – Minor Win
I’d had my fill of 40k by this stage and so had my opponent. I was glad when the game ended.
So in the end I managed 5th place out of about 130 players, by far my best placing in terms of size of players and talent at a comp. Which considering I was using marine list with apart from the 4 Imperial Armour, was pretty basic. So I am quite pleased with my result. Would I have done things differently? Yeah, for sure. I would have liked to have had a Storm Eagle, I would have done a few moves differently with the Necrons in the 7th game. But overall it was a great learning experience in terms of tactics and army composition.
The final placings were
1st – David Teoh – Necrons
2nd – Joshua Leondaris – Daemons
3rd – Joshua Pope – Dark Eldar
4th Chris Turk – Necrons
Best Imperial Army – Me – Space Marines
Best Xenos – Andrew Wynen – Dark Eldar
Best Sports – Joshua Diffey
Players Choice – David Travers (couldn’t hear what army he painted when it was announced)
Overall, as far as the event was concerned I was very disappointed. It didn’t live up to my expectations given the size and longevity of the event. Let me qualify a few observations of areas that were lacking when I compare them to other events I’ve attended.
Terrain – This for me was by far the biggest let down. For an organisation the size of the CGS that runs an event the size of CanCon with the amount revenue they must generate from CanCon, they STILL rely on terrain lent to them from the larger gaming community. Wouldn’t it be sensible to reinvest some of the revenue into their own tables and hire a storage shed to keep it between comps or even hire it out to other event organisers to create an income stream. I can not stress enough how much of a let down this aspect of the tournament was for me. Even just limit the amount of players so that you get quality over quantity.
At $50 per player and 130 players, that means $6,500 in revenue was generated. Prize pool was $2,000, with a large proportion of it donated by the Combat Company,The Games Capital & Milsims. I really think much more could have been done in this department. Big let down.
Organisation – Although the tournament ‘happened’ it could have happened a lot better with just a few minor improves. None of the tables had an ‘admin area’. Most tournaments I’ve been to have been played on 8 x 4 tables with a 1 x 2 section at each end cordoned off for the players to keep templates, models, drinks etc. I’ve even been to tournaments where key aspects of the game flow and terrain adjudications have been fixed to this area for easy reference. There was non of this at CanCon. Each table had a stapled together set of pages with this on it, but they went missing, and there was no admin area on the tables.
Also, for an event this size, 130 players, the round draws were printed out on A4 pieces of paper and sticky taped onto walls in two places. You can imagine what this looked like when 130 players wanted to find out where their next game was. It was ridiculous. Seriously. Hire a projector, ask a friend for one, buy one and book it as a capital purchase for CGS. Its not like it will never get used again. Printing out the draw on a few pieces of A4 paper and sticky taping them to the wall is far from an acceptable stand for an event of this calibre.
One last point on organisation. Timings and announcements. Neither of which were done well. If you know you’re going to be having to communicate to about 130 people in a giant hall with about 500 people in it, yelling won’t cut it. Get a PA or something, see my remarks regarding a projector for possible solutions to this problem.
Army Presentation Standards. Although this is to a degree out of the control of the organisers, it can be influenced and shaped by culture and incentive. By culture I mean ensure that players who are attending this event know that army presentation is expected to be and is to a high standard. This expectation is from the other players attending as they will be bring armies presented to a high standard, and this is reinforced by the event organisers ensuring that army presentation is elevated by themselves in terms of prizes and status provided by winning these components of our hobby at their competitions. Finally, the second way it can be influenced in a positive way is by having a reward, or consequence by not having a well presented army nor for players providing a vote for the players choice. By having more rigorous appraisal standards for painting, a bigger consequence for having a poorly presented army, and finally a negative effect on battle points for not voting on an army for players choice.
Non of this was present. I saw unpainted armies, no exaggeration. I saw some armies that were in various stages of assembly and some extremely well presented armies too. As a matter of fact the 2012 Armies on Parade winner was present. So it wasn’t all bad. However, on average the one third of people that did put some effort into their armies were grossly overshadowed by the people that had no regard to this important aspect of the hobby. This is disrespectful and mustn’t be allowed to feature as a cultural aspect of our hobby.
A culture of well presented, best of your ability armies needs to be fostered and rewarded, both in terms of status and prizes. Coming first for your painted army and first for your level of skill as a general needs to be equal and treated as such.
So, sadly I was let down overall by my experience at CanCon. Perhaps I had too high an expectation? Maybe. I genuinely believe that if a few improves where implemented this tournament could be world class. It seems that the event organisers have been using the same formula for many years and its been getting them by.
To finish on a positive note, it was great to play some of the best players in Australia and see the way they do business. If you want to improve your gaming ability and painting ability, tournaments are by far the best place to do that in, in the shortest amount of time. Also, going interstate meant that I was exposed to players and armies that I don’t see where I live in my usual gaming circle. So this experience was invaluable. I am looking forward to seeing if CGS implement some changes to their formula and turn CanCon into what it should be. Exceptional.
Again, this is a very quick one to show you some pics of my completed squadron of Iron Hands Landspeeders. I decided to do a video diary of this build for something different. I’ve posted the last two tutorials on this pages YouTube channel if you’d like to have a look at them. I fully magnetised these kits so that they can be put together in various configurations. I’m a big fan of this now as its difficult to predict what will be a good or bad configuration until you’ve had a few opportunities to pay test them. Also with all the kits now being plastic its pretty easy to do.
About 3 weeks ago I played in Quarter Master 3 held here in Brisbane at Greenbank. Although I didn’t place my Carcharodons did get Best Painted. Apart from the Trophy I also got some gift certificates that I could spend at an independent gaming store called The Combat Company. I have to say, I was really impressed with their service. I ordered the models on a Friday, and I had them on Monday, no fuss. I ended up getting two, one for my Carcharodons and the other for my Iron Hands. Now that in 6th Ed troops that have a toughness buff from being on a bike don’t suffer instant death from their original toughness but their buffed toughness, taking out Ork biker Nobz is tough. But not with this heavy hitter! Its also really useful at smoking Terminators too who are also a real problem in 6th Ed. So in my new Iron Hands list that I’ll be using next weekend at Alpha Hobbies Titans of War 1850pt Team Tournament has one it in.
As a matter of fact, I’m so happy with how this one has turned out I’m going to paint the second one as an Iron Hands Vindicator and I’ll be getting another so I can have a Line Breaker formation for games of Apocalypse, which I’ll be playing in Games Workshop Mt Gravatt’s 8000pt November tournament.
Anyways, here are some pics of the finished model. I have to admit, I really like it without the dozer blade on it. Reminds me of the old Epic scale Vindicator from back in the day.
On a completely different topic I have always wanted to attend Adepticon held each year in Chicago. I’ve been giving it a lot of thought how awesome it would be to go, and even more awesome to go with a bunch of other guys (or gals) who are into the hobby. The big hurdle for most people (including myself) is the cost involved. However in a previous life I knew a lot of people in the travel industry (one of the largest travel agencies in the world, Flight Centre) So I got back in touch with a them to talk about what we could do if there were enough people who’d be keen on coming. So I put up a small question on my Facebook page to judge what the level of interest is from other enthusiasts that visit my blog. Keep in mind that the even isn’t until mid April 2013 so if you do want to go, and all the stars align putting a little cash aside each week would mean that it could happen.
So please take a few moments to let me know what your level of interest would be to attend Adepticon in 2013. This is really for Australians, but if this gets off the ground it’d be awesome to meet some of you guys in the States.
Ok, thanks for checking it out, hope you like the tutorial!


")