Its been a while I know. Doesn’t mean I haven’t been thinking of you though. Things have been pretty hectic to be honest. Lots of commitments, namely family and study. However that doesn’t mean I’ve not been doing anything. I’ve got a few projects on the boil at the moment painting and hobby wise (more on that later). However my World Eaters are still my focus. Since completing the units you’re about to look at a few weeks ago, I’ve had a few games and have really enjoyed myself. In fact, having a few games really re-inspired me. I’m still focused on getting a pretty large infantry based World Eaters army together. It just takes a lot of time, preparing, assembling and painting all those infantry. You’ll be happy to hear that I can now quite comfortably field a 2,500pt force. I’ve just today began preparing the third tranche of World Eaters. More infantry and a Typhon… With any luck you’ll see that sooner rather than later. This is because I am aiming to play in a 30k tournament here in Brisbane in October and I’d really like to take a tone of infantry. It seems the way to use the World Eaters… so much so they even have a Rite of War: Berserker Assault dedicated to the idea.
So, what do we have here in today post?
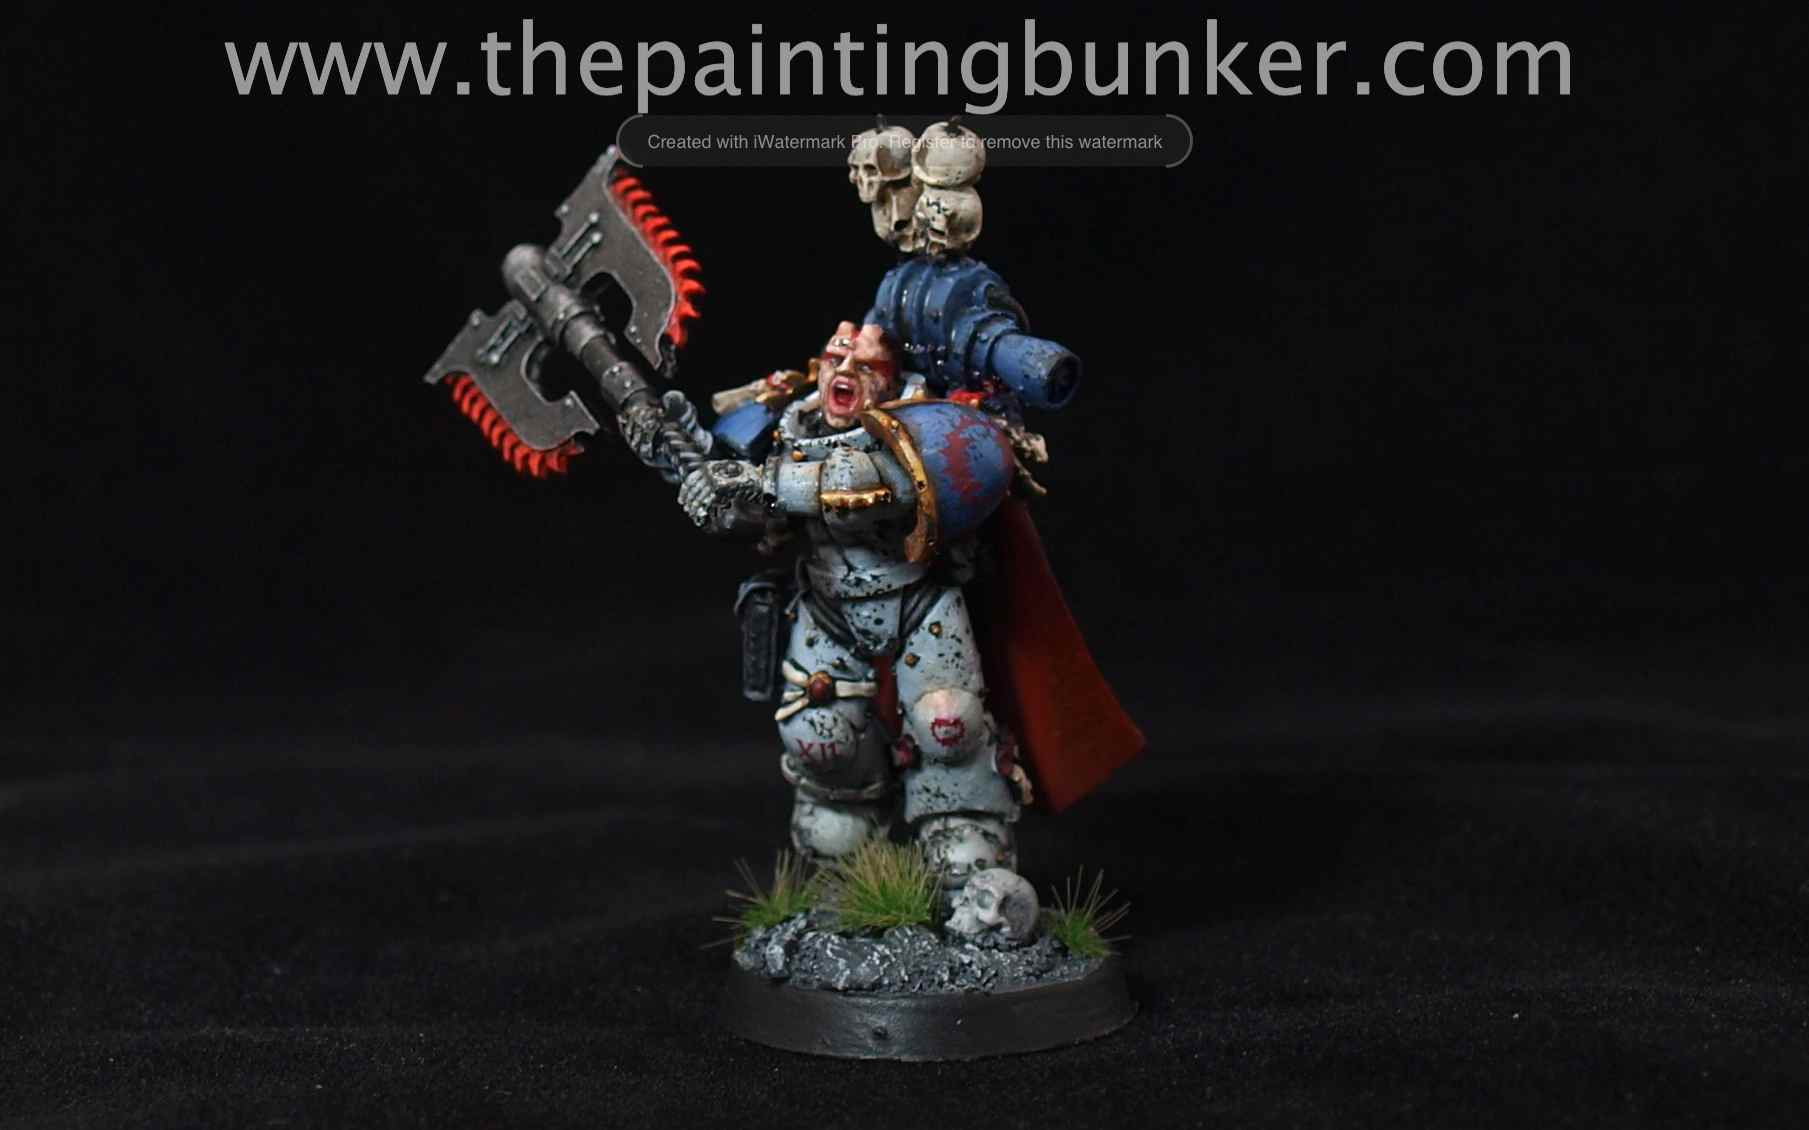
First up is a loyalist World Eater – Centurion Shabran Darr.
He’s based off of the Flesh Tears Gabriel Seth model. I just did a few minor conversions to fit Darr’s description a little better. Originally I really liked the head that came with Seth, however after painting it, I was pretty unimpressed with its lack of expression. I added the butchers nails to his cranium. Next up is our friendly neighbourhood Master of Signal (Centurion w/consul upgrade). I like this guy, both in game and model terms. Firstly, I like the D3 templates he can drop on marines heads. Nice. Plus, the model is pretty cool and reminds me of a Rogue Trader era model from WAY back in the day. These guys are just a must have for your Legion Tactical Squad. What more can I say. I don’t really know what I was thinking when I painted or even thought up the idea to have these fools in my army. Oh well, they’re done now. Legion Tactical Support Squad. Plasma guns are cool though. Hoses squads of marines. Last but not lease, the work horses of the Legion, the Legion Tactical Squad. I aim to have three squads of 20 of these guys for the World Eaters. They’re just so versatile. Plus they look legit on the table. Nothing says ‘get off the table’ like 20 marines unleashing fury of the legion on a prone foe.
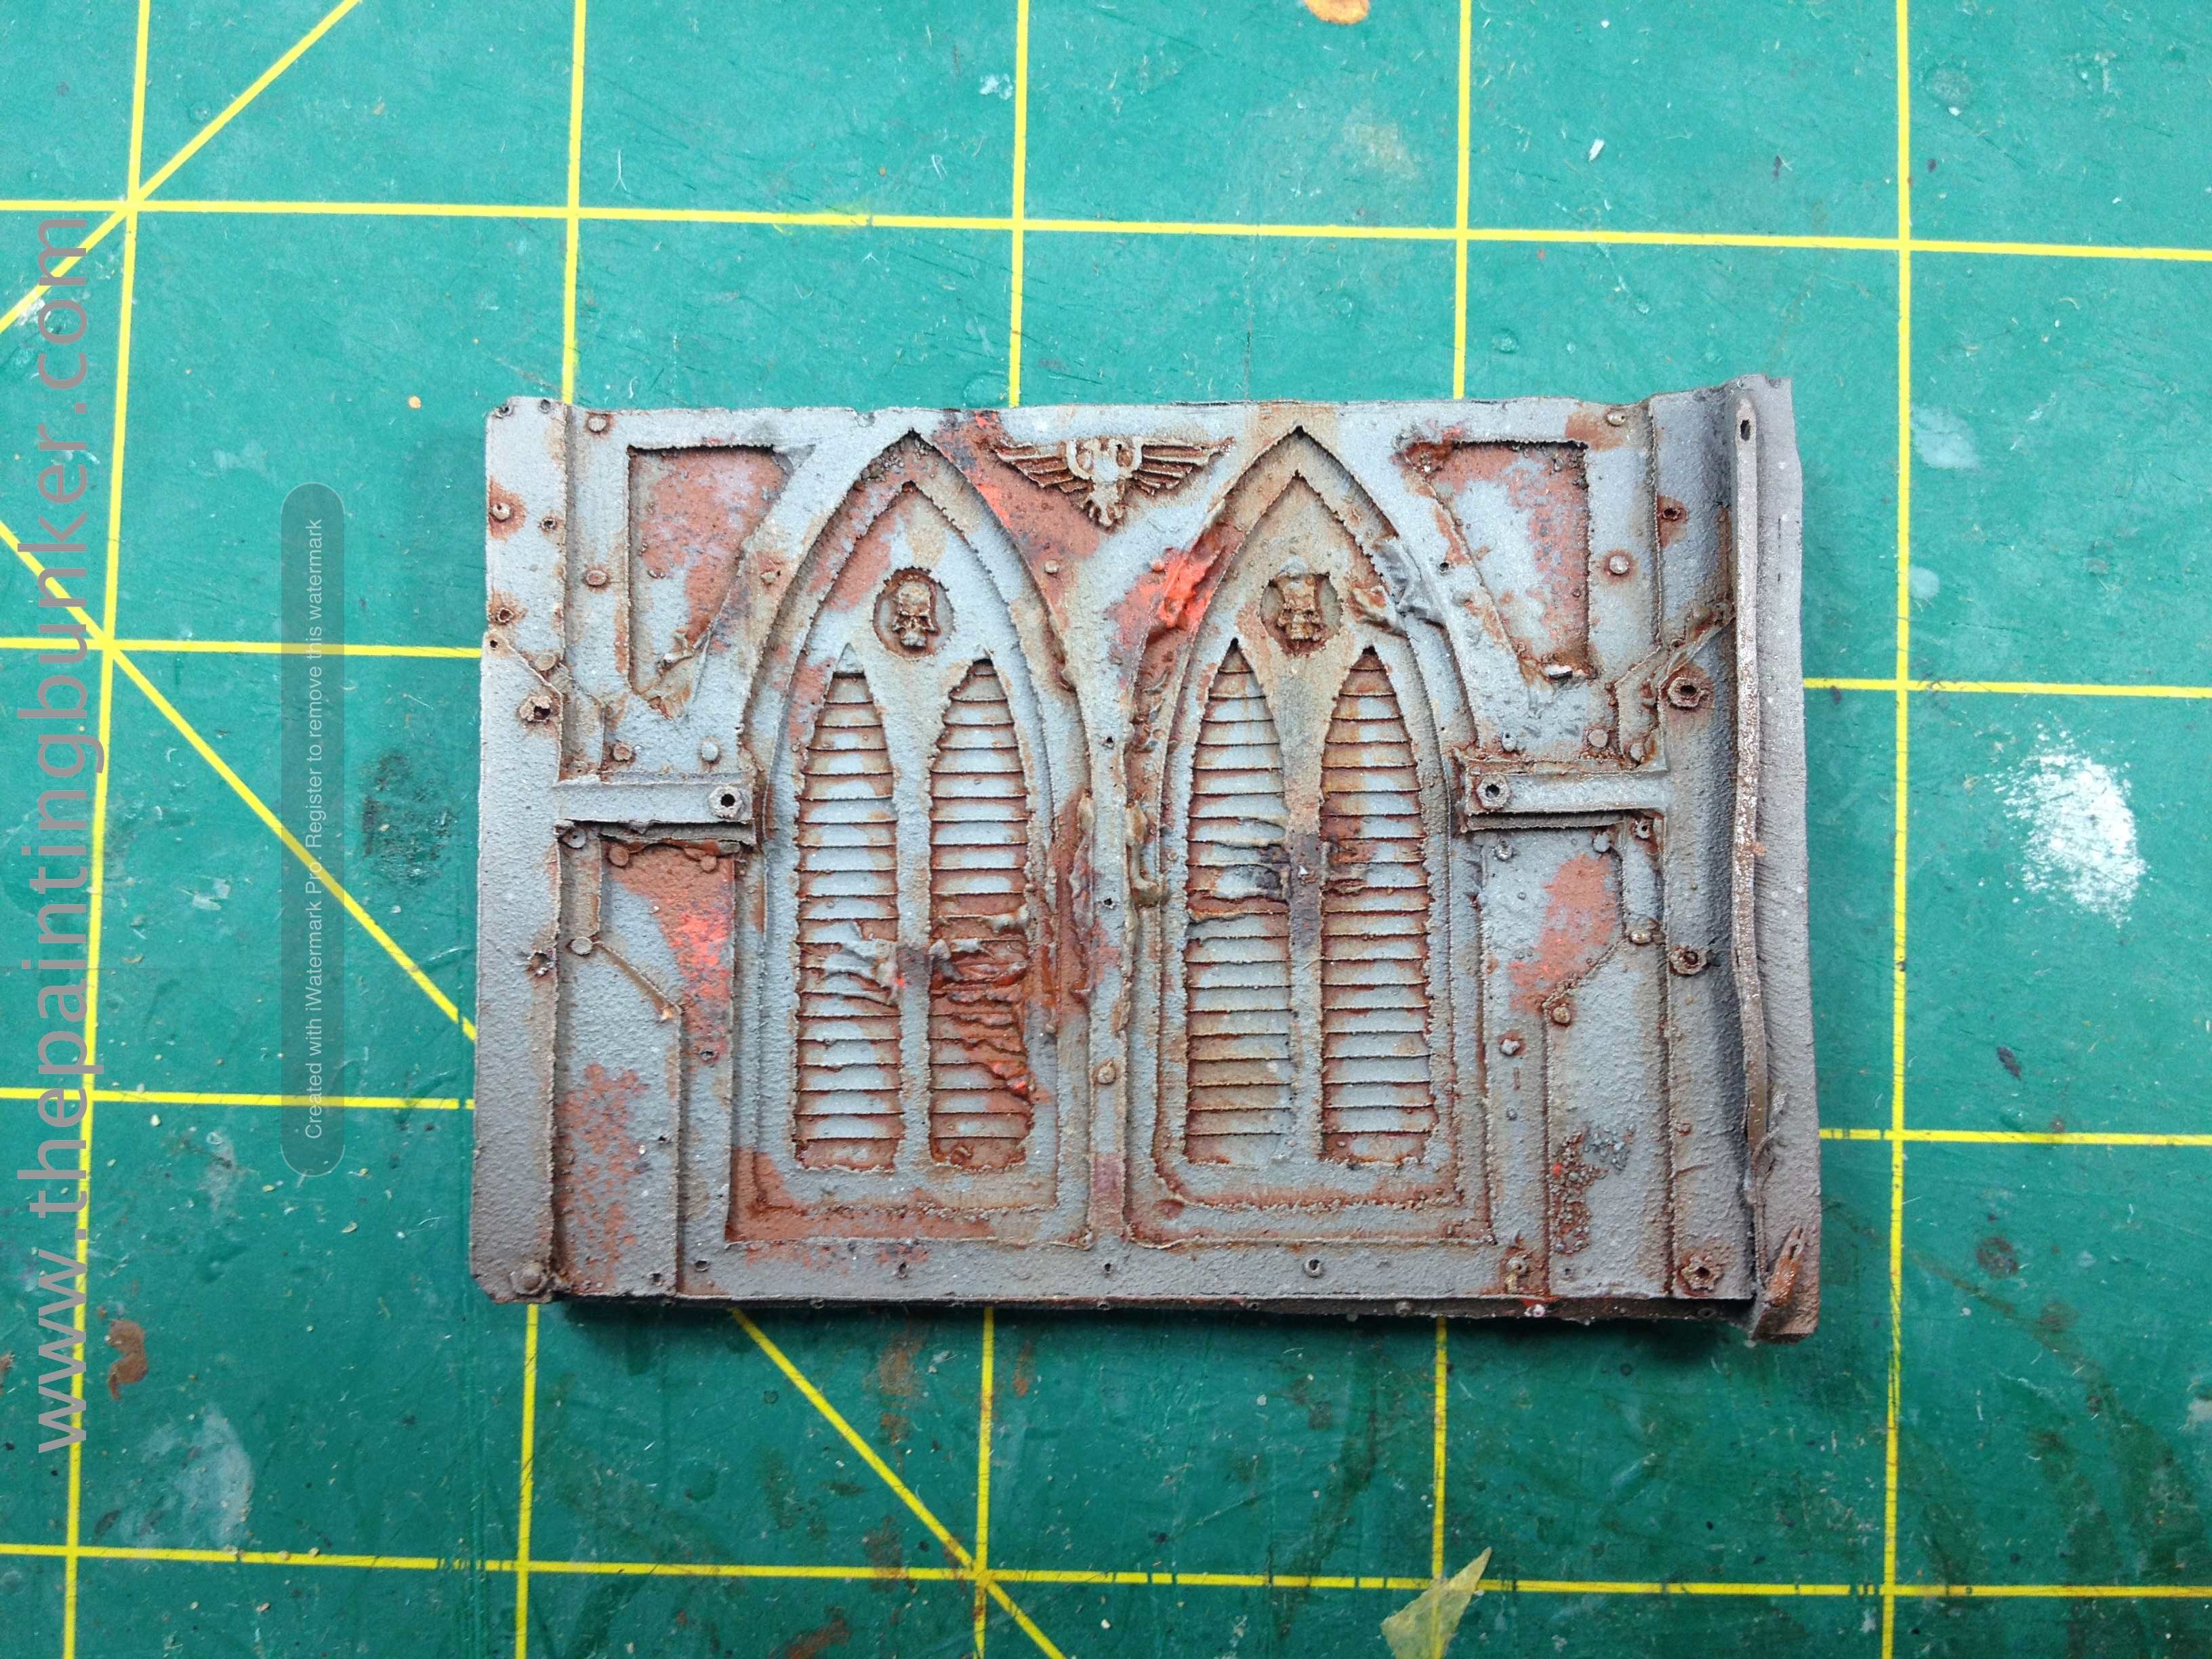
Well my friends, thats it for now. I’ll leave you with a little sneak peak on a small side project I’ve got going on… I’ll do a more thorough post on it in the future, but for now….
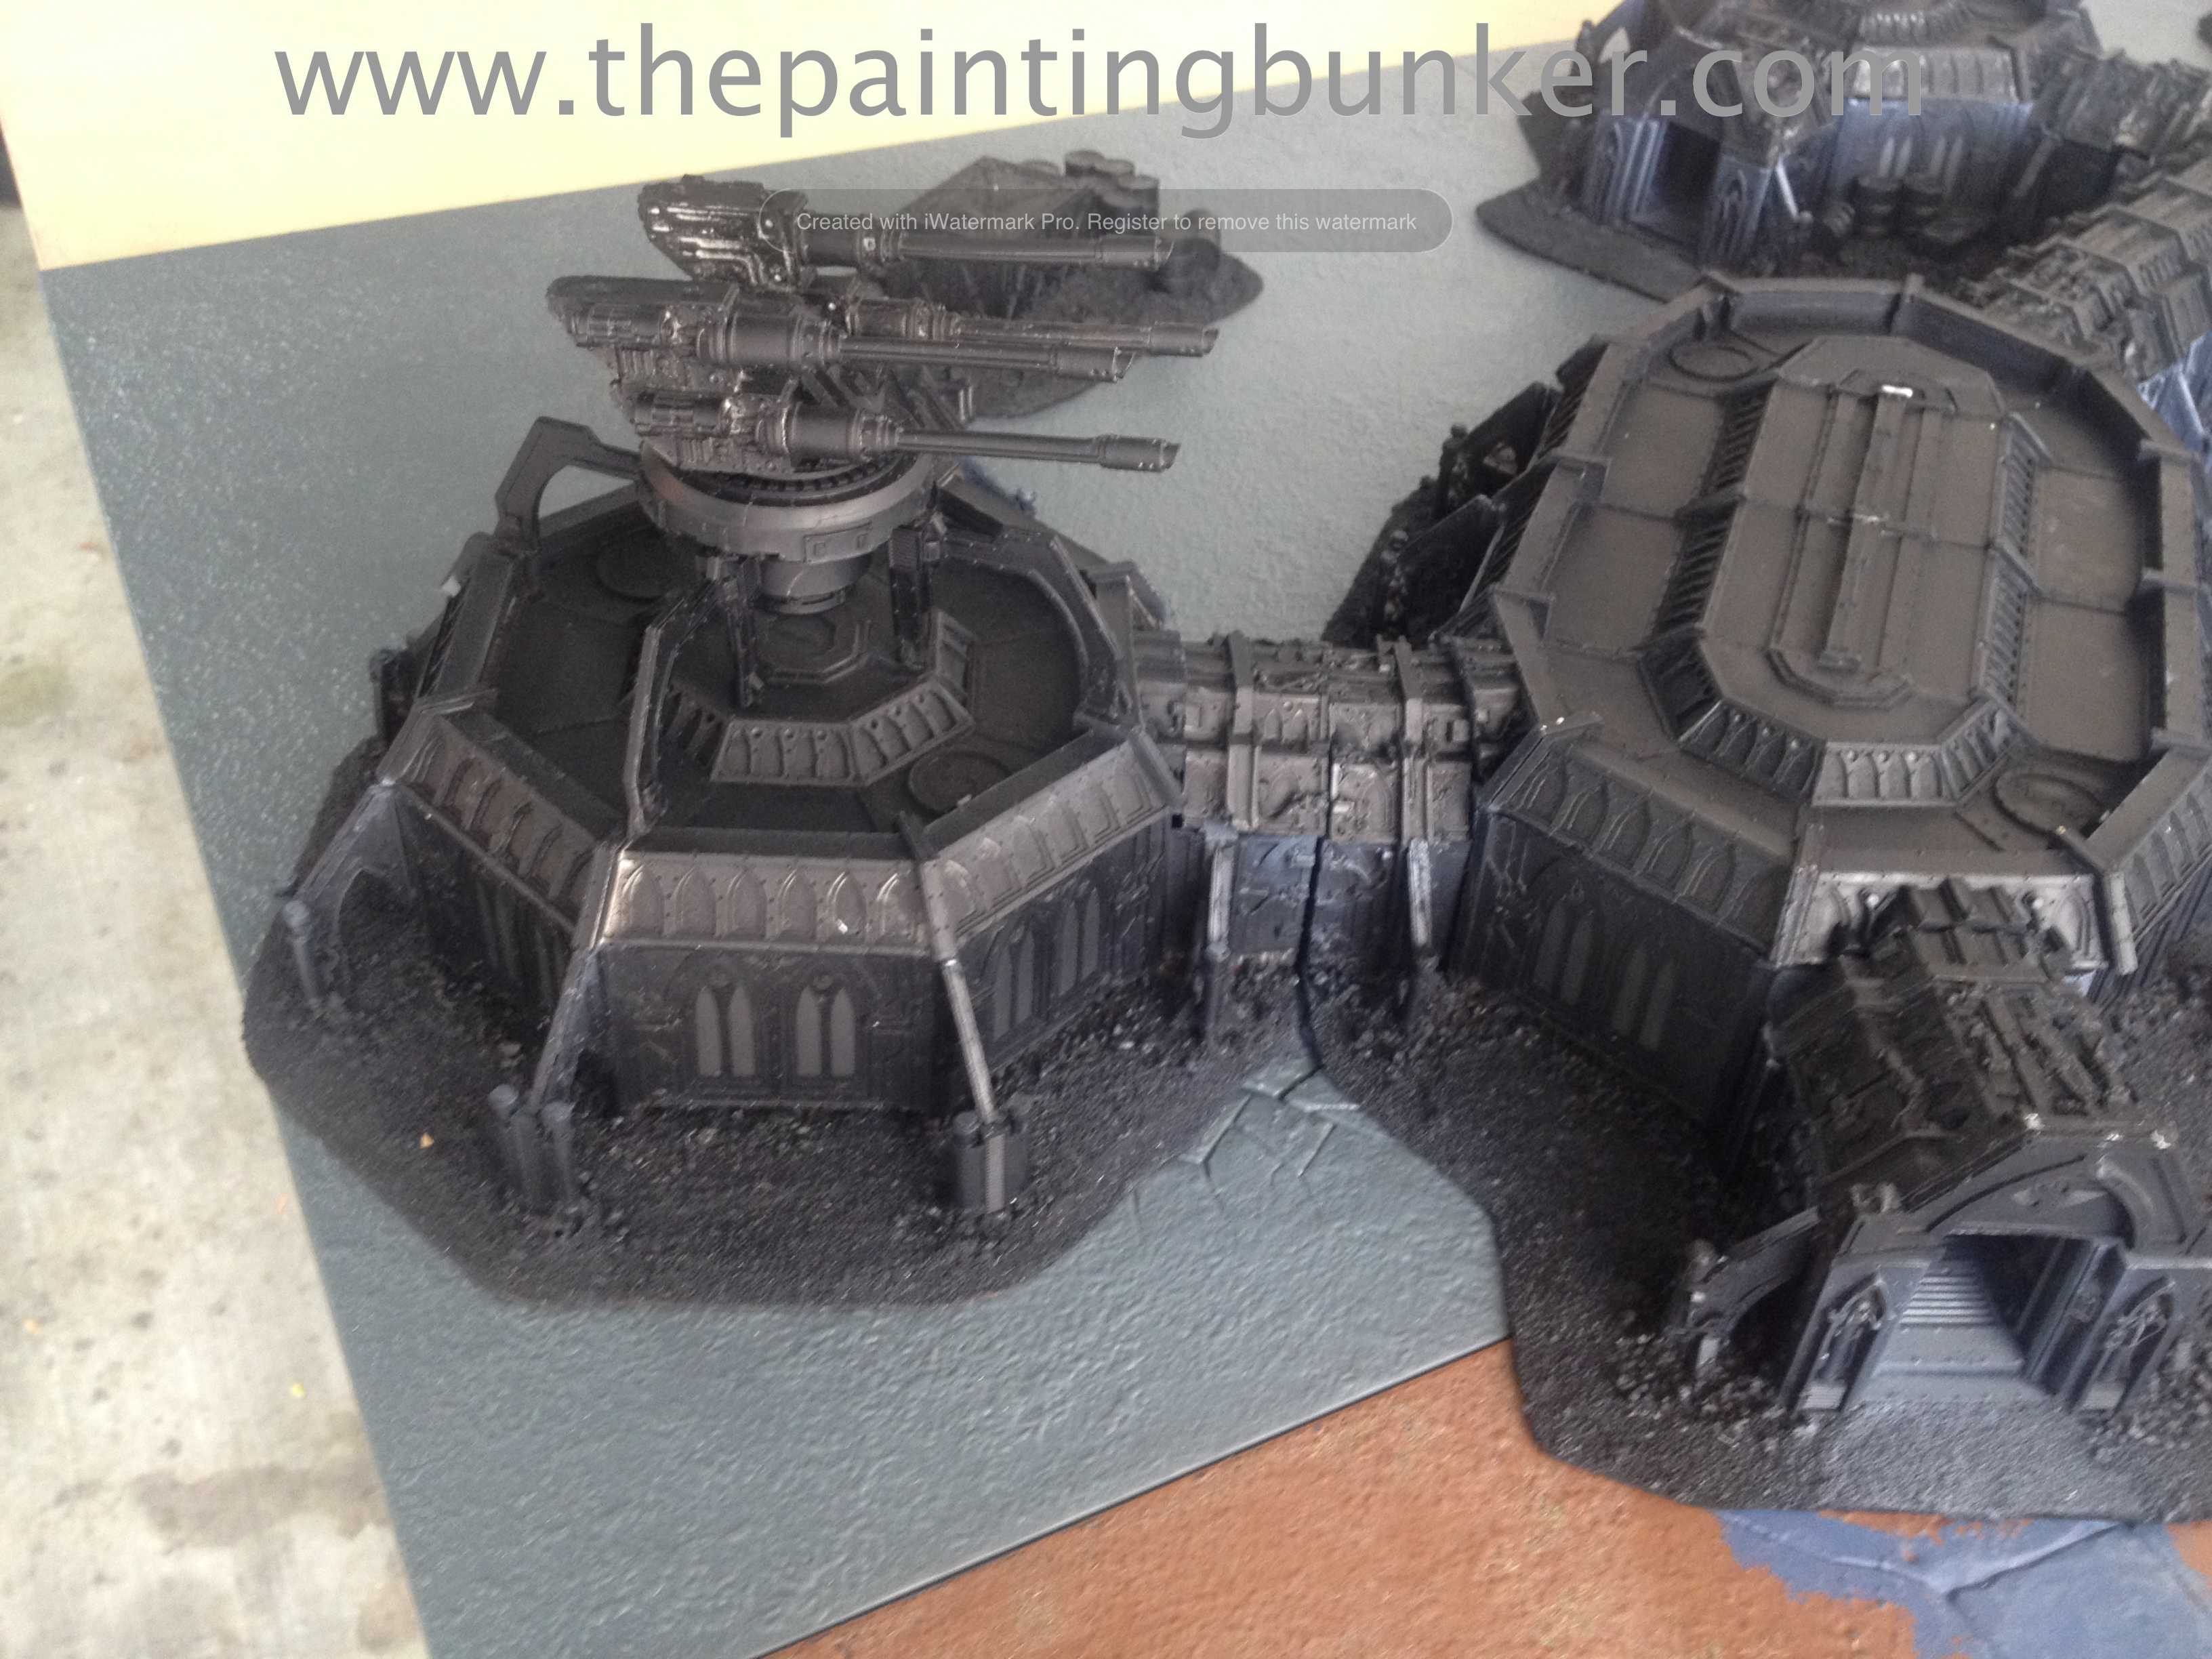
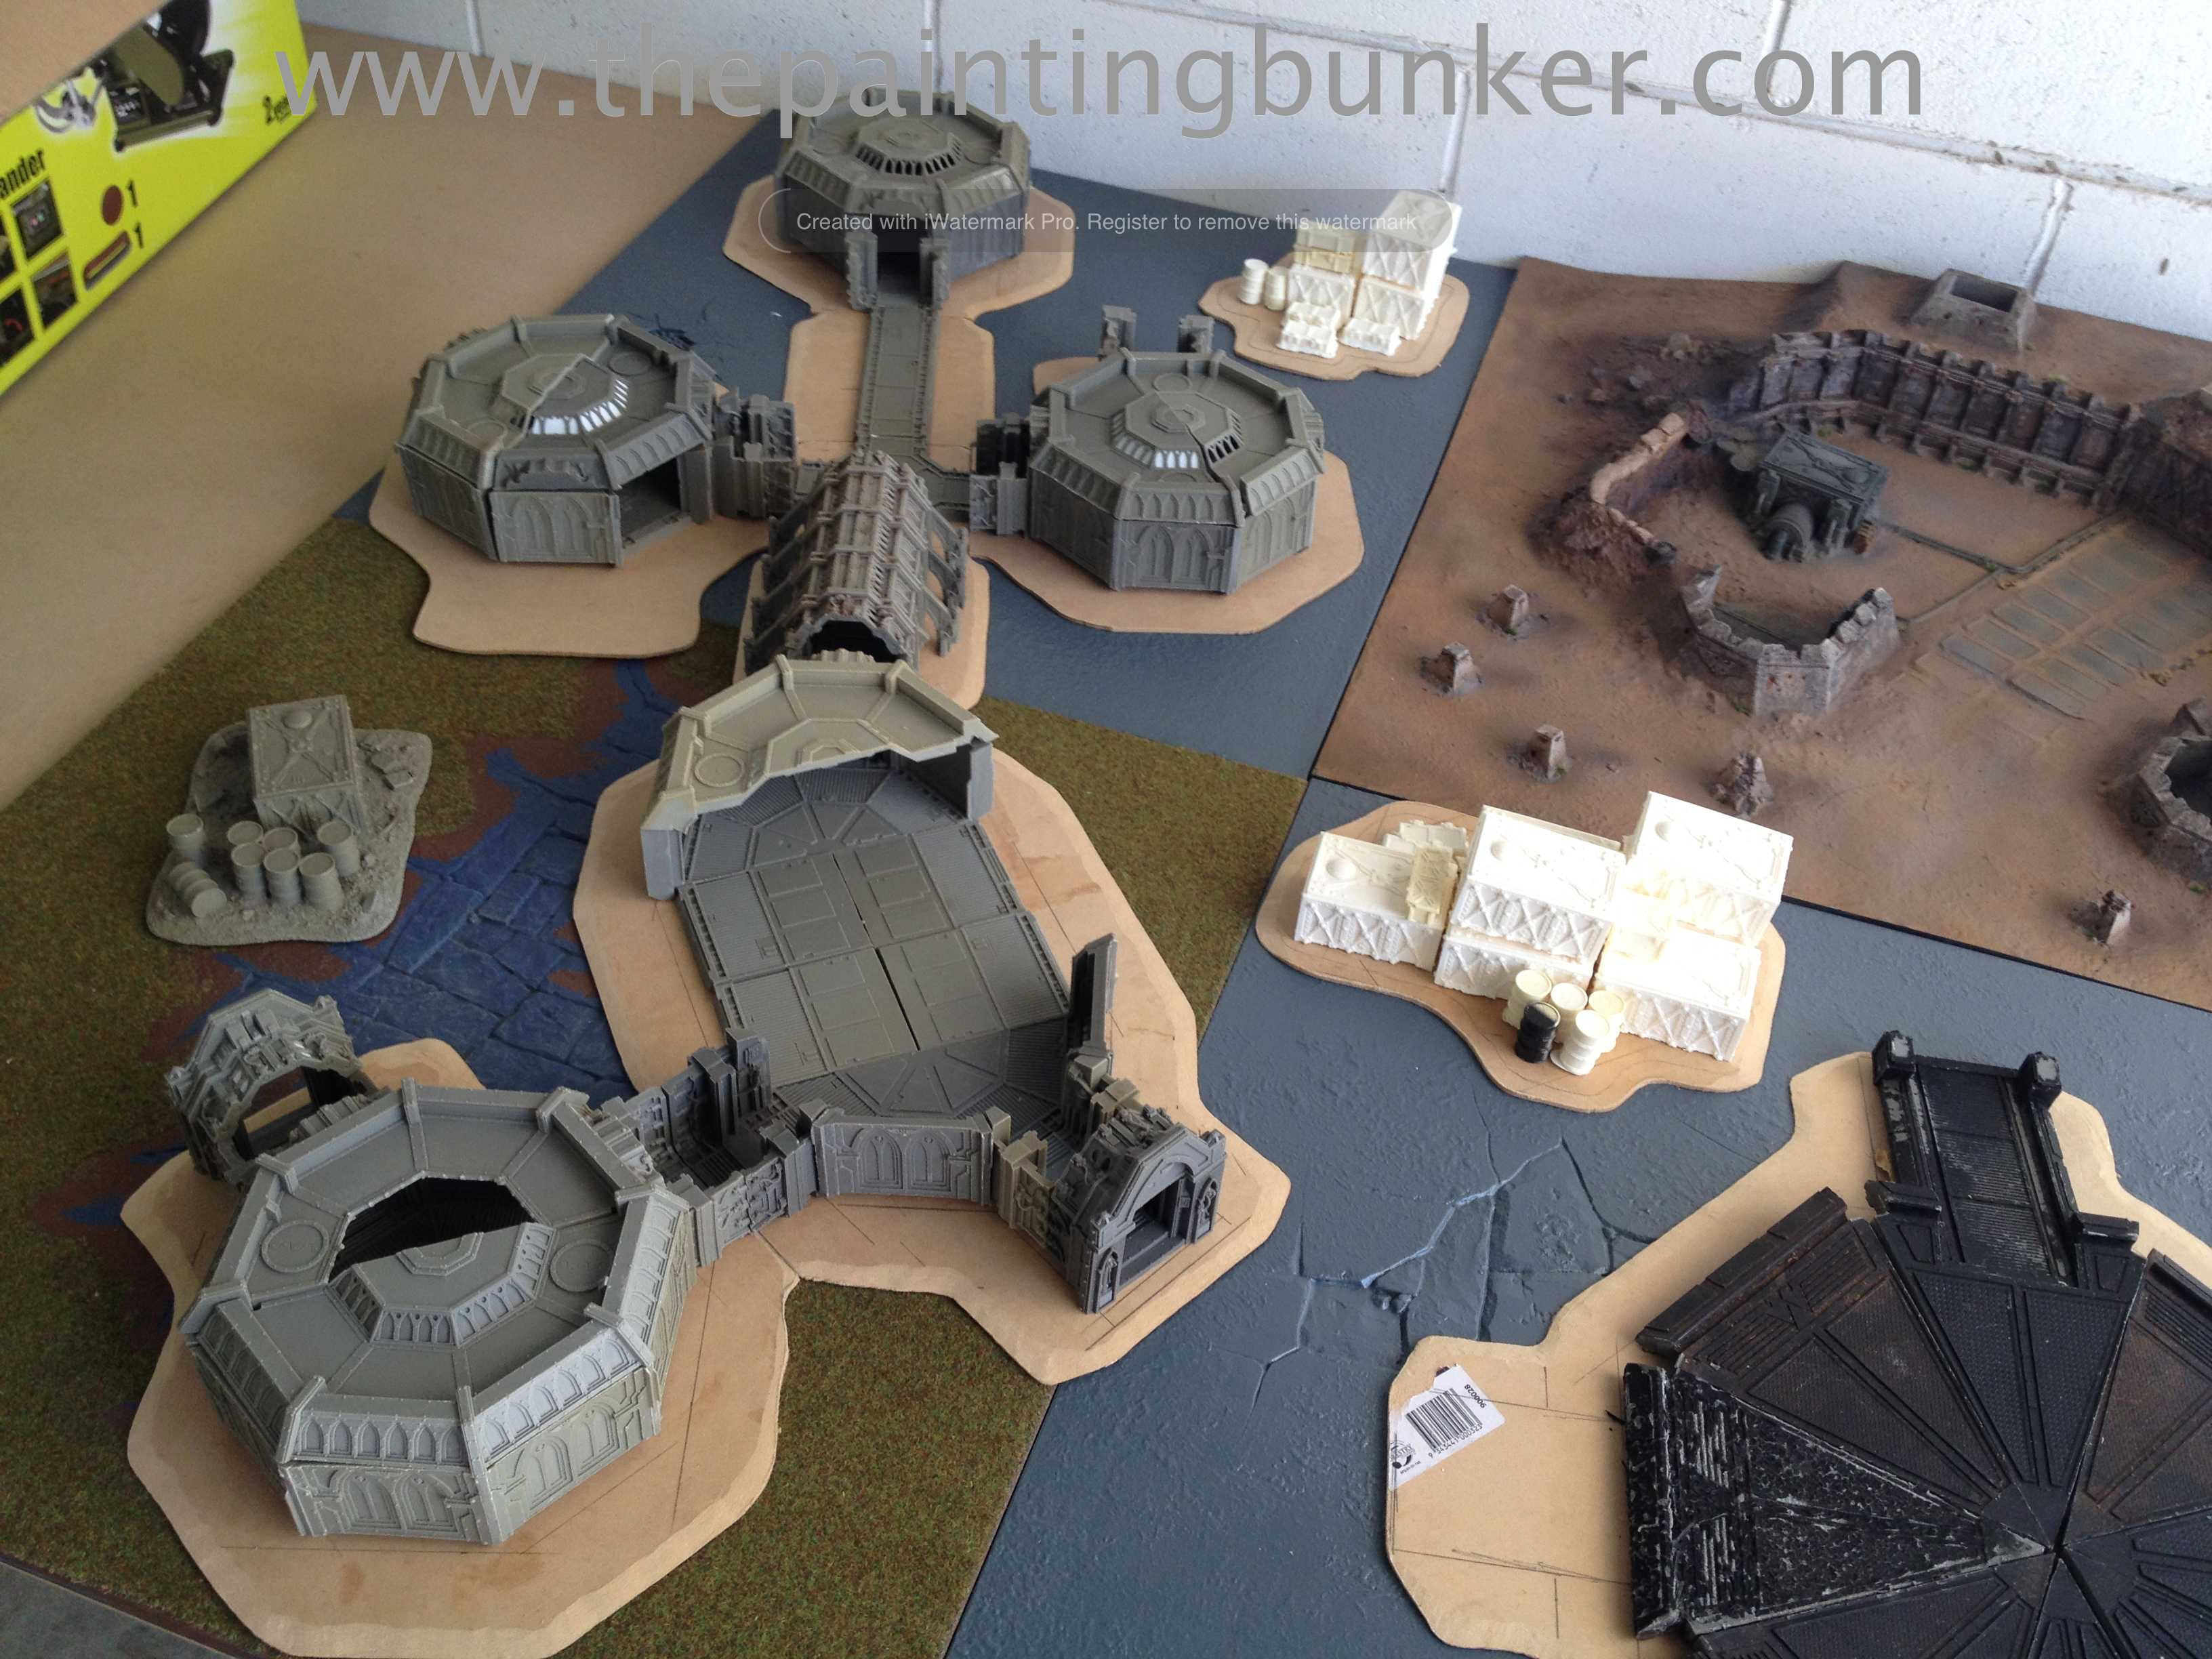
Well, as you can probably tell from the flavour of my last few posts I’ve not been doing much mini painting… Instead I’ve been making scenery. This is all in preparation for the tournament I’m running shortly. I wanted to have five 4 x 4 tables for the tournament. I had four done. The two 4 x 4 Forge World Realm of Battle boards I did some time ago. I admit I only did a 6 x 4 board, however I did have 8 2 x 2 tiles. I finished off the last two tiles recently, just haven’t taken any pics of them… soz. The Anhpelion Base, and a Zone Mortalis.
I needed a fifth.
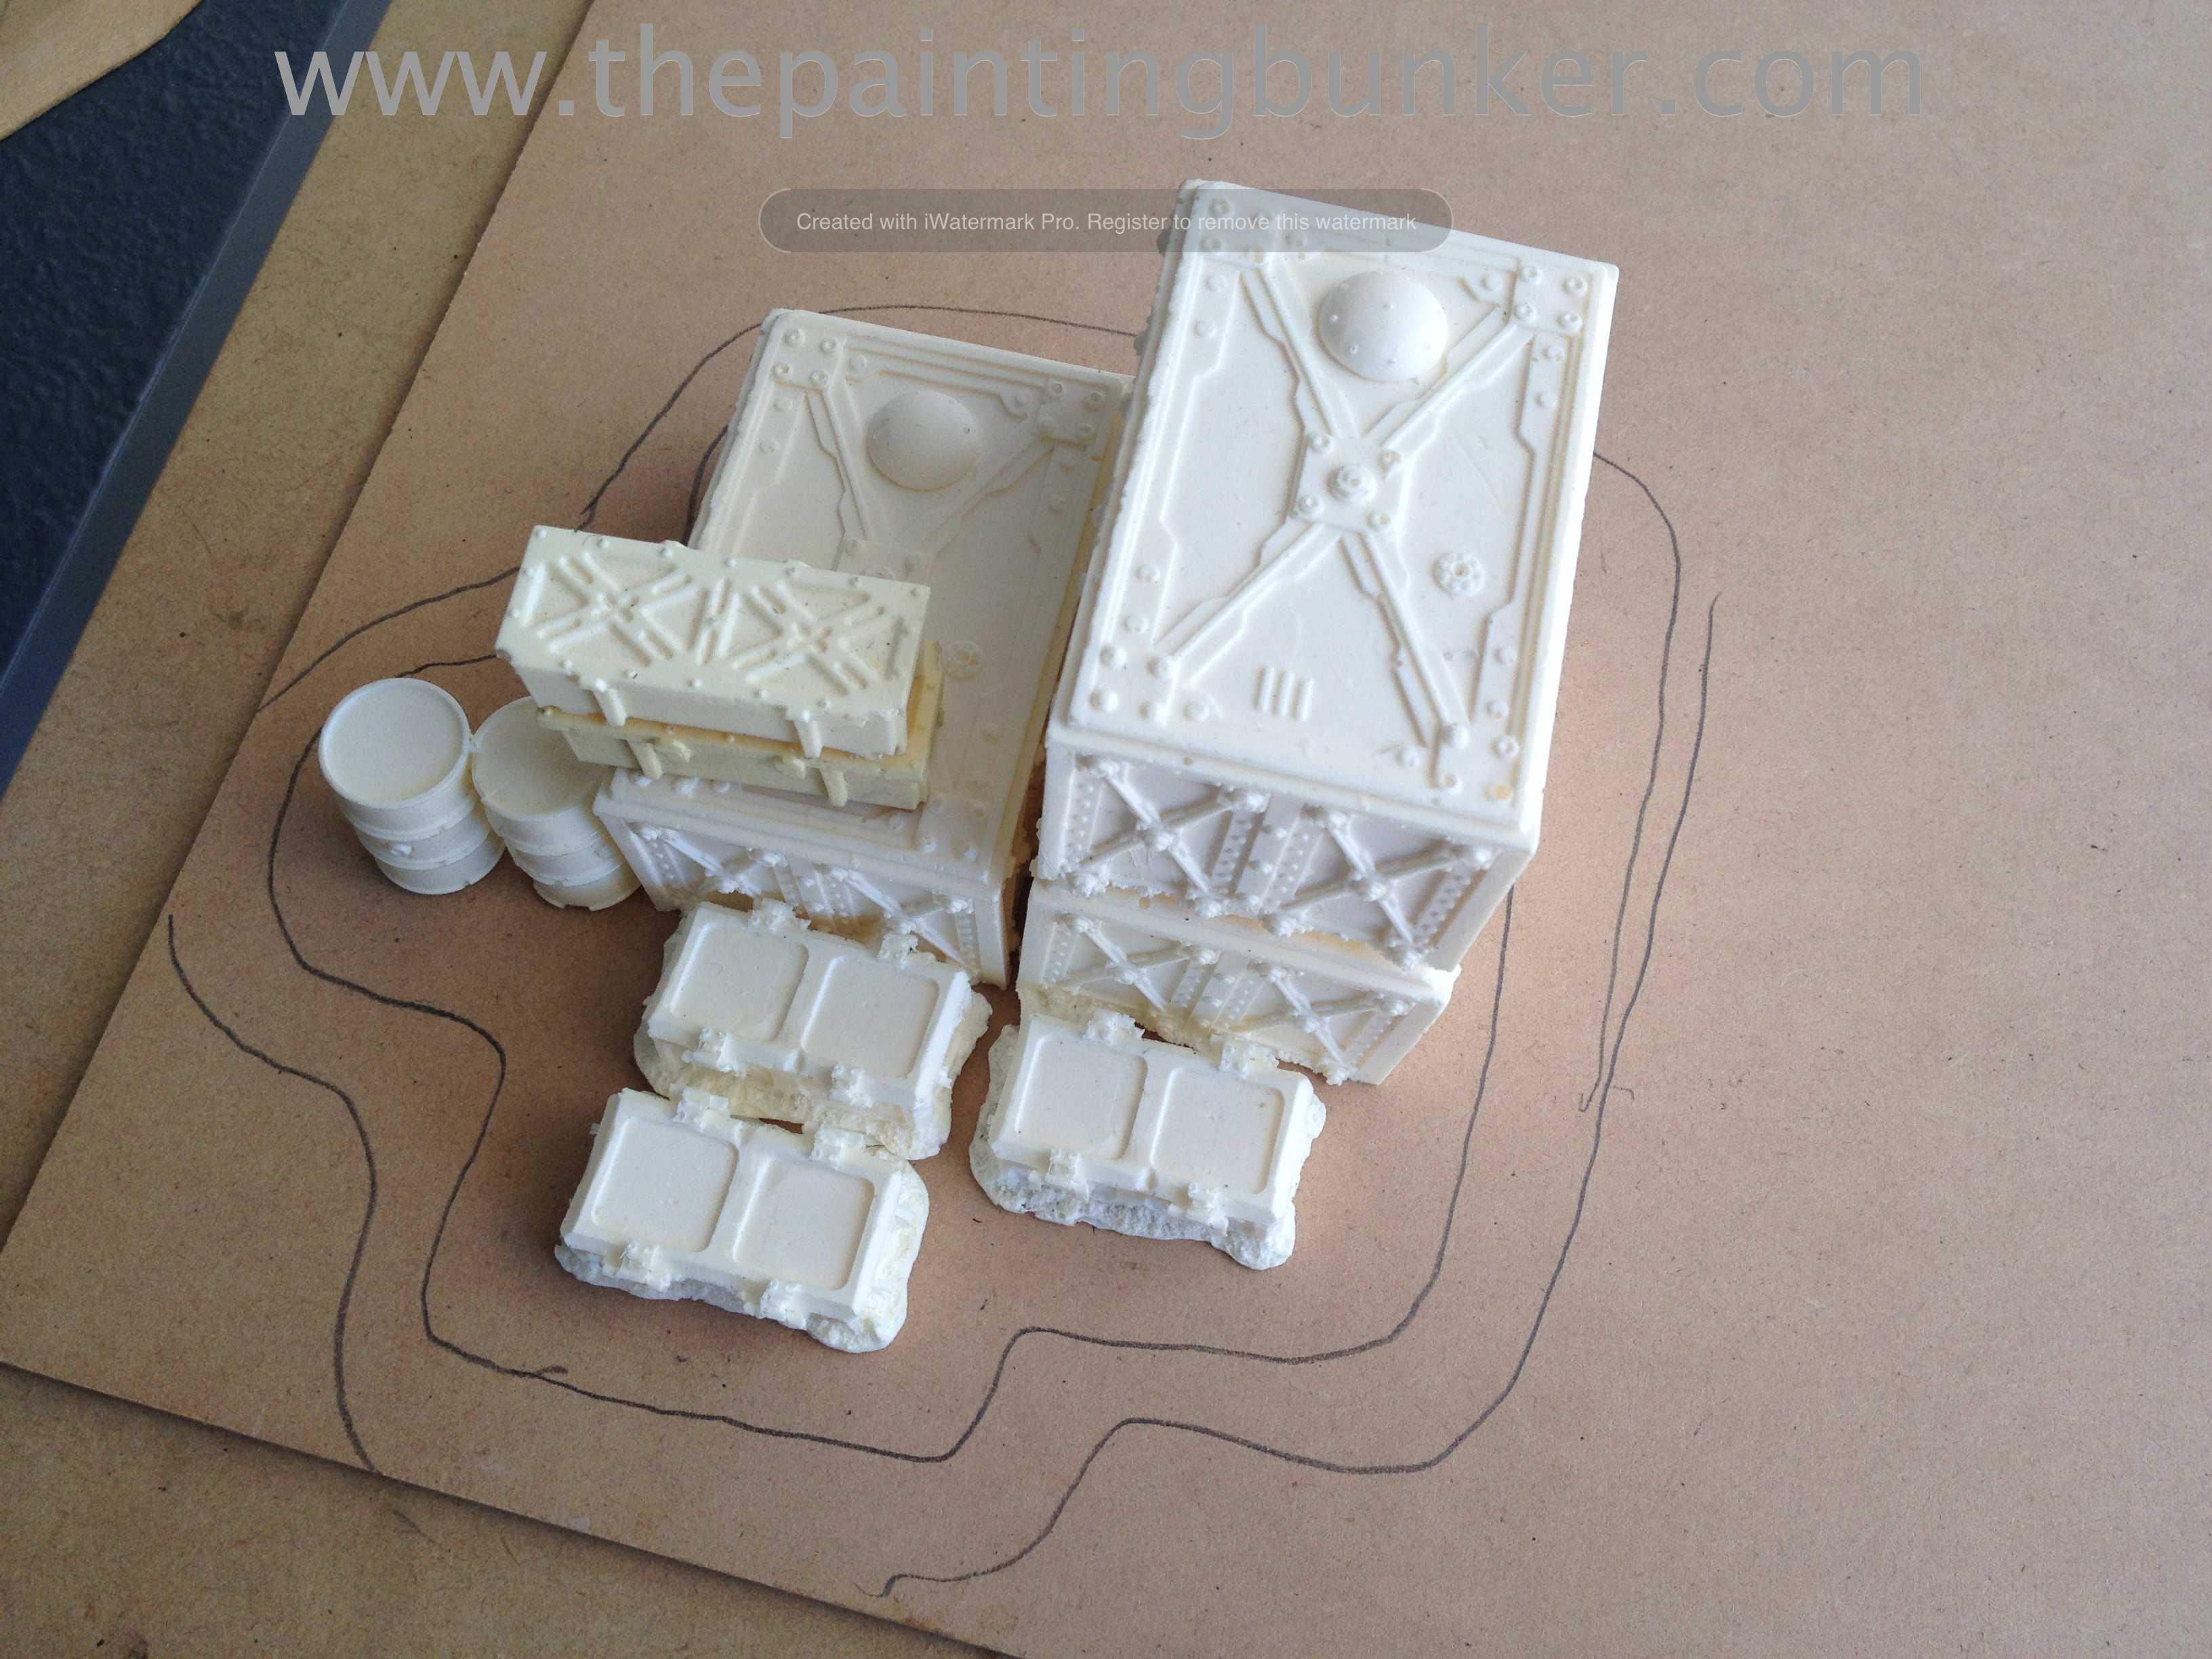
Going with my theme of buildings rather than ruins, I decided to make an Air Strip. Remember the Forge World Aeronautica Imperialis Air Field they did for Master Class 1 ( I think)?
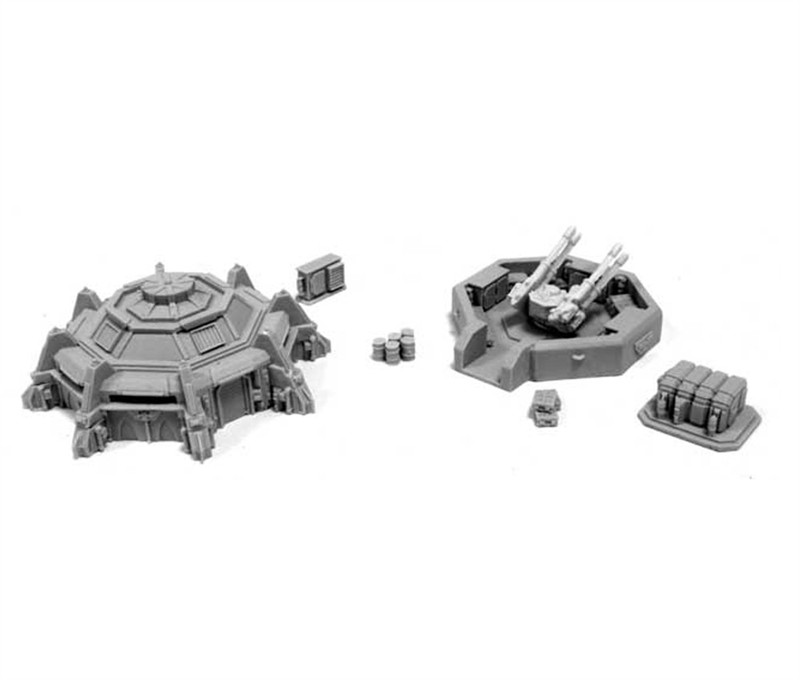
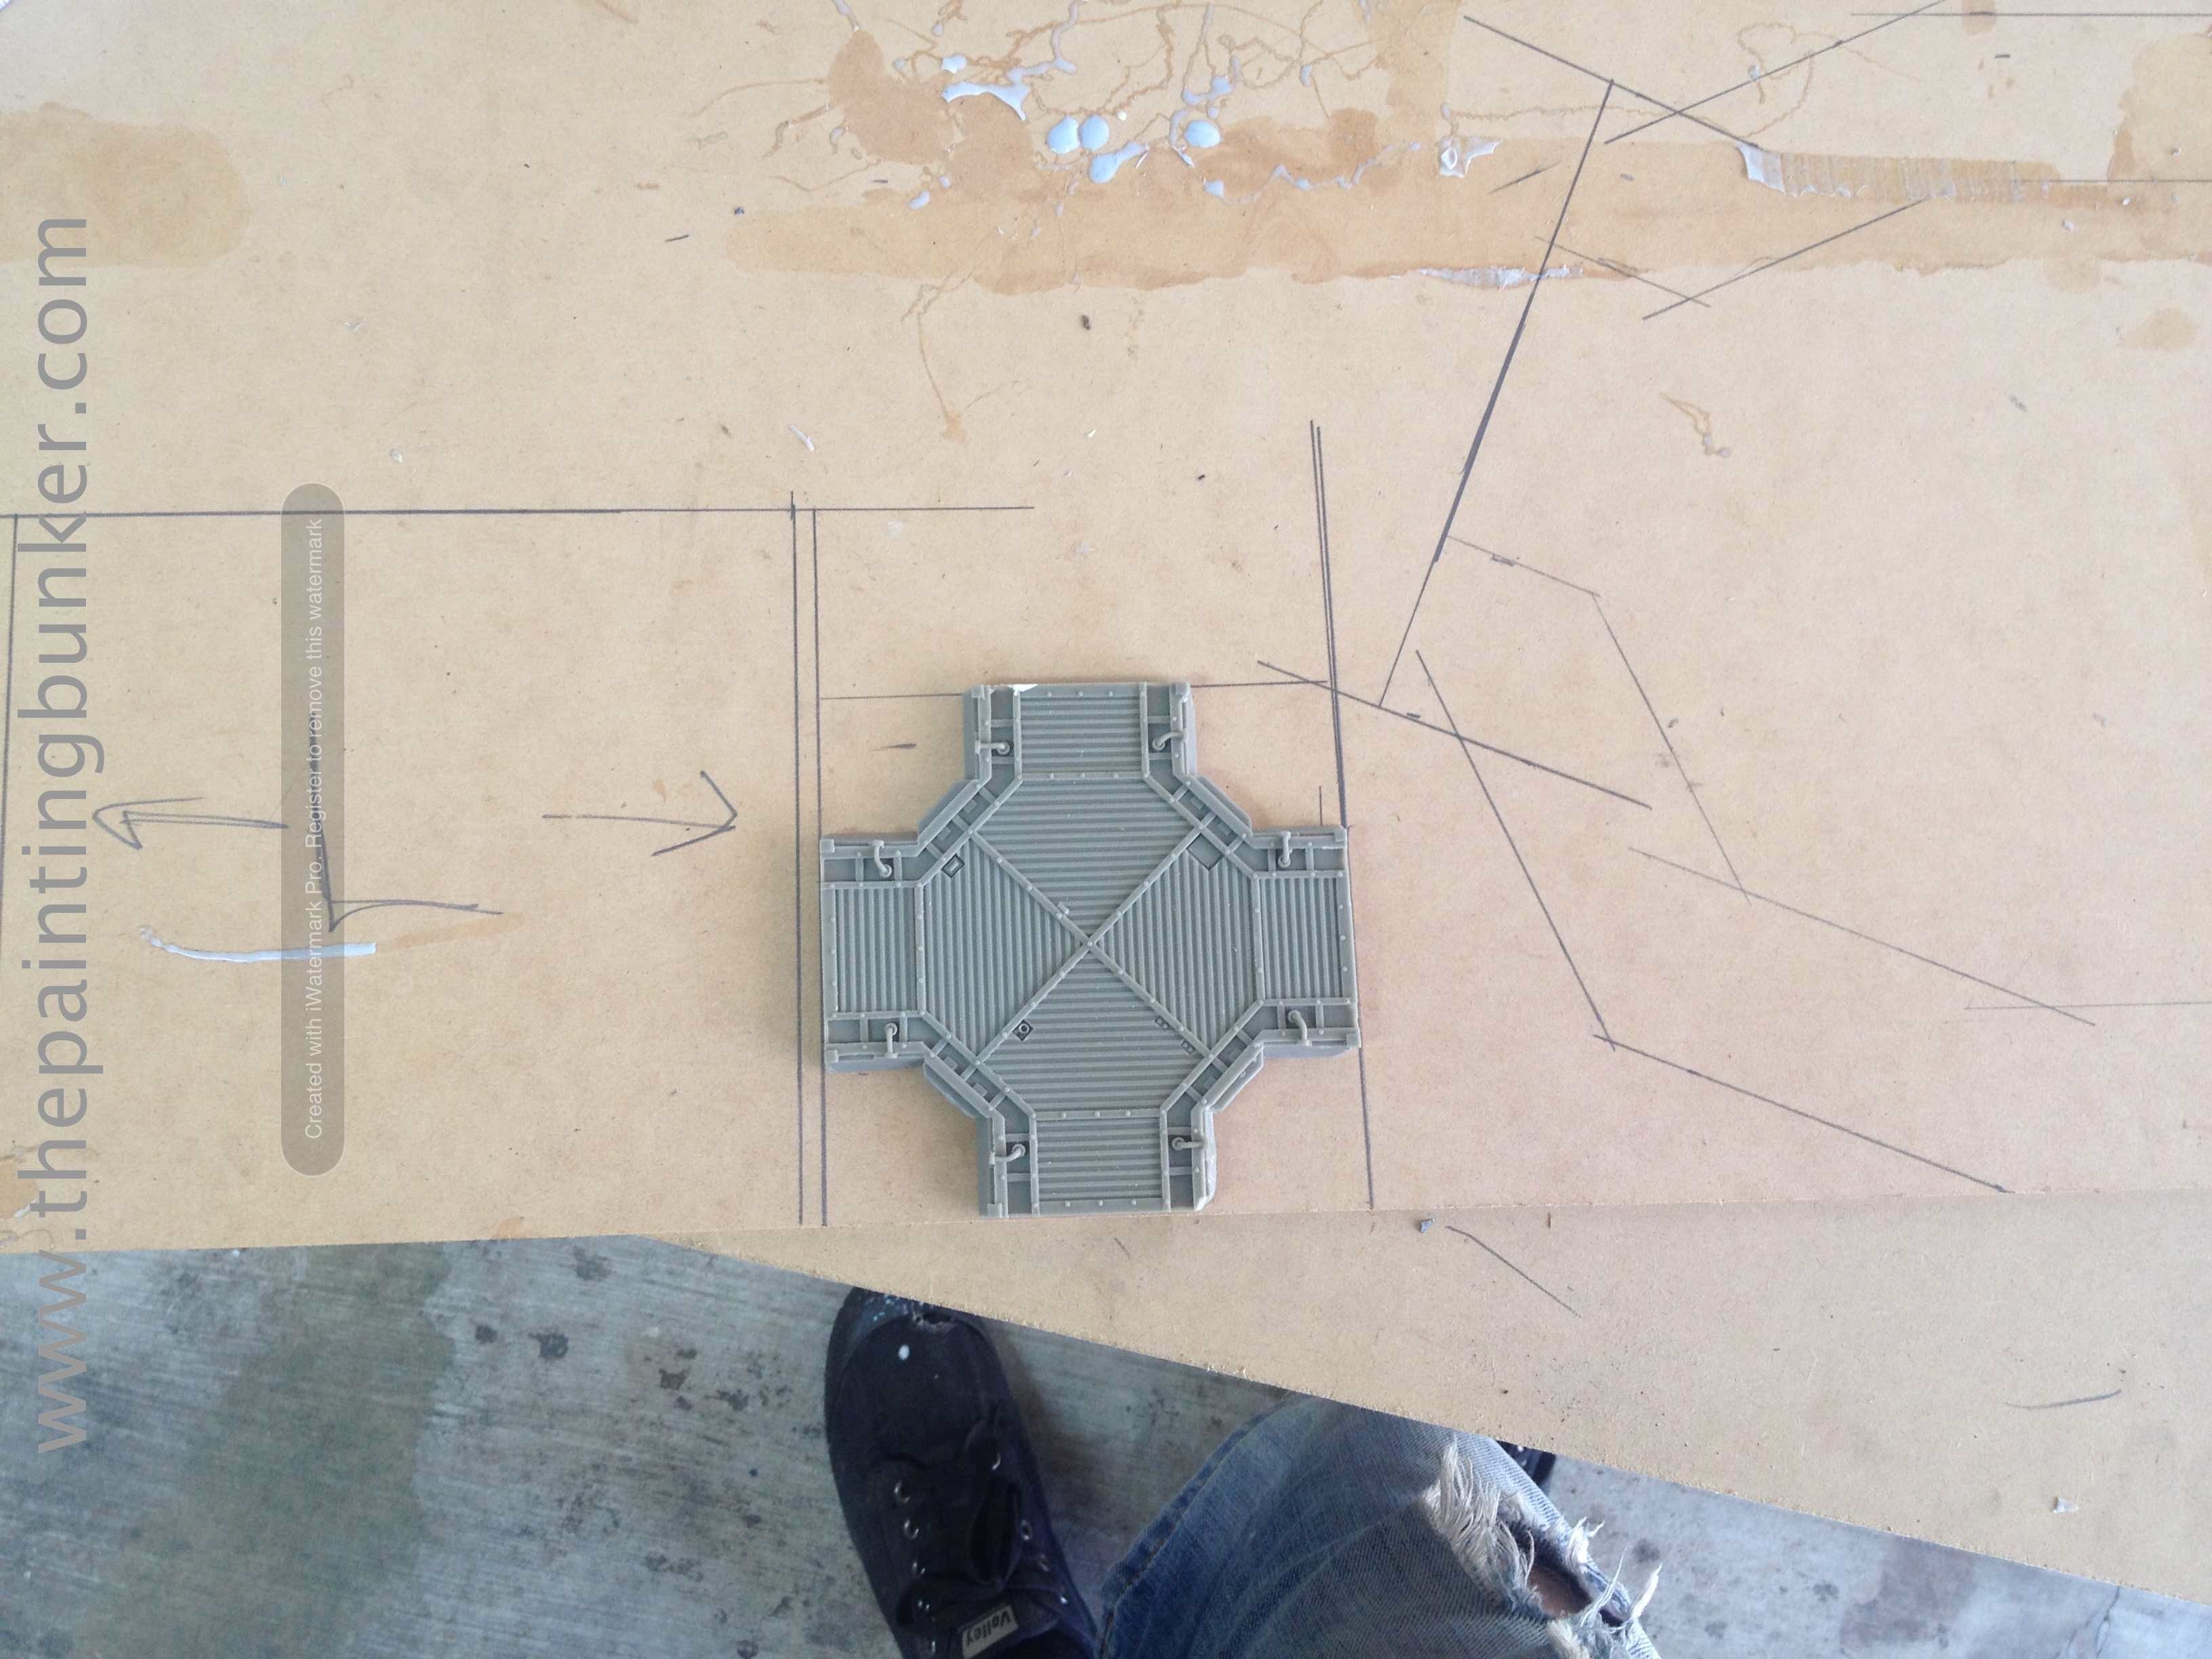
Well, I sort of wanted to do something like that but on a 40k scale. Seeing as I had some left over bits from my Anphelion Base I decided to go with that. Something I was really anxious to try out was to make a 40k scale one of these… I think its a Forge World bunker of sorts for Epic scale. You can see it in the picture above too.
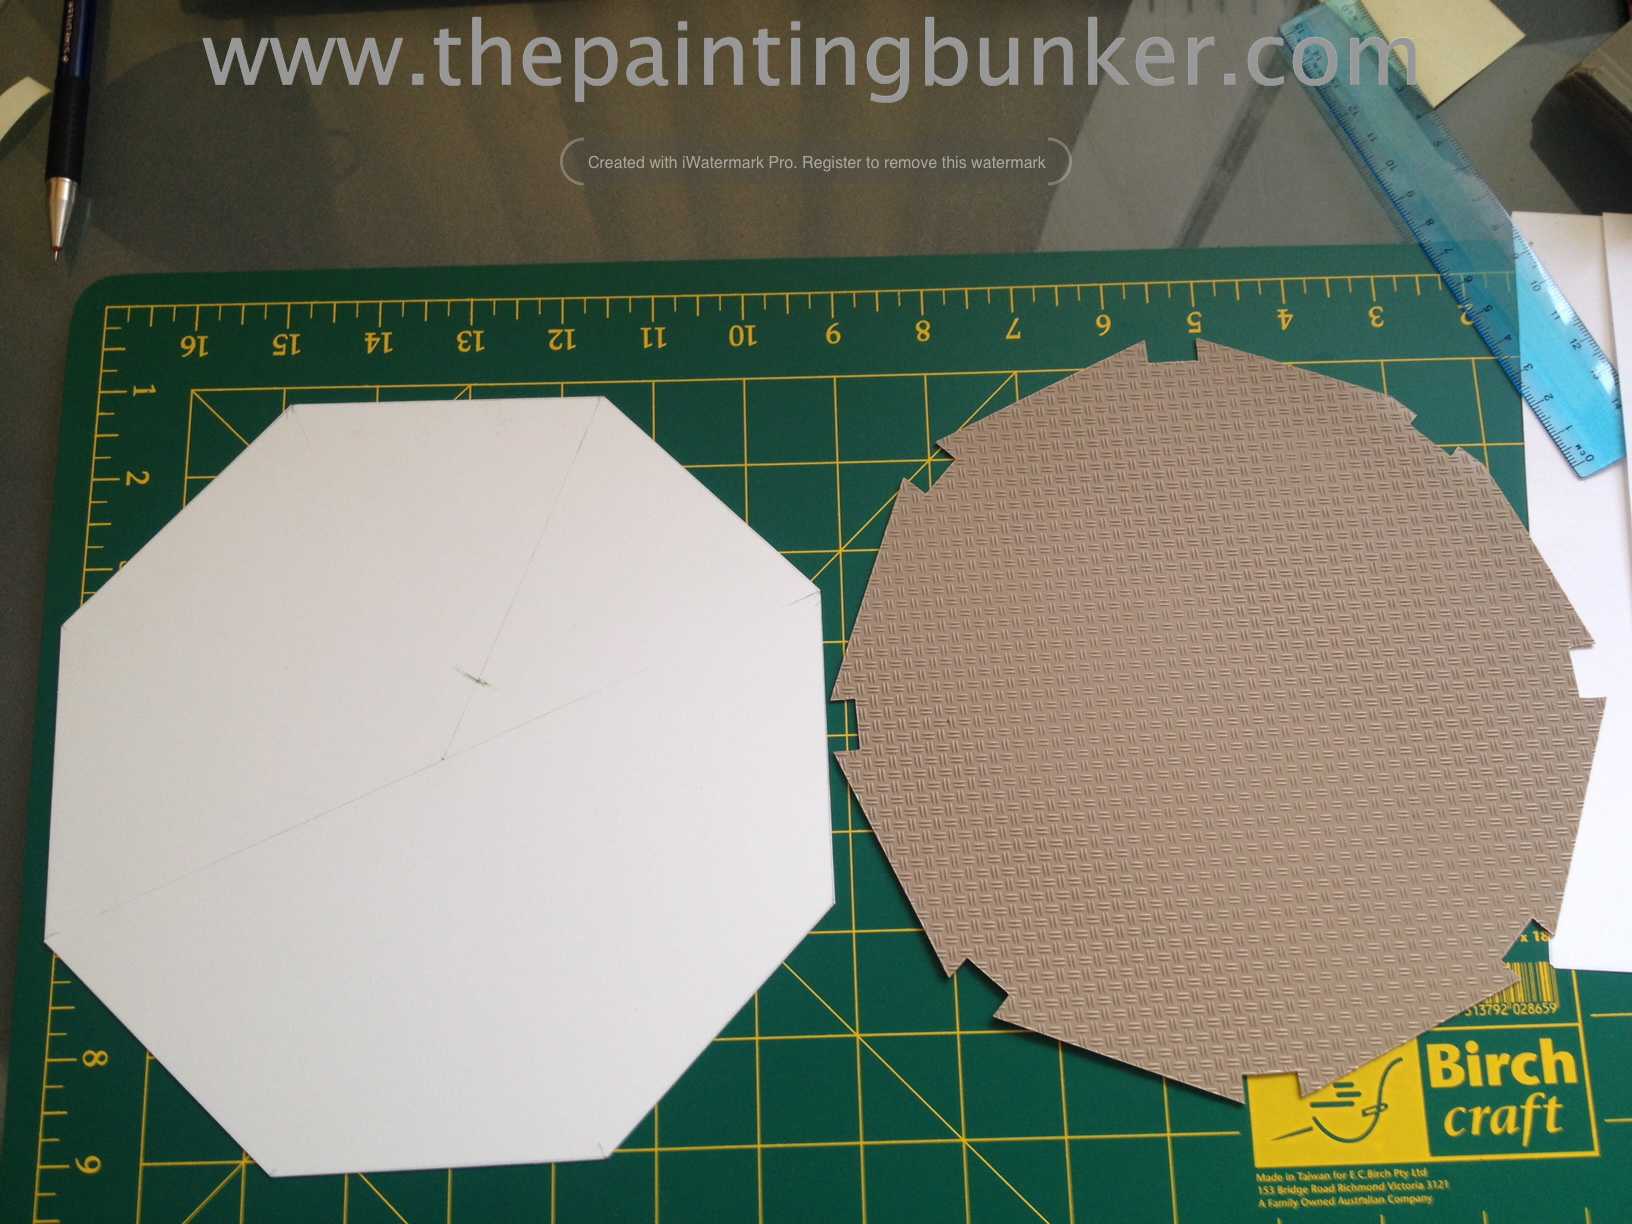
Its the thing on the left hand side. The first thing I did was got out the old drafting kit from way back in the day and draw out a scale version of what I wanted to make, and then cut out the base plate. I wanted the inside to be made out of tread plate, so I cut two bases. One in the actual tread plate, and the other in just 1mm thick plastic card. To give it stability.
Here you can see the two bottom plates. Next I glued them together.
The bottom one is slightly larger to accommodate the exterior walls.
Not being happy with just a nice tread plate interior floor, I decided to add some detail. I don’t know what you’d call the detail that I added, but it looks cool…
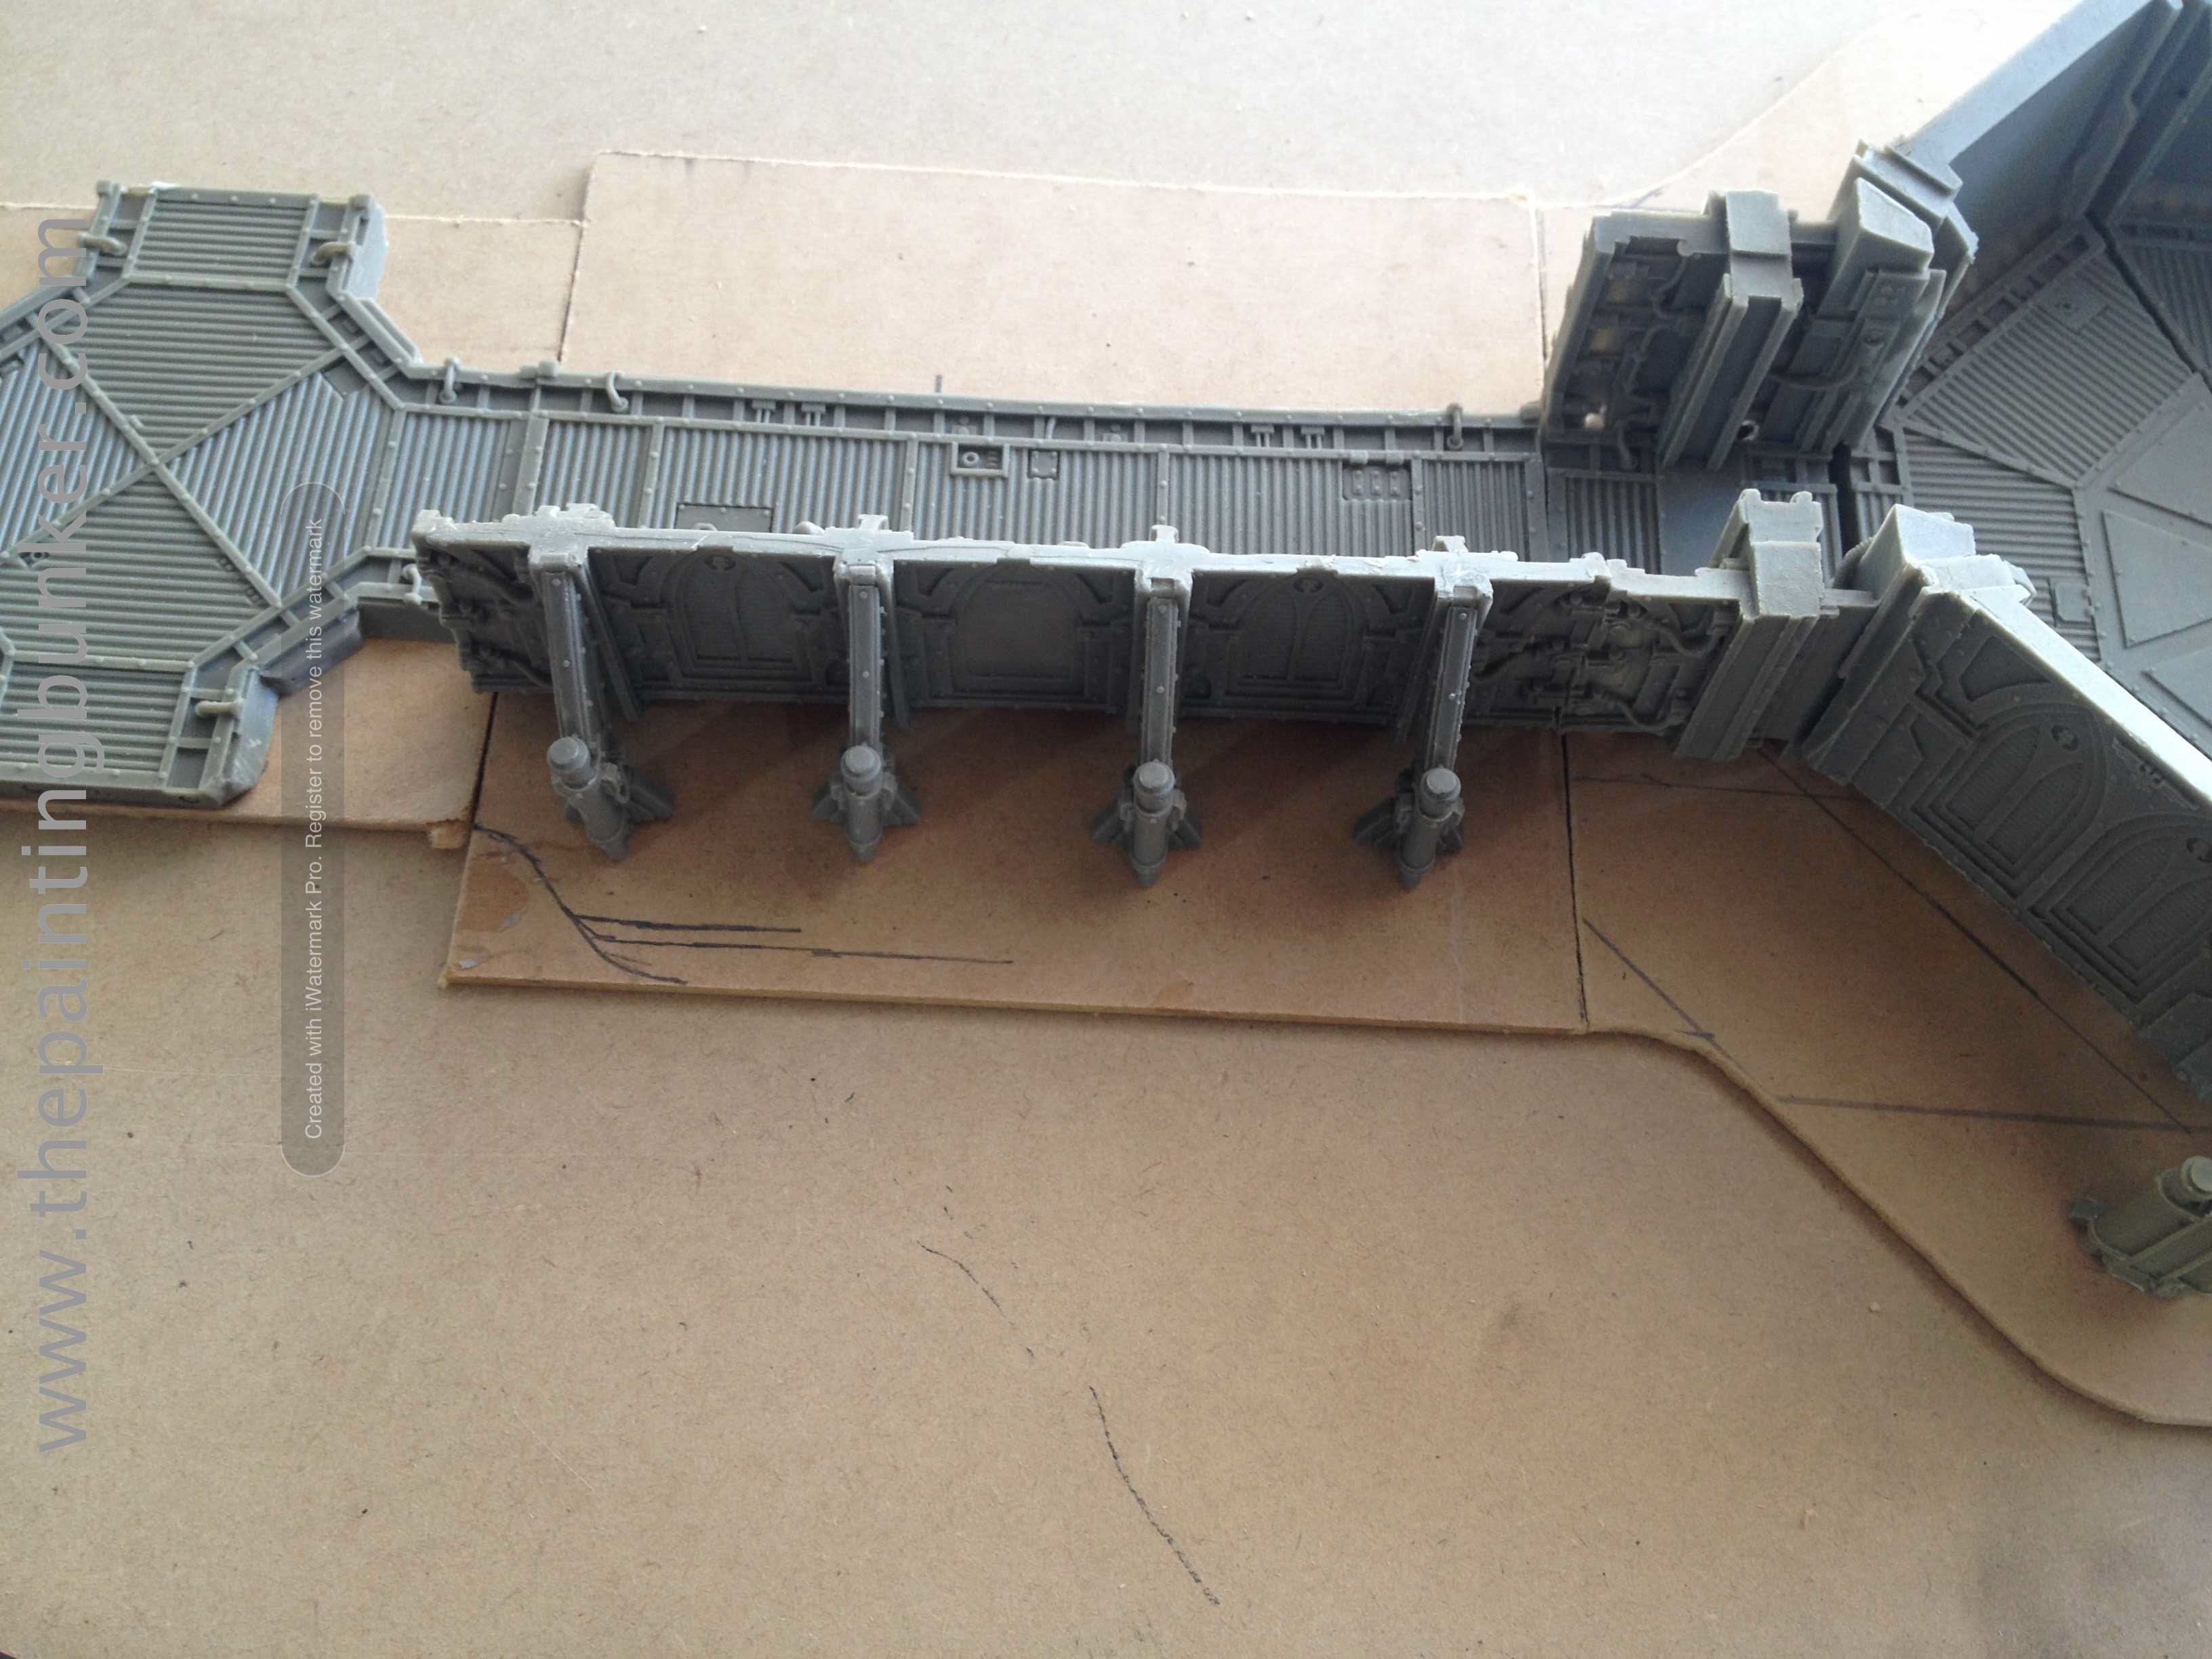
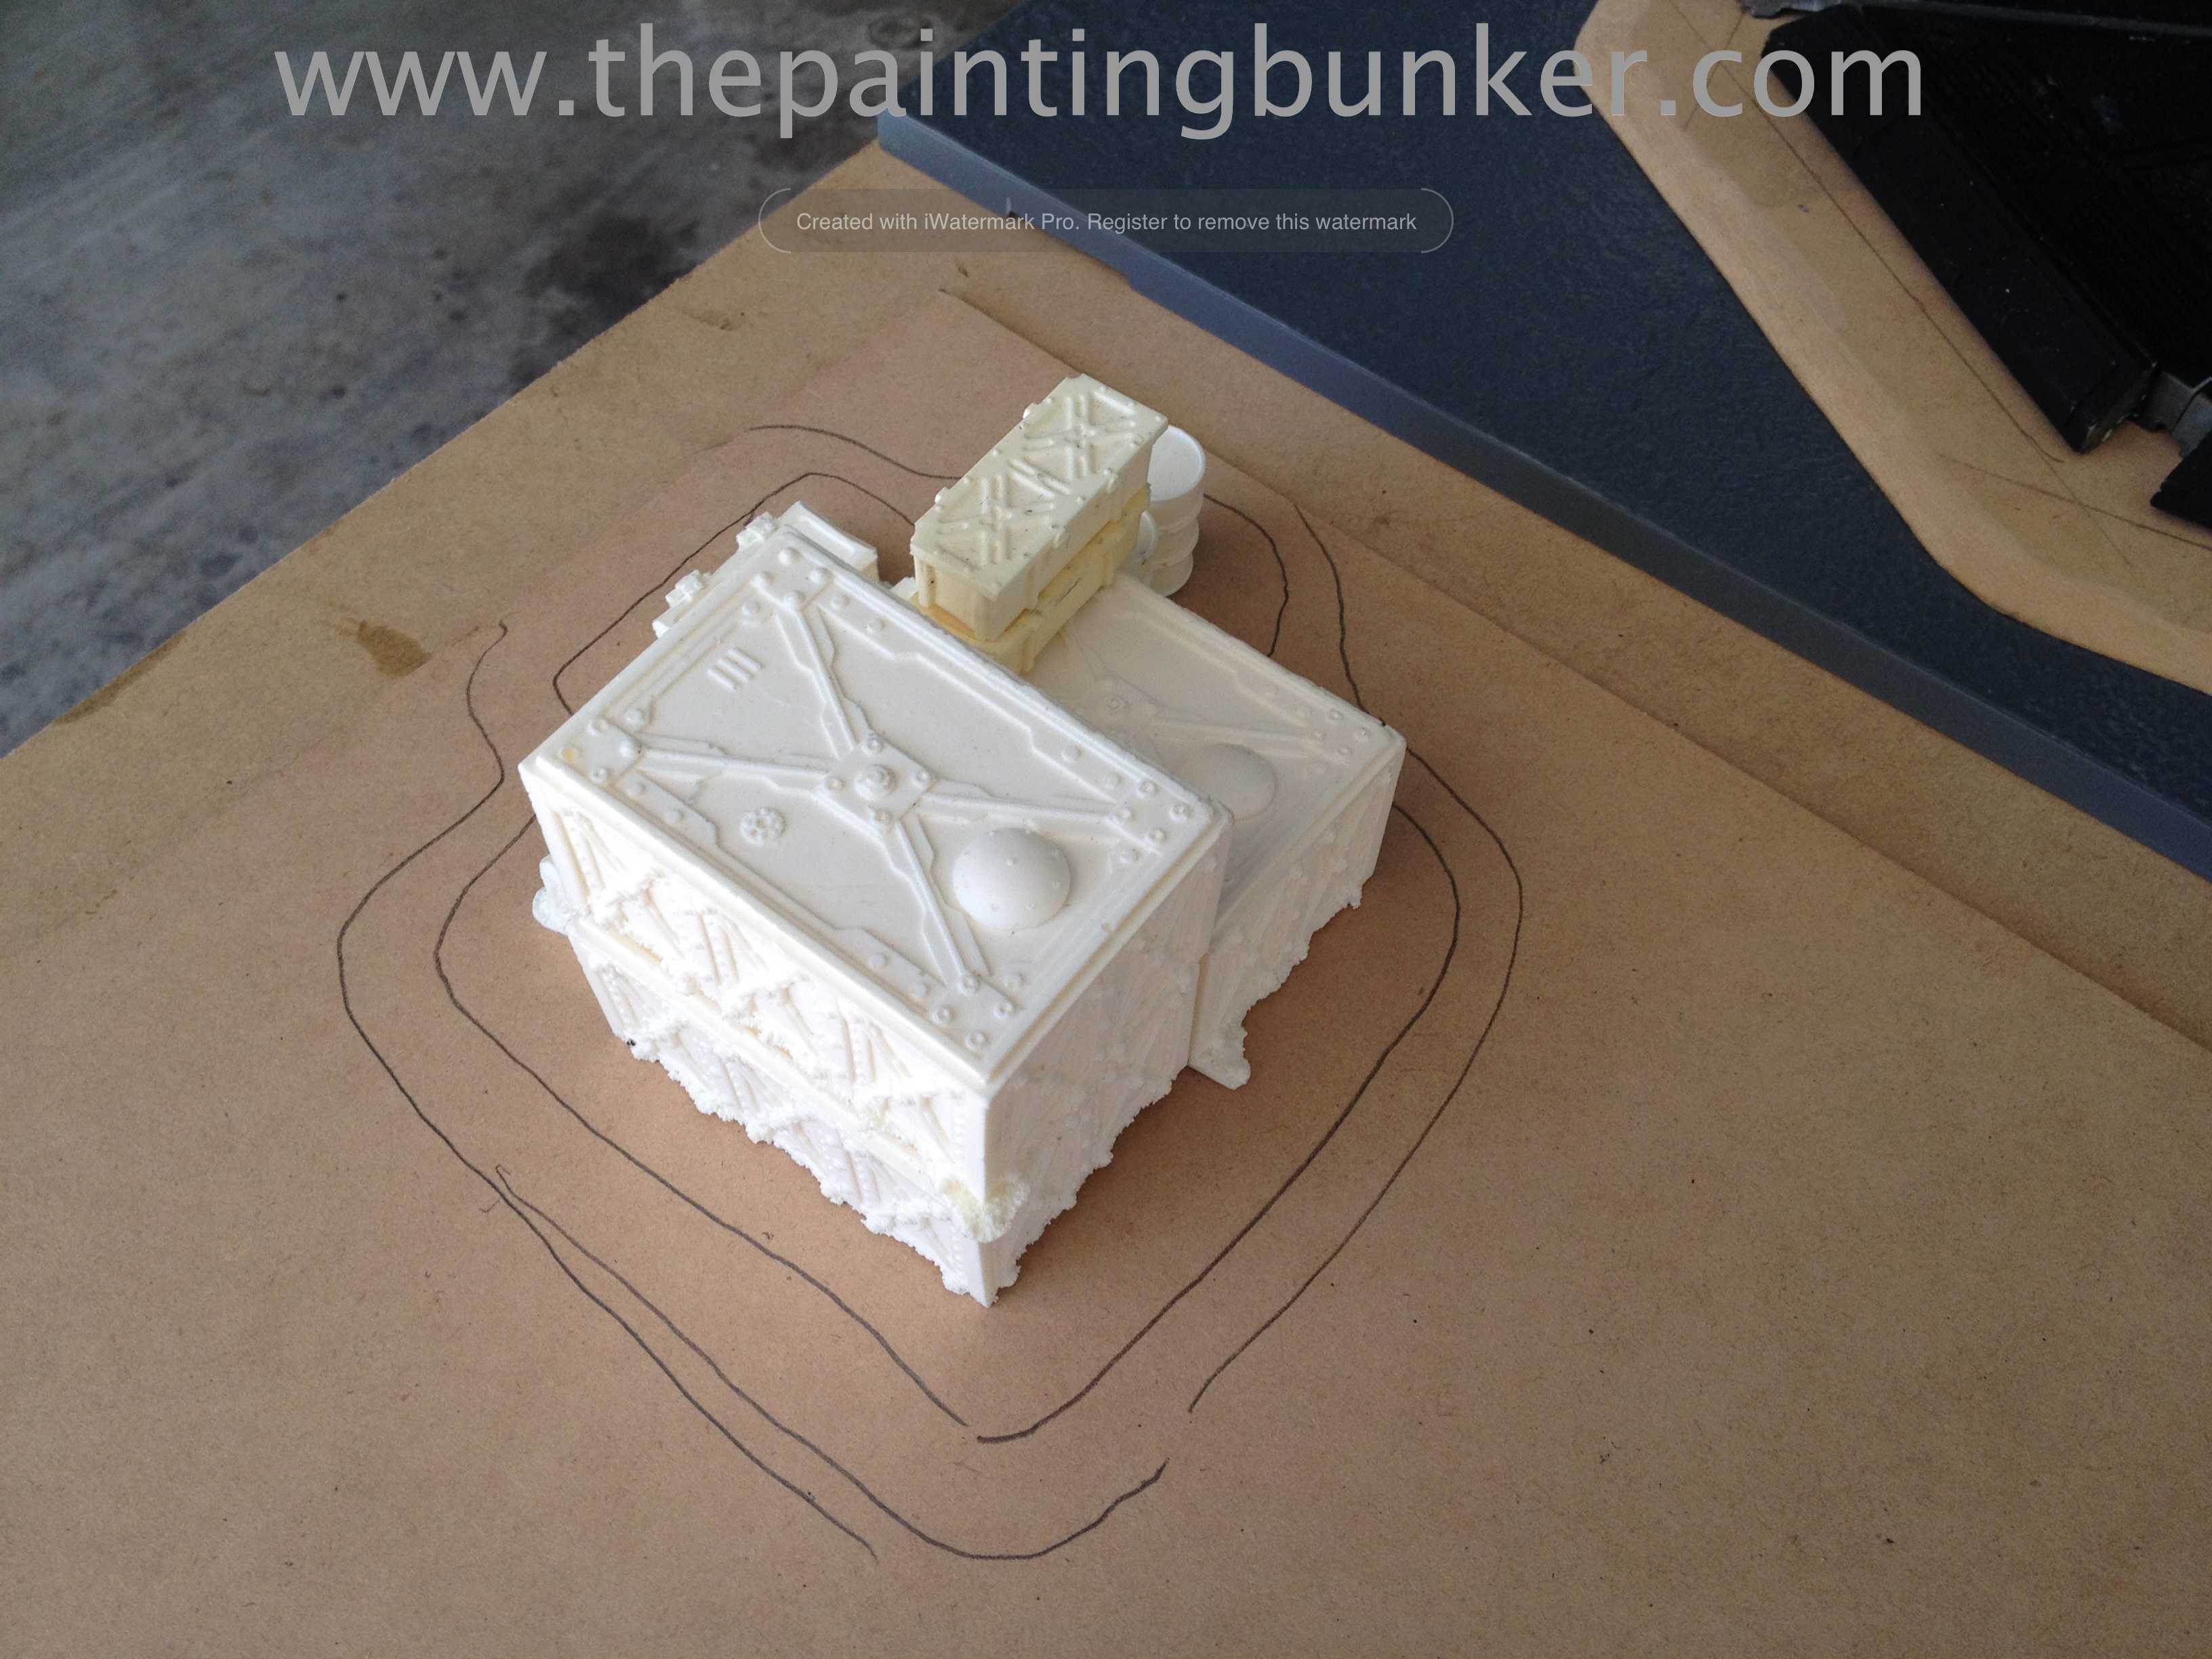
Next up came the roof. Now, I see this as a control tower of sorts. So instead of having the top of the roof just end, like the Epic scale model. I wanted to have antenna etc sticking out of the top. So I modified a Rhino Razorback weapon mount to accommodate the antenna. The centre piece is a 40mm piece of PVC plumbing pipe (I think).
Just adding the roof panels. Very tedious…
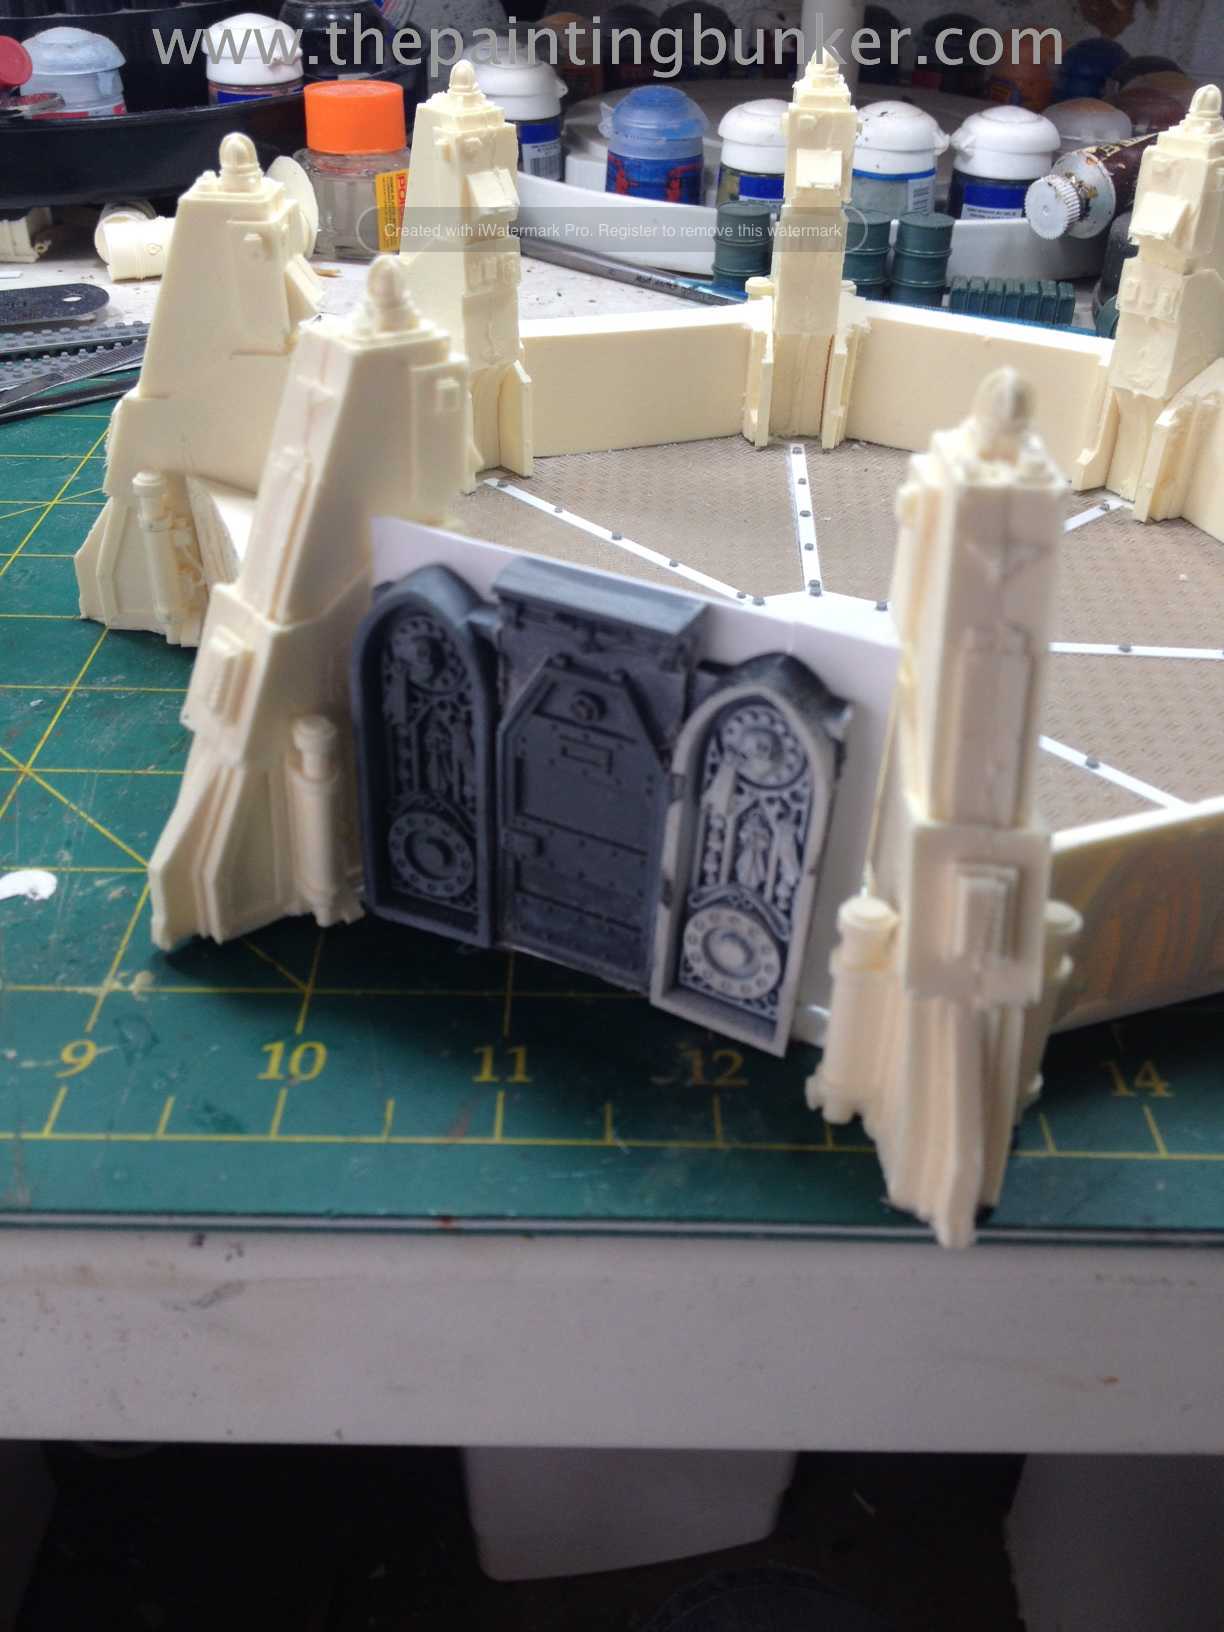
The door. The parts are from the engine of the Baneblade and a door from the Imperial Bastion fortification.
Its starting to look like an actual building now. I wanted the roof to come off to make putting models inside a lot easier. I did detail up the interior panels, however I forgot the take photos of them. You’ll see what it looks like inside when I do the final shots.
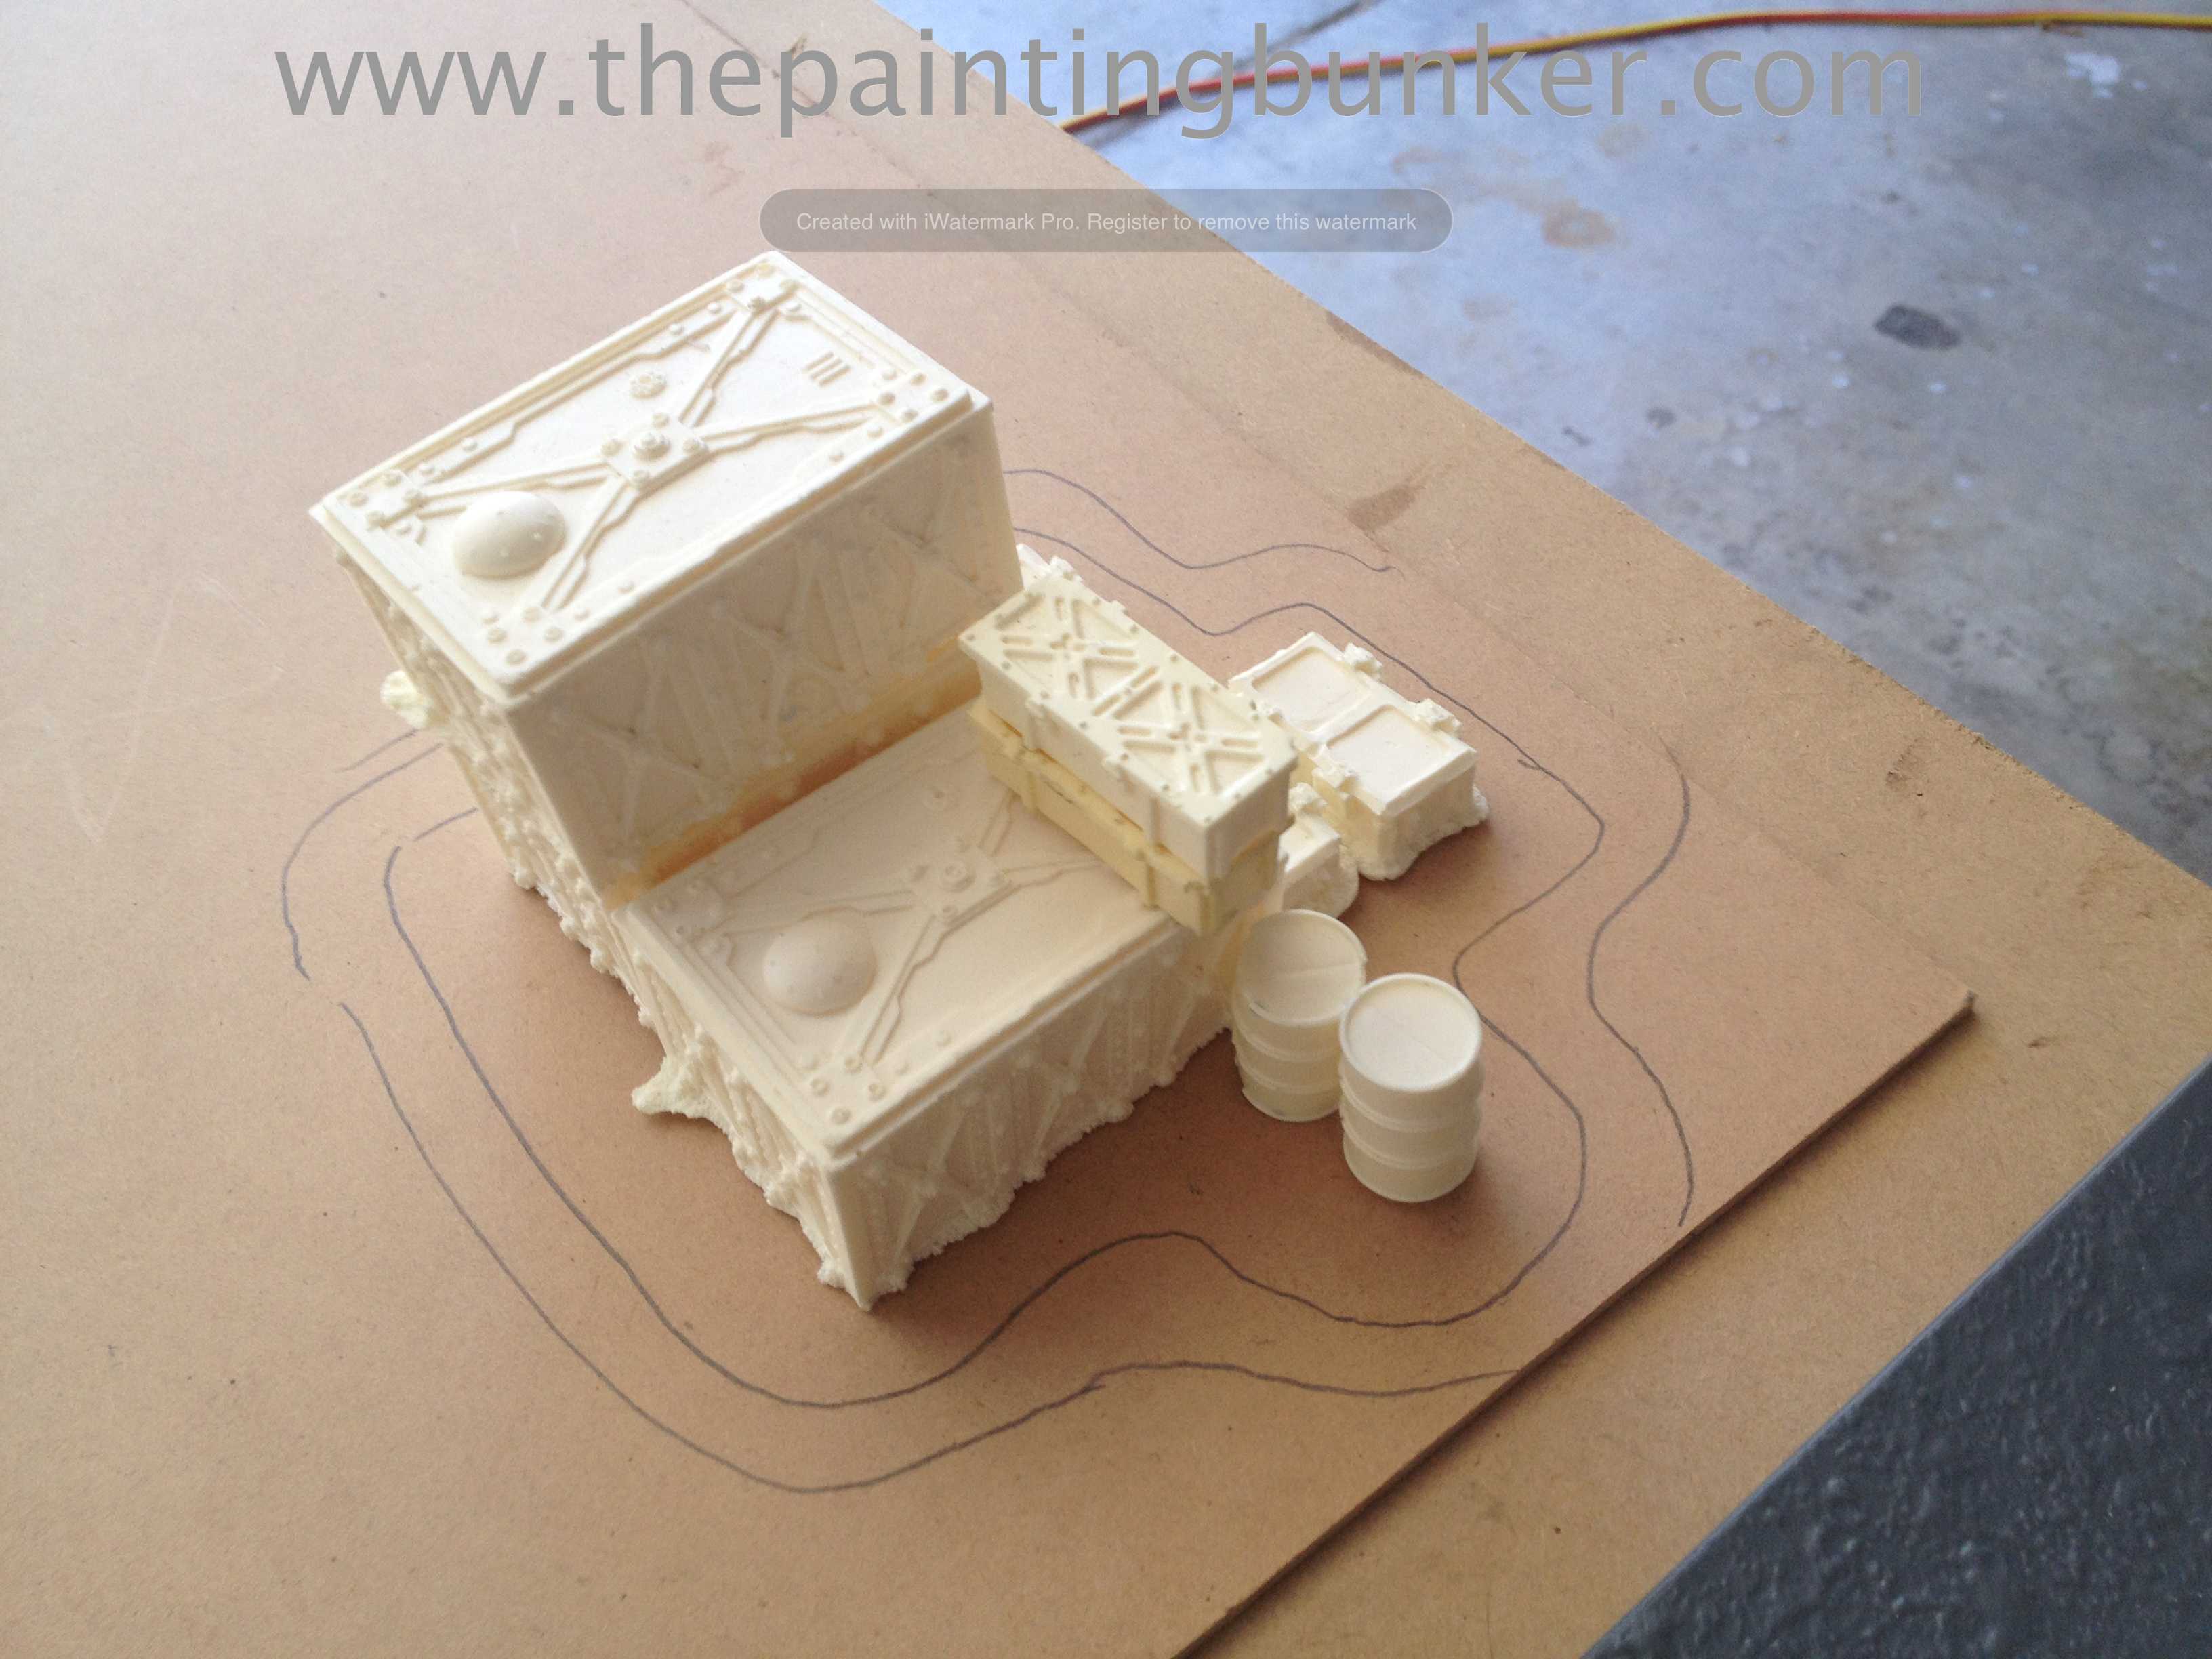
There you have it! You’ll notice the small grey rivets. They’re actually a military modelling detail kit I found while wandering aimlessly through a hobby store a few months ago. They are nuts and bolts that come on a strip and you just cut them off and glue them on. It’s a nice touch.
So there you have it. Building one complete. Well, mostly. Next up I’ll show you how I made the bulk fuel storage container. (think 150mm diameter piece of PVC pipe covered in rivets)
I’ve actually finished painting this board however I’ve just gotten my act together to show you what I’ve been upto. So I don’t intend on drawing this out into 6ish posts, probably just 2-3. I don’t want to overwhelm you, you see…
Welcome back to another Anphelion Base update. Things are getting pretty serious now! The models been cleaned and assembled (years of therapy ahead over that one). It’s been based and undercoated, then the interior was painted. Its now time to mask the interior and begin to paint the exterior.
First up, masking
The photos of this stage will be fairly self explanatory, so I’ll dispense with the commentary
A pretty light on post. I didn’t want to spend too much time describing what is essentially sticking tape to a model then spraying it. However what I will say is that the model isn’t going to be brown. This is the undercoat. I’ll be using the hairspray technique as one of the weathering stages of this model. But that will be in the next post…
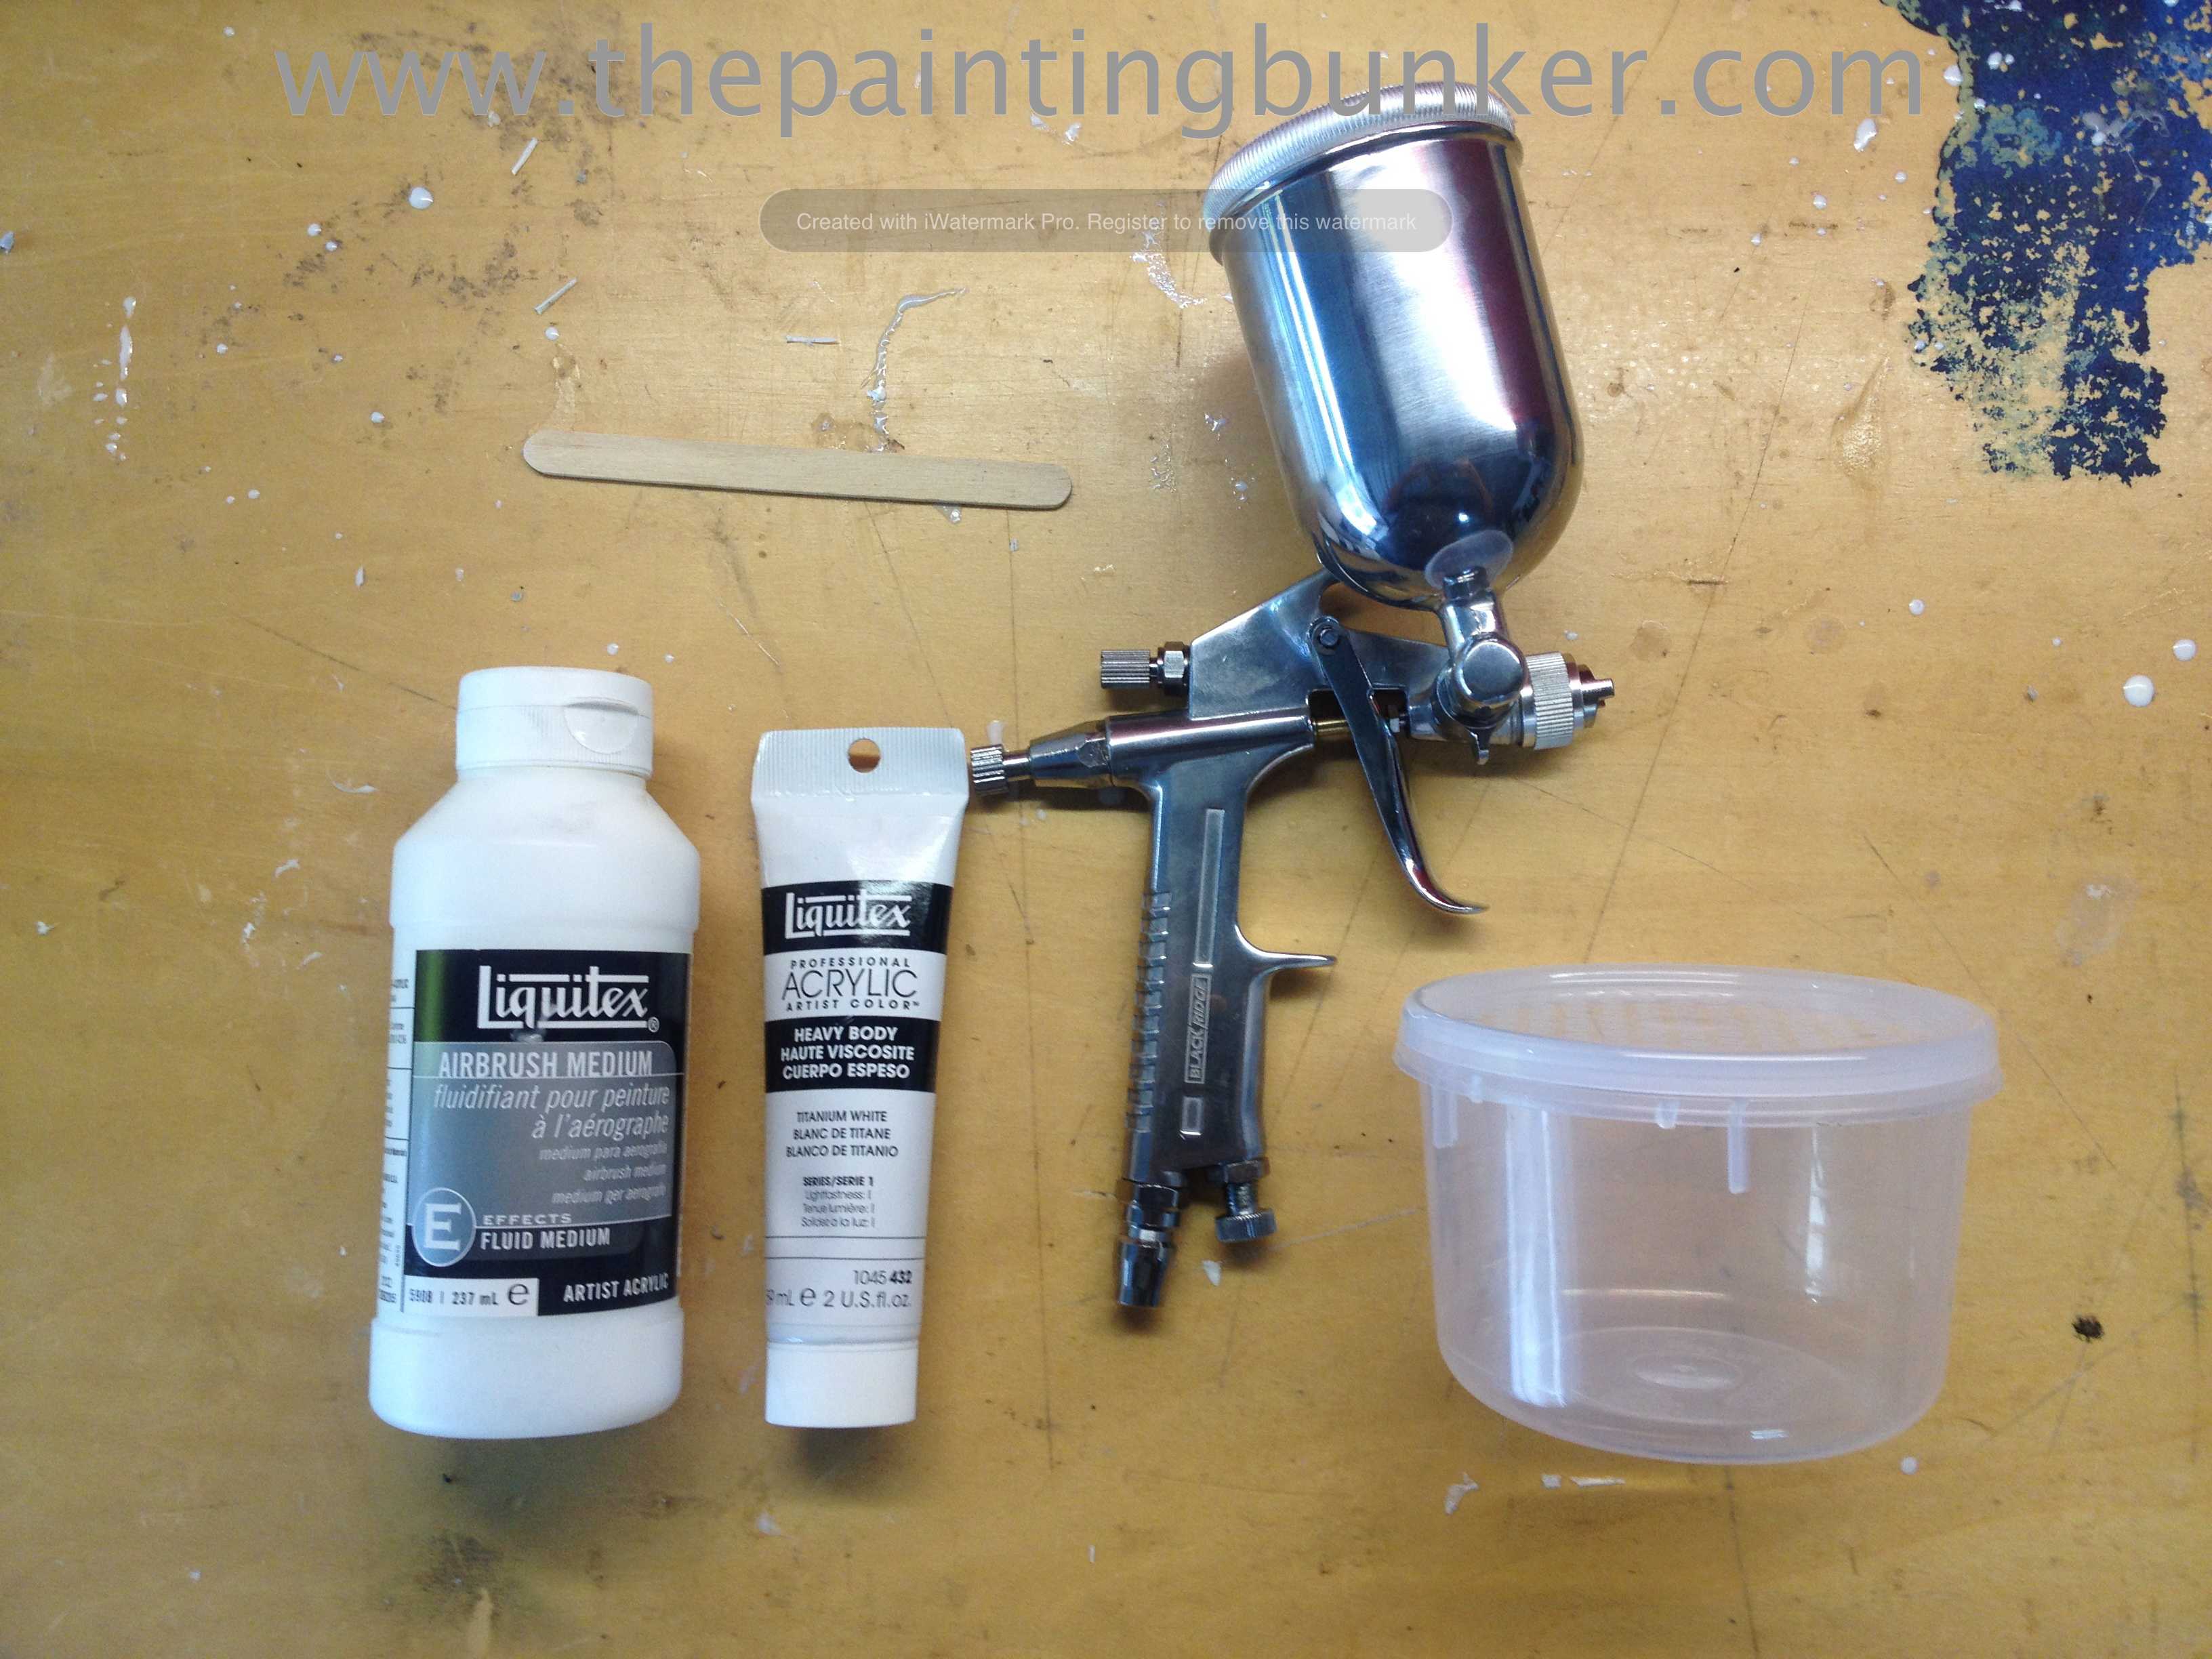
With undercoating complete, its now time to get down to business. I always knew this was going to be a big job. From previous experience making scenery I knew that I had to do a few things a bit differently painting wise to last time. I ran up a small fortune in paint. Using those little Citadel paints to paint huge pieces of scenery is not only tedious but also very expensive. Also, modelling airbrushes are just not designed to paint large amounts of flat surfaces, they lack the paint capacity.
So, off I went to my local art store to investigate other possibilities paint wise, and to my local automotive store to look at other methods of paint application. Below is a photo of what I came up with.
I’ve actually used Liquitex paints before. Back in my Vinyl 1/4 action hero painting days. They’re very high quality and also importantly, affordable. In addition, they also have a range of additive for their paints. Gel mediums, matte and gloss varnishes etc, plus as you can see in the picture, an airbrush medium. I thought I’d give it a shot. I also purchased a HPLV touch up spray gun from the automotive store. It has a 100ml reservoir, much better than my airbrushes 10ml.
A close up of the paint and airbrush medium for those of you who like specifics.
So I purchased a few containers from the local supermarket and got mixing. I made up about 100ml, didn’t really know how much I’d actually need, but this seemed like a lot!
So after a bit of wrestling with the paint gun this is what I came up with. The airbrush medium was ok, however I found that it really helped if I added some mentholated sprits to the mix. The alcohol helps application as it evaporates quicker than the airbrush medium and therefore assists in paint coverage. Overall very happy with the results.
Just a bit of cutting in with a brown ink
More cutting in of the wall panels… it was a tedious job.
As you know, my plan for this base is that its been abandoned. Therefore I want the internals, and externals to be very weathered and decrepit after decades (centuries) of neglect.
After a quick gloss varnish, I applied some oil paints to complete the effect.
A close up of a ‘pod’ or whatever they’re called. As you can see, it pretty derelict (derelicte)
I’m pretty happy with how this is coming along. My next step is the mask up all of the interior surfaces and get ready for painting the exterior. This is going to be a massive job.
Ok, thats it for now. Until next time, thanks for dropping in
Well, I finished off these recently. I’m actually very happy with the outcome. As I mentioned in my pervious post, this is something that I’ve wanted to do for some time now. Just seems like a novel idea. They’re now molded and cast. The originals are kept in storage, the models in these pictures are casts. As you can see from the pictures I’ve added roman numeral decals to them. I got them from the Space Marine transfer sheet. I’ve done this for the mission in the 6th ed 40k rule book, The Scourging. I figure that once the objectives are placed on the table and just before the game begins, my opponent and I can randomly generate the objective values
ie objective I = 3, II = 2, III = 4, IV = 1, V = 3 and VI = 2. This can be randomly generated each game.
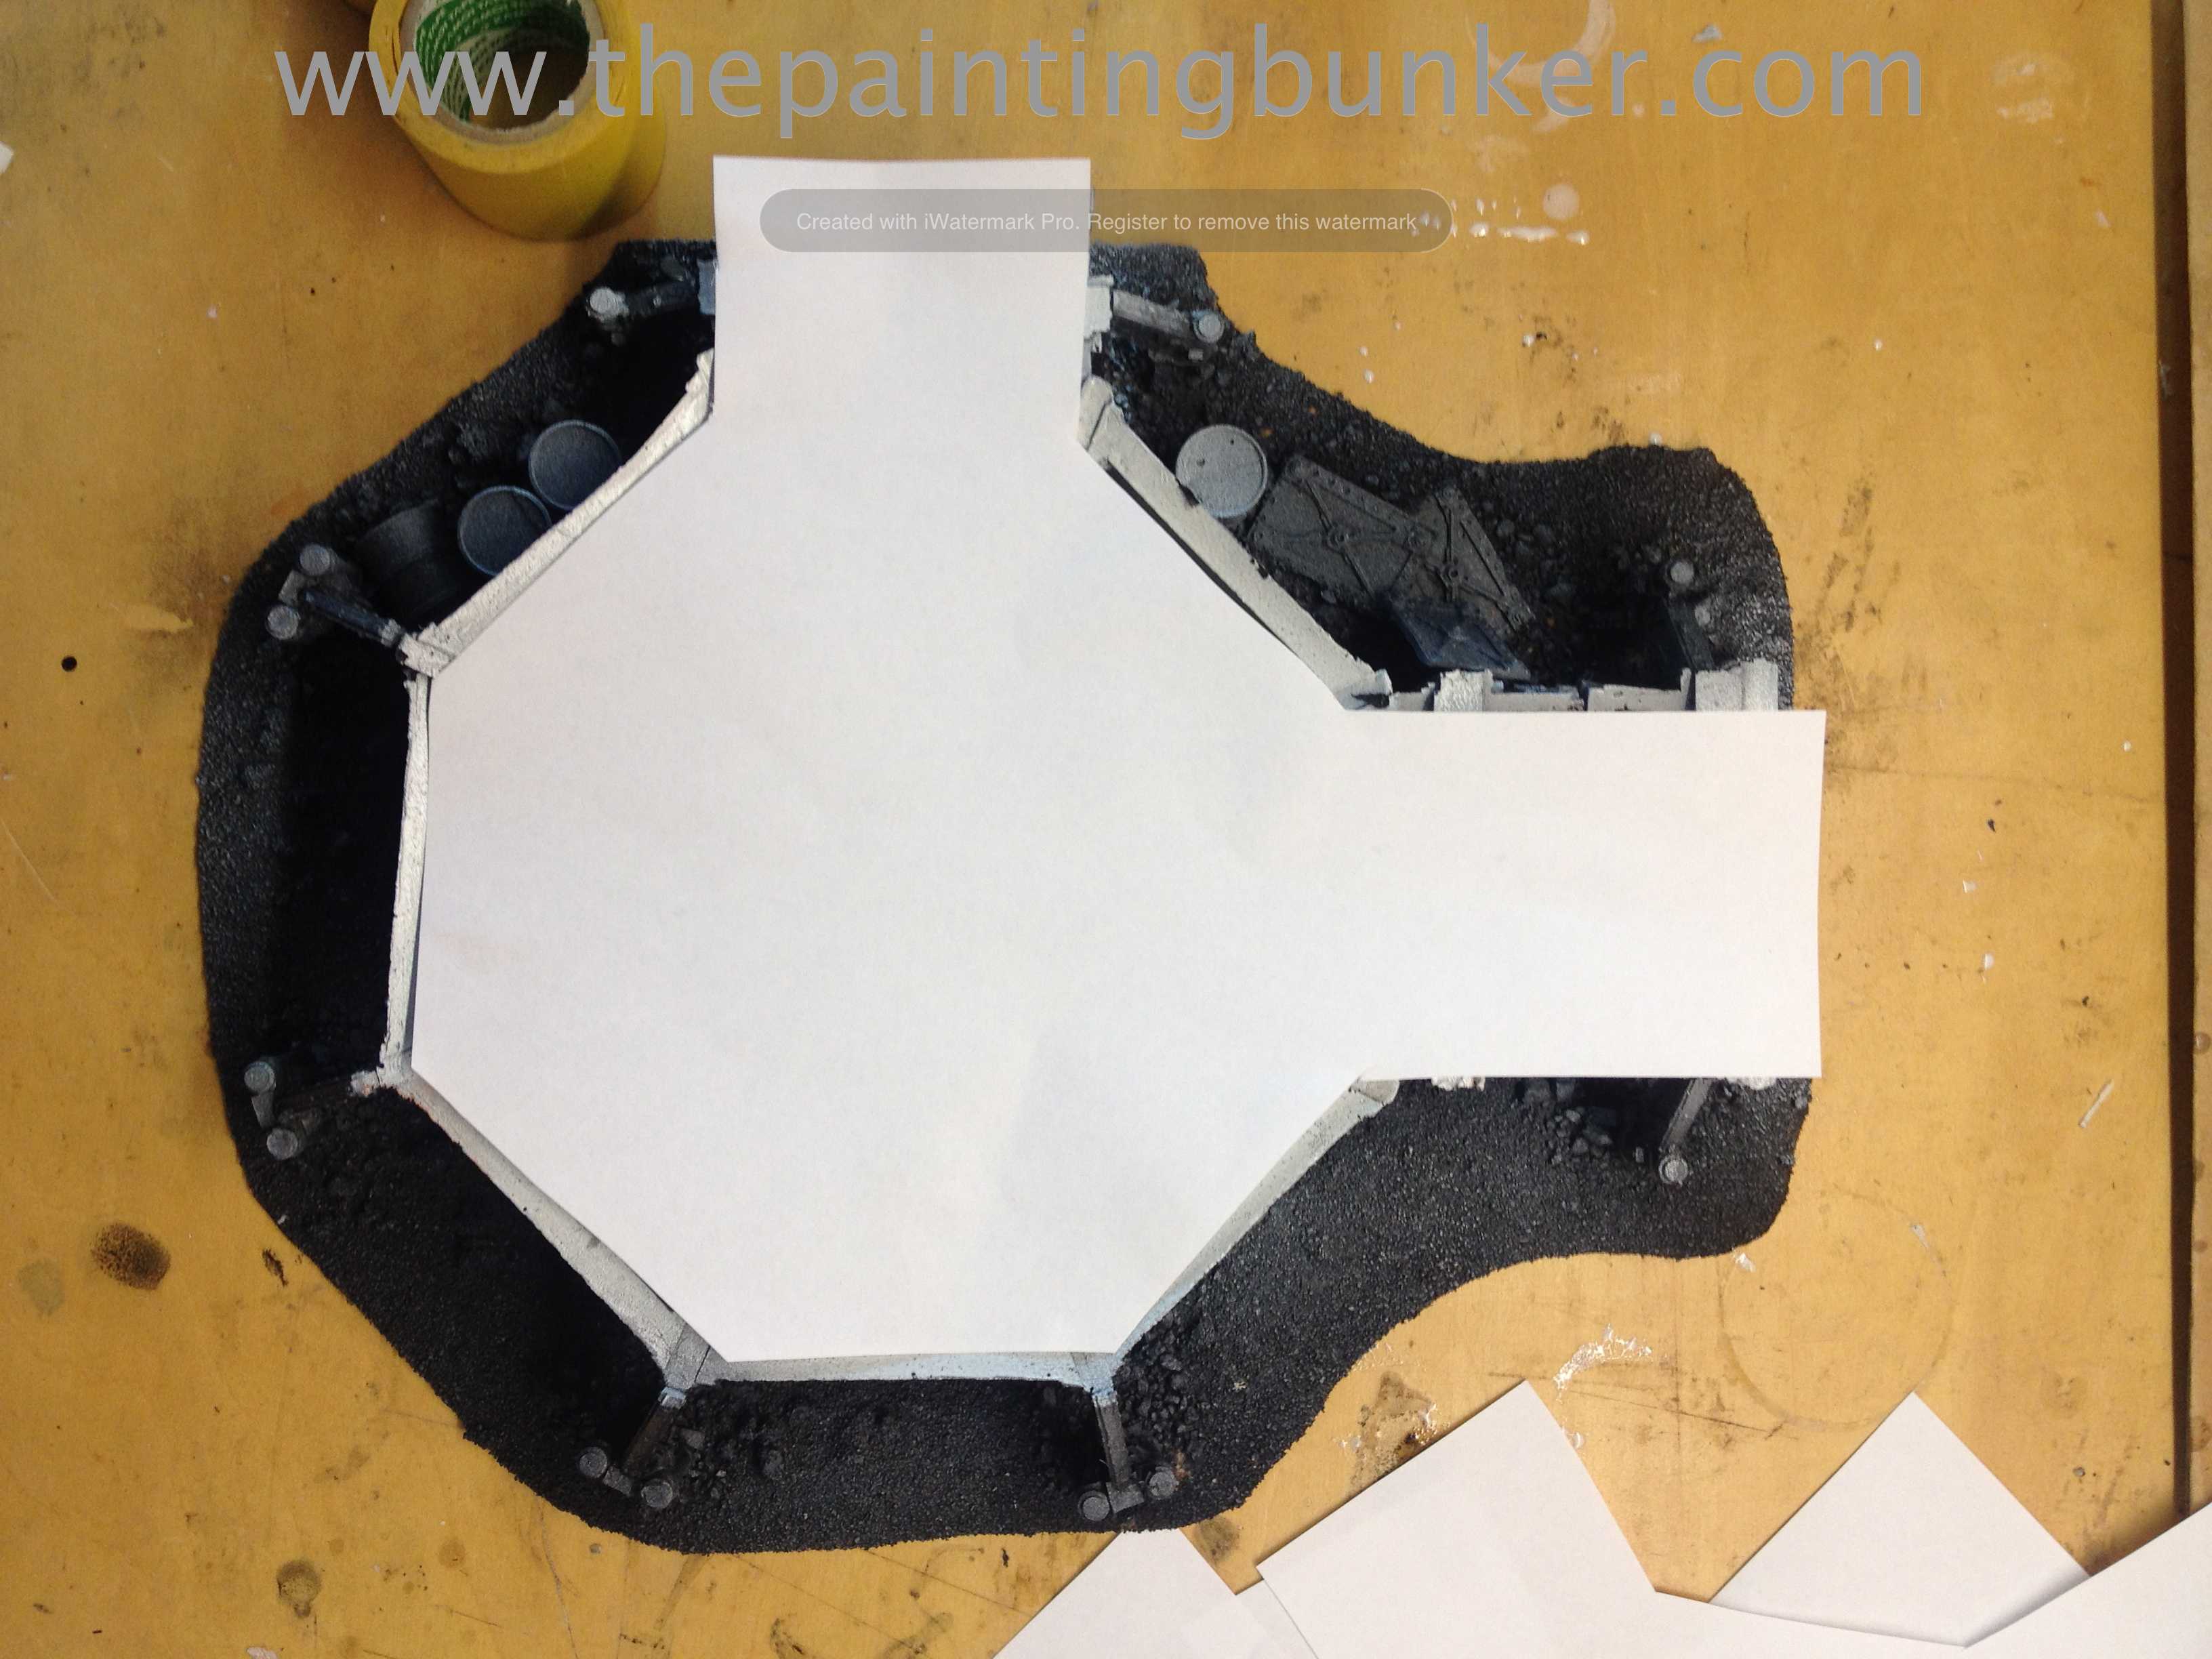
So, this is part two of this project. Basically we’re up to under coating at this stage. Assembly is a distant memory, however I feel that it will haunt me for the rest of my days. It was seriously hard work. A task I’m thankful I’ll probably only ever do once in my life.
Ok, lets get down to business. One thing I really wanted to do to the landing pad is not to have a gap between the ground and the underside of the landing platform. I also wanted to make whatever I put in that gap be suitable and fitting with the character of the base, and finally, be simple and easy to produce (I’m quite a lazy bugger you see)
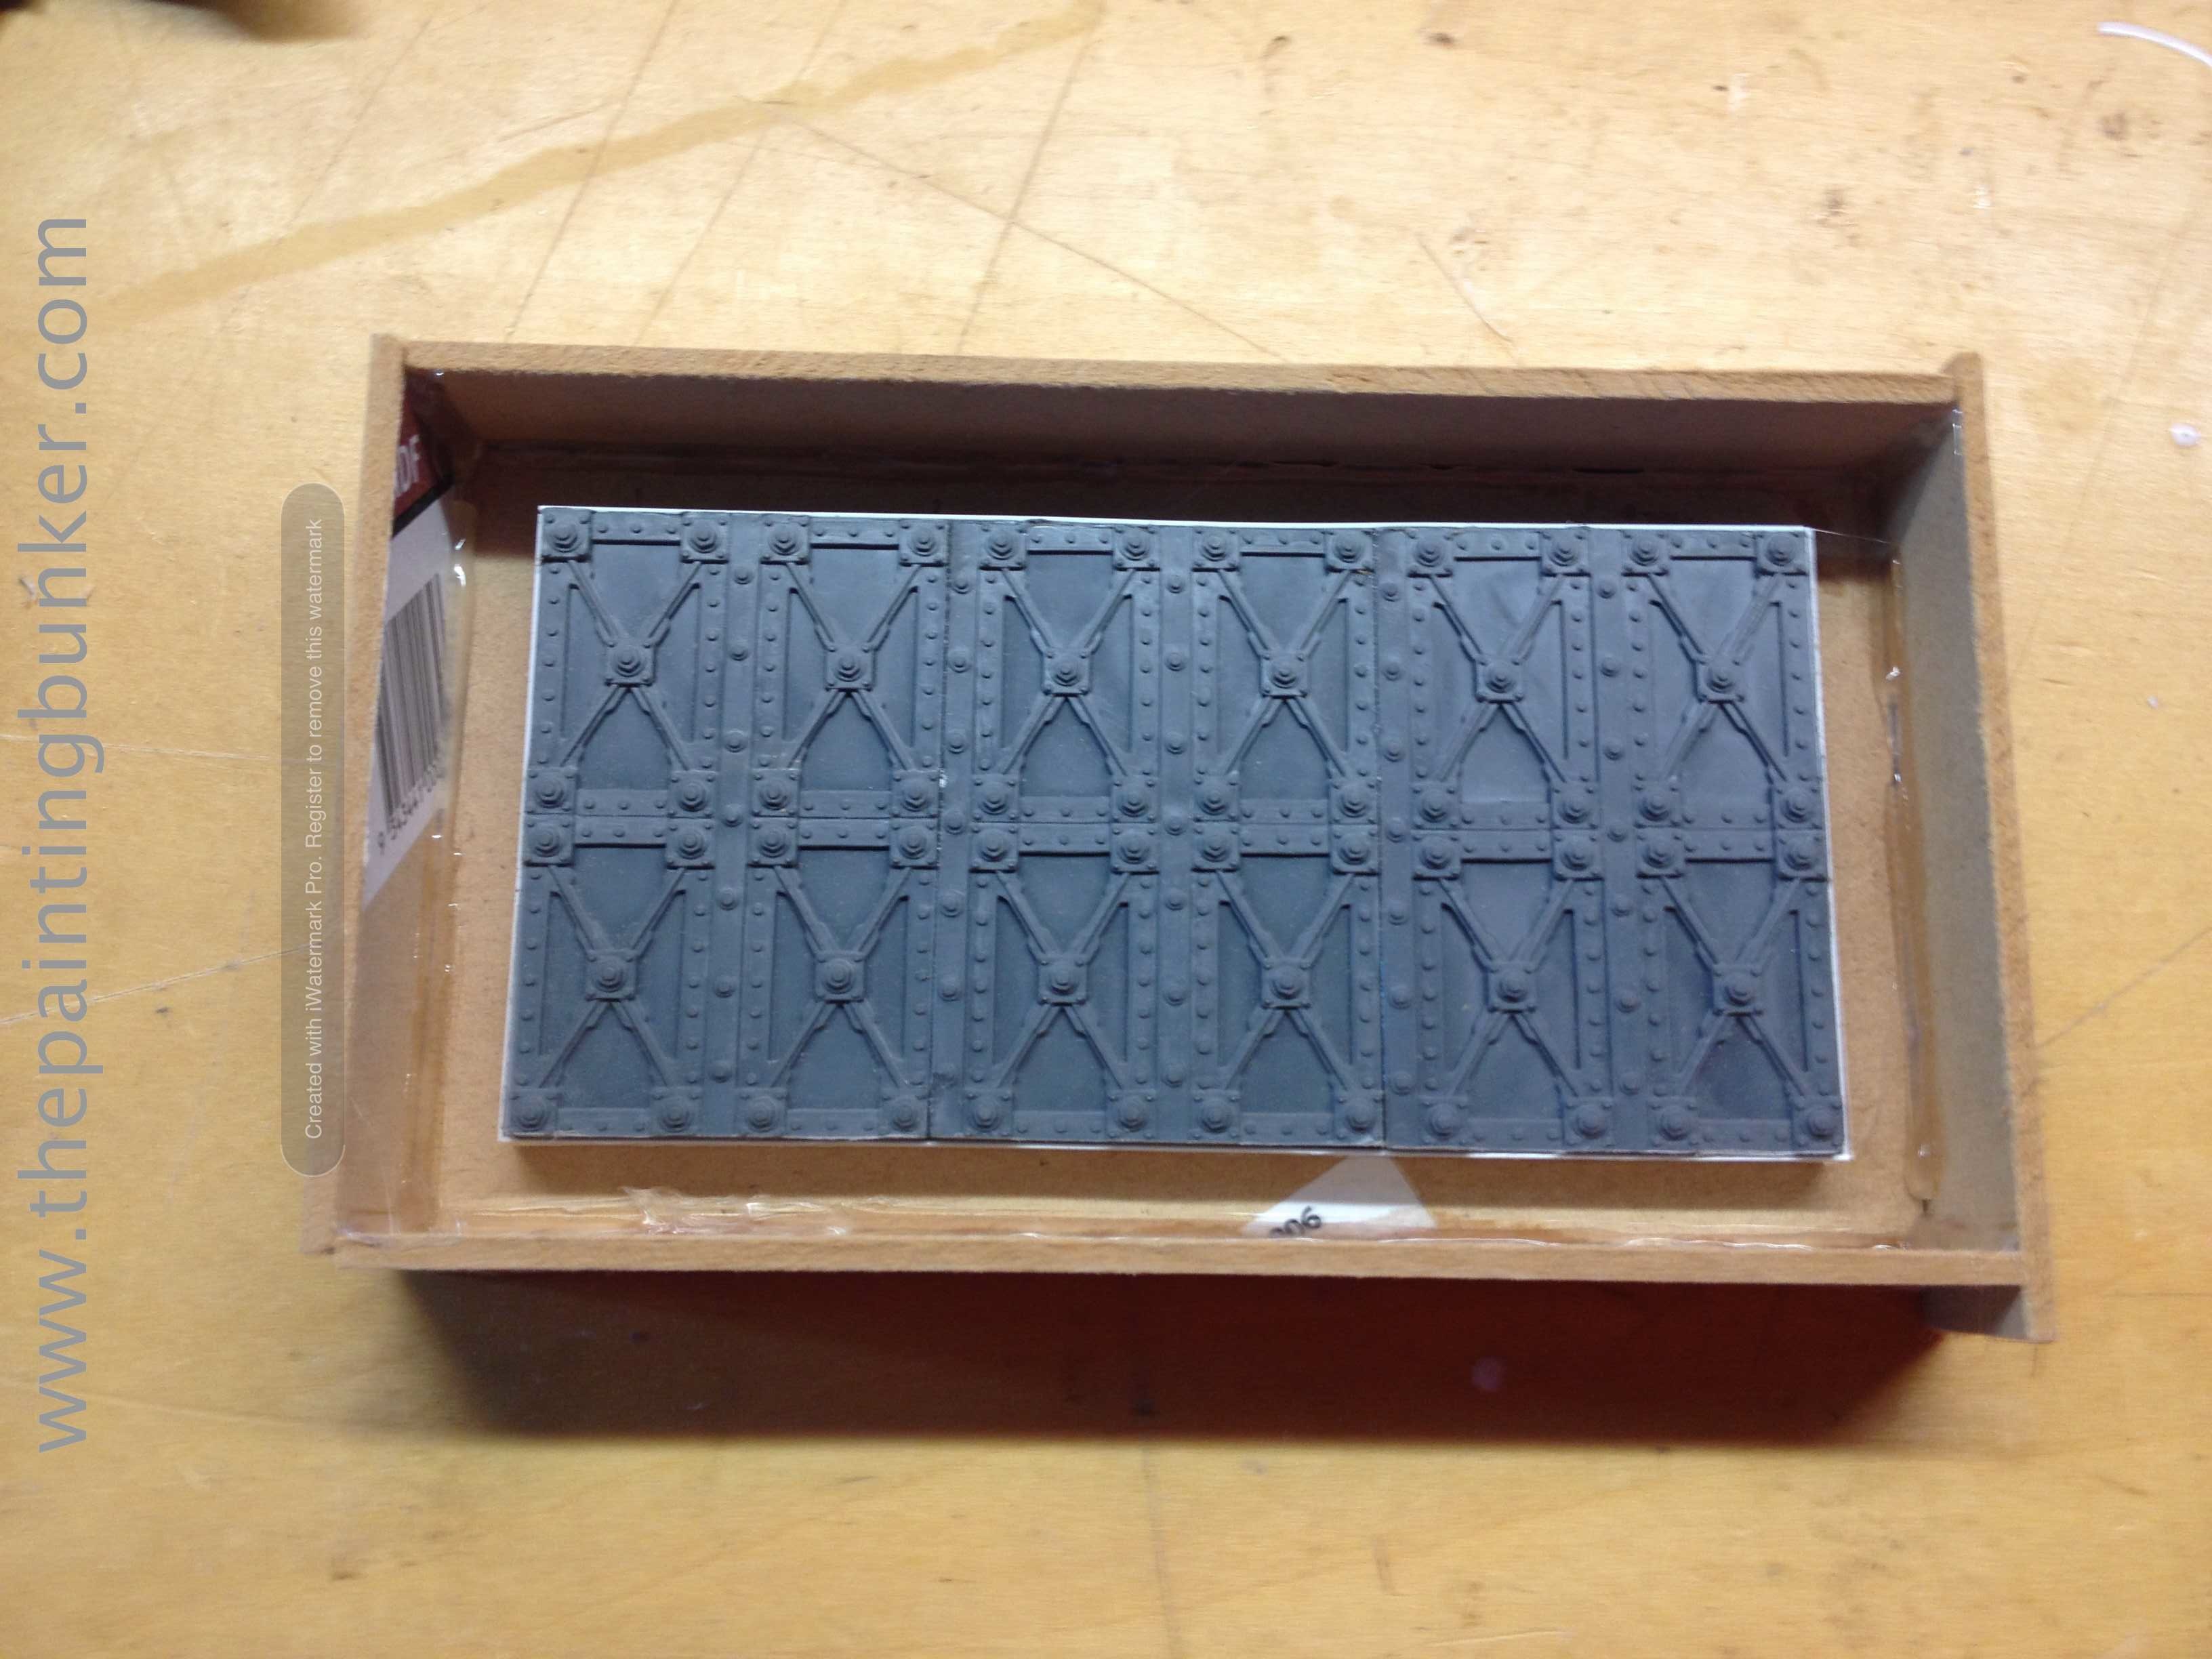
So what I settled on was getting some of the old Necromunda bulkheads. Remember these?
Big Jim, if you’re reading this, thanks for donating them.
So basically I chopped a bunch of them up up to make a panel wide enough to span the gap between the support pylons on the landing pad.
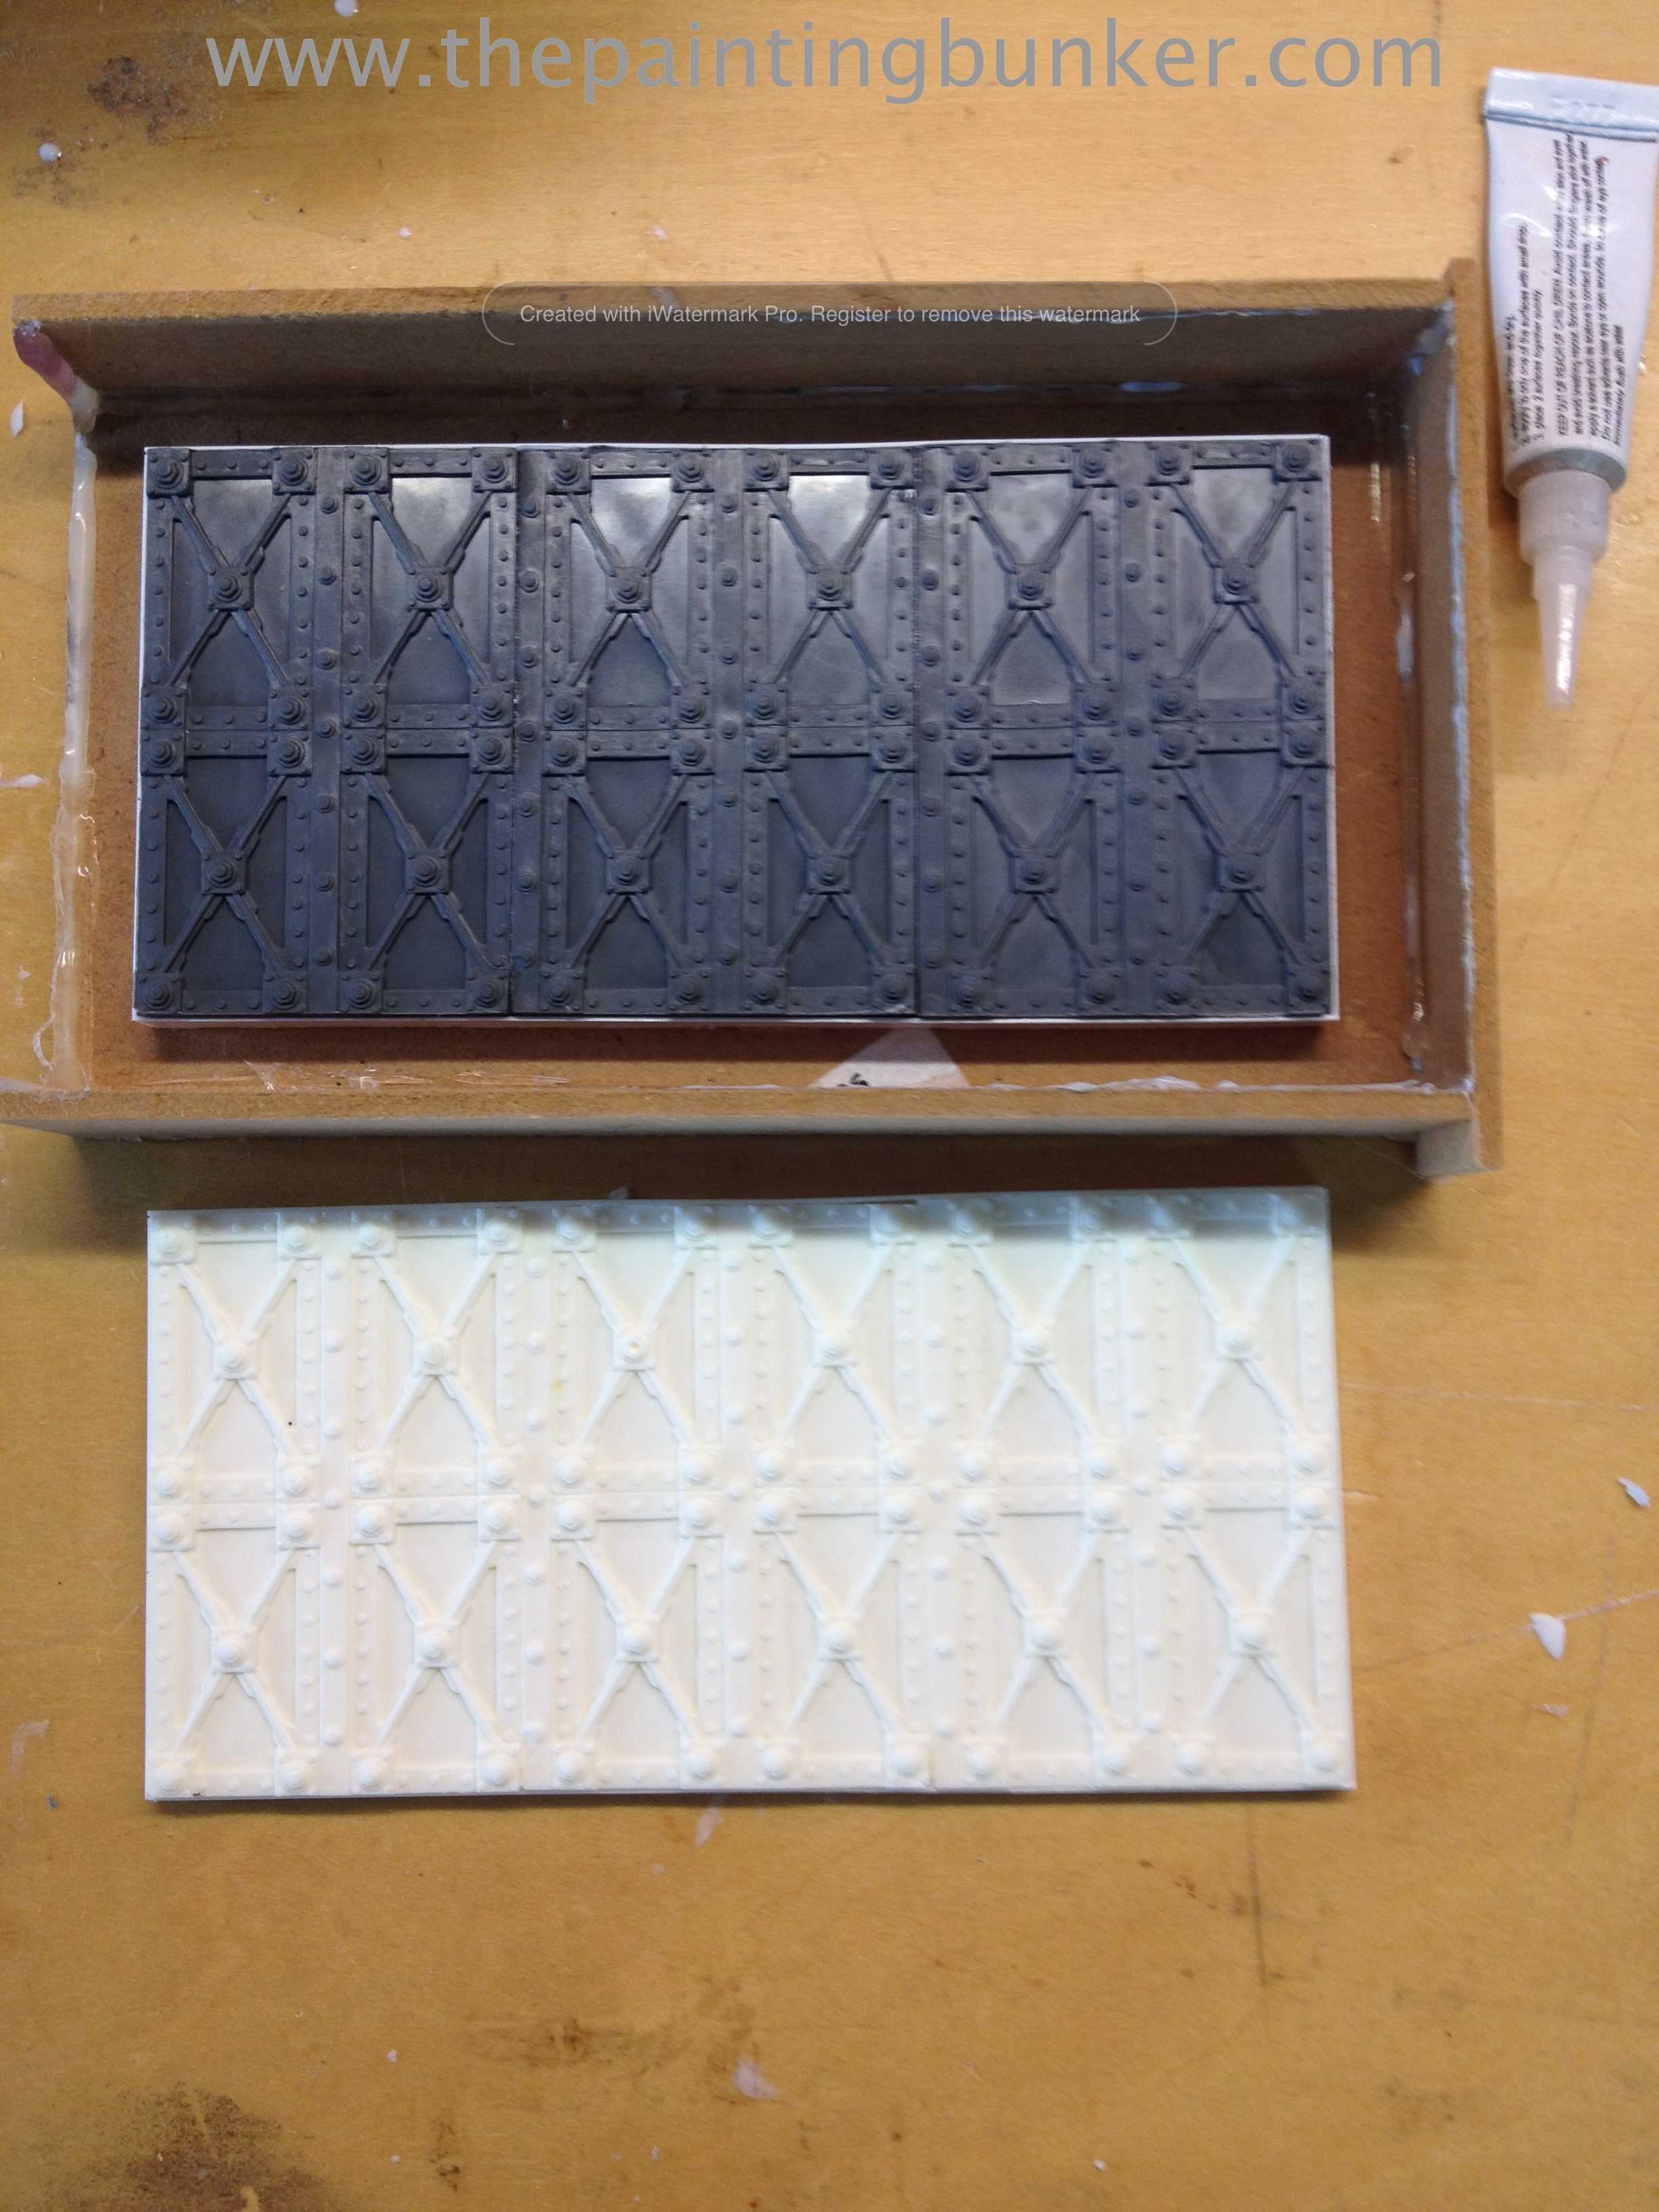
Because I needed about eight lengths, I decided to make a quick one piece mold of the newly constructed panel so I can make the appropriate amount of casts.
And the cast panel. These will come in handy later on too. They have a lot of character and will make useful bits later on…
I also did a test paint scheme piece for the base. I want it to look very neglected (it is abandoned after all) I like how it came out.
Here is a close up of some of the scatter terrain. I really like the shipping container looking objects. Again, more Necromunda bulkheads glued together and cast.
The cast panel in place on the landing pad. In case you’re wondering, the basing material I use is kitty litter, and a type of small rocks that are used in reptile enclosures. I just like the consistency.
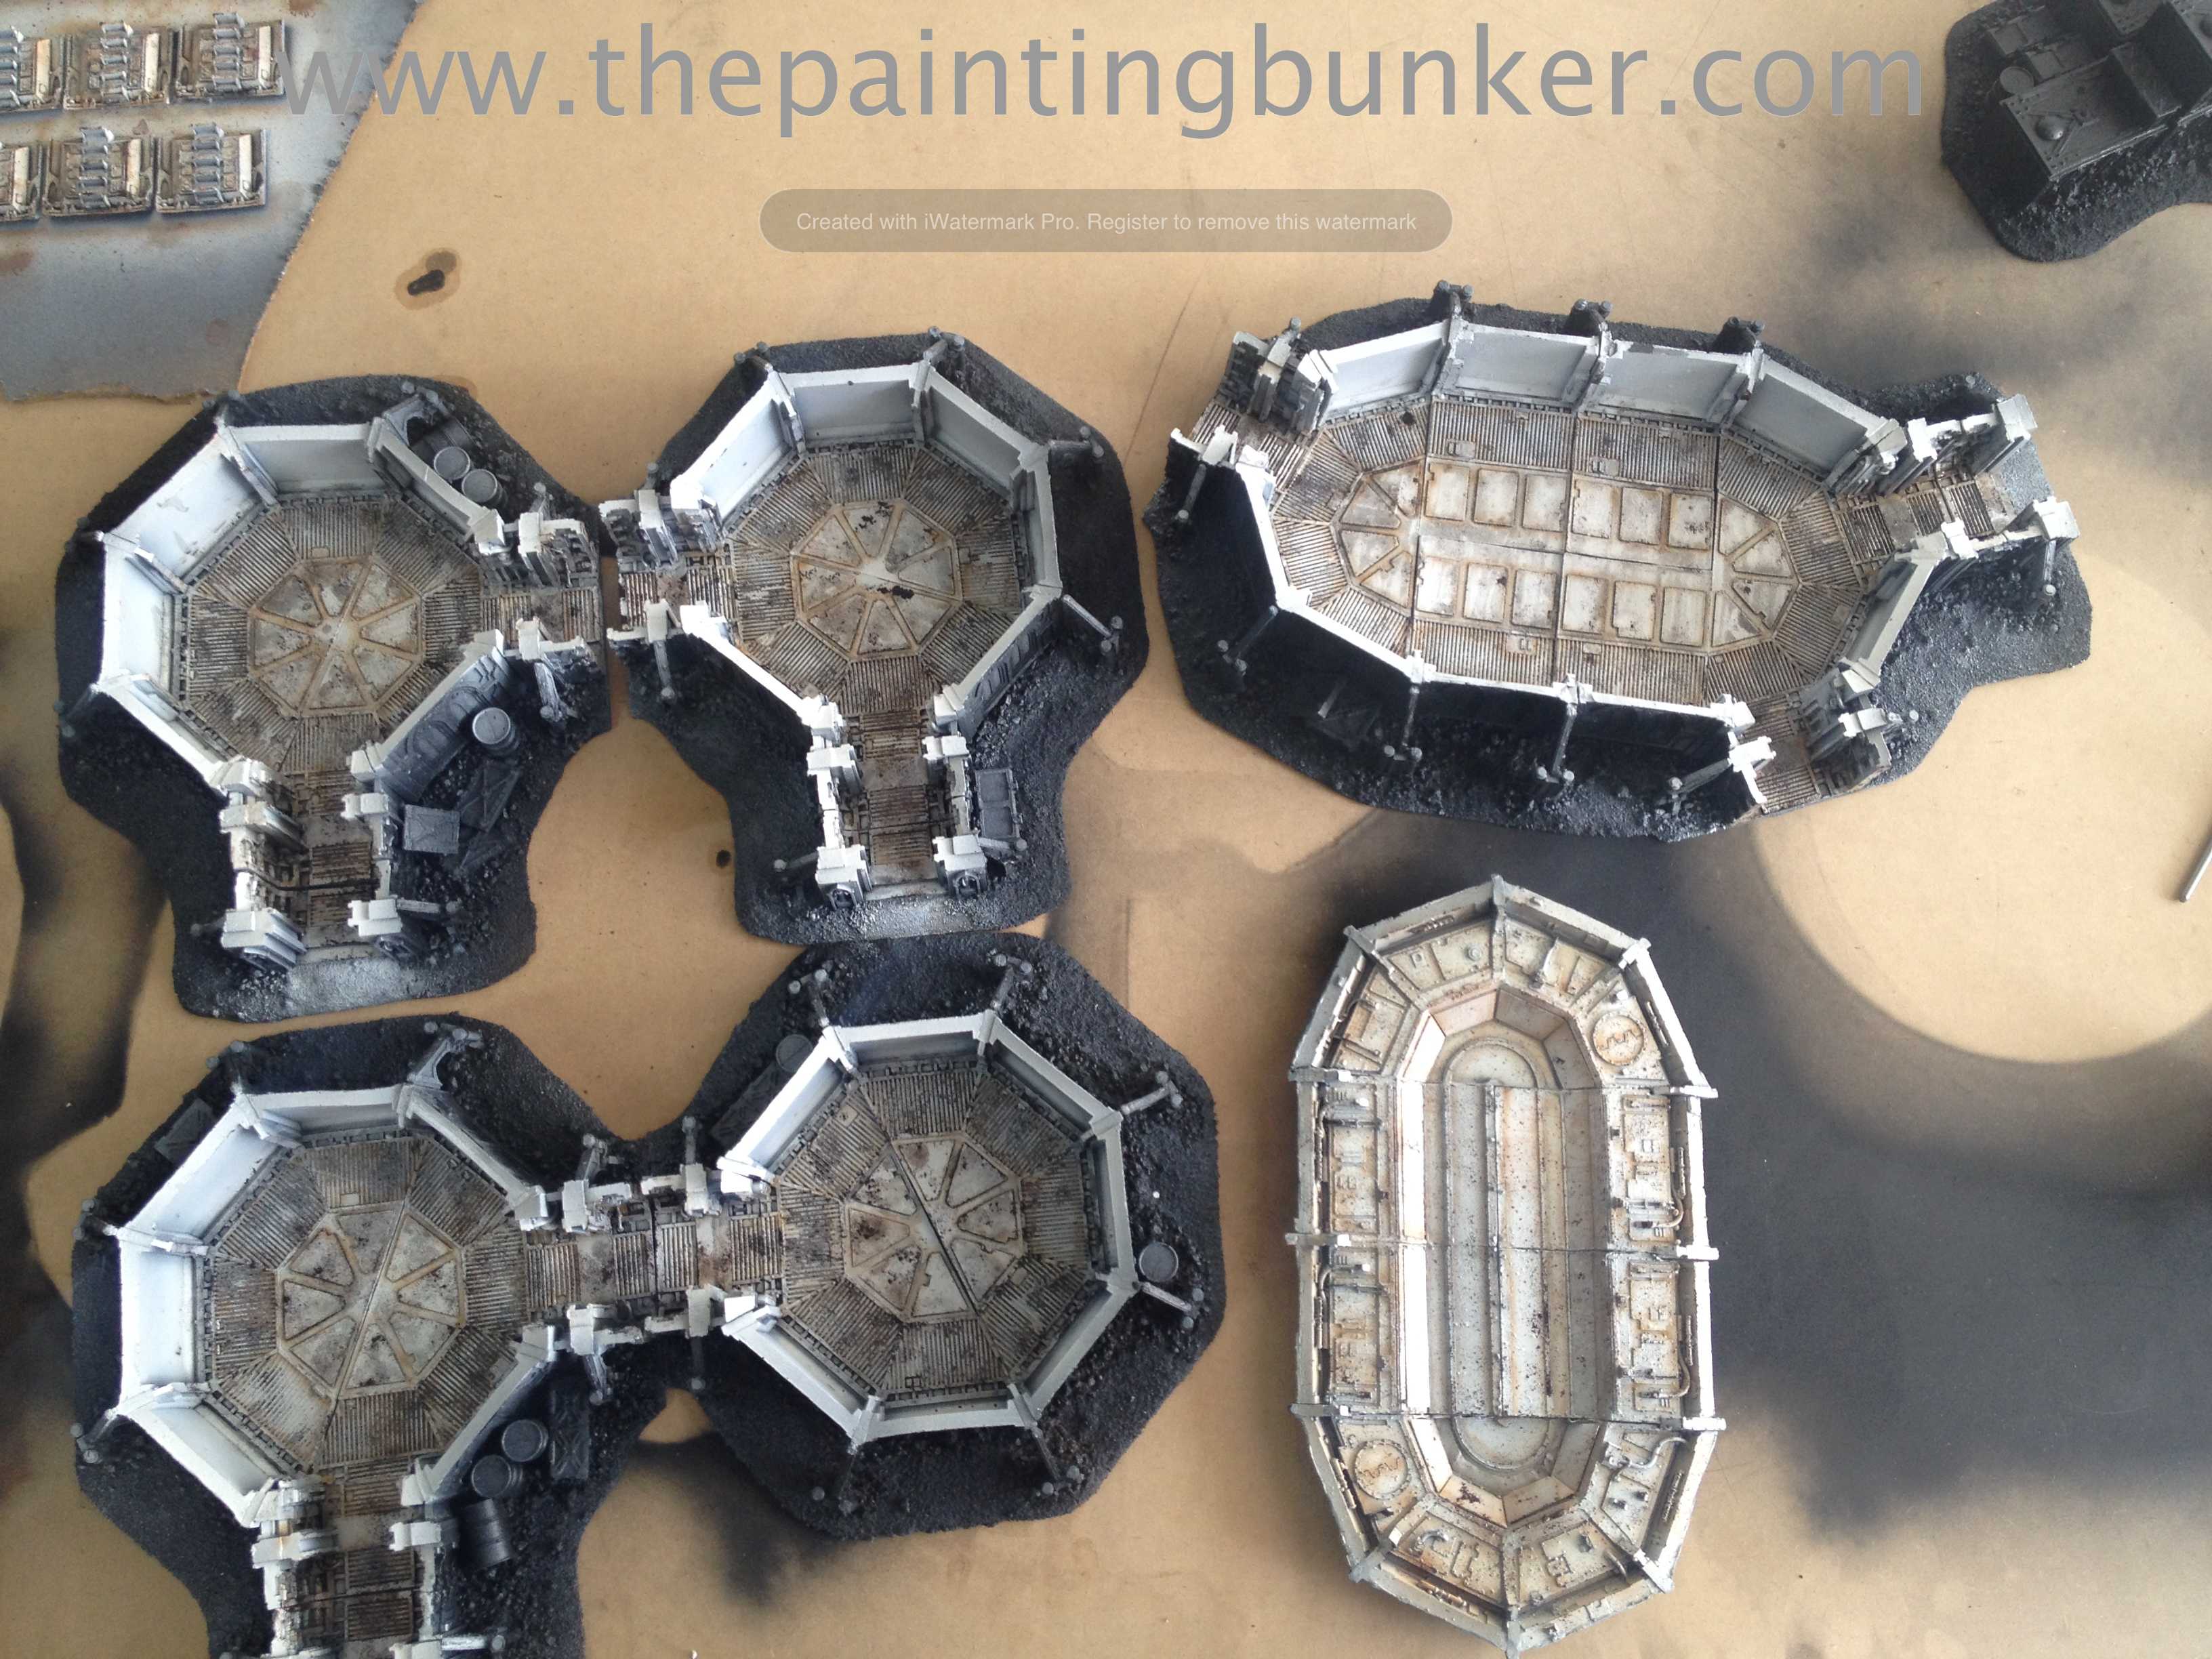
The rest of these photos are of the base assembled and undercoated. As I’ve mentioned, getting it to this stage was a massive mission. However it’s really pleasing to see it at this stage. I have to admit, when I saw it all assembled like this, it really renewed my enthusiasm for the project. It was waining…
The next few photos reveal the interior. I’ve started undercoating it grey because I plan on painting the interior white.
So, next step is to start working on the interior. This is going to be a pretty straight forward part actually. Except for the interior panel inserts. Particularly the ones I’ve chosen for the ‘quad gun’ and ‘comms relay’ controls.
I’ve been wanting to make some awesome objective markers for my World Eaters army for some time now. I got a bolt of inspiration when I was painting Angron. On his base (as well as Fulgrims and Ferrus Manus) are dead and dying space marines. I thought to myself that these models would make great objective markers. However the thought of desecrating a Primarchs base was too much to contemplate (especially the $$). However after a lot of thought I decided just to do it… and this is what I came up with
In this photo, they are still not finished, but it’ll give you a pretty good idea of where I’m going with them. The white plates are for dice to rest on so players can indicated what mysterious objective they represent. I actually plan on molding these and making casts of them once they’re complete. I plan on giving them away to participants at The Emperors Legions, a 1000pt, 30k comp I’m running in March of 2014.
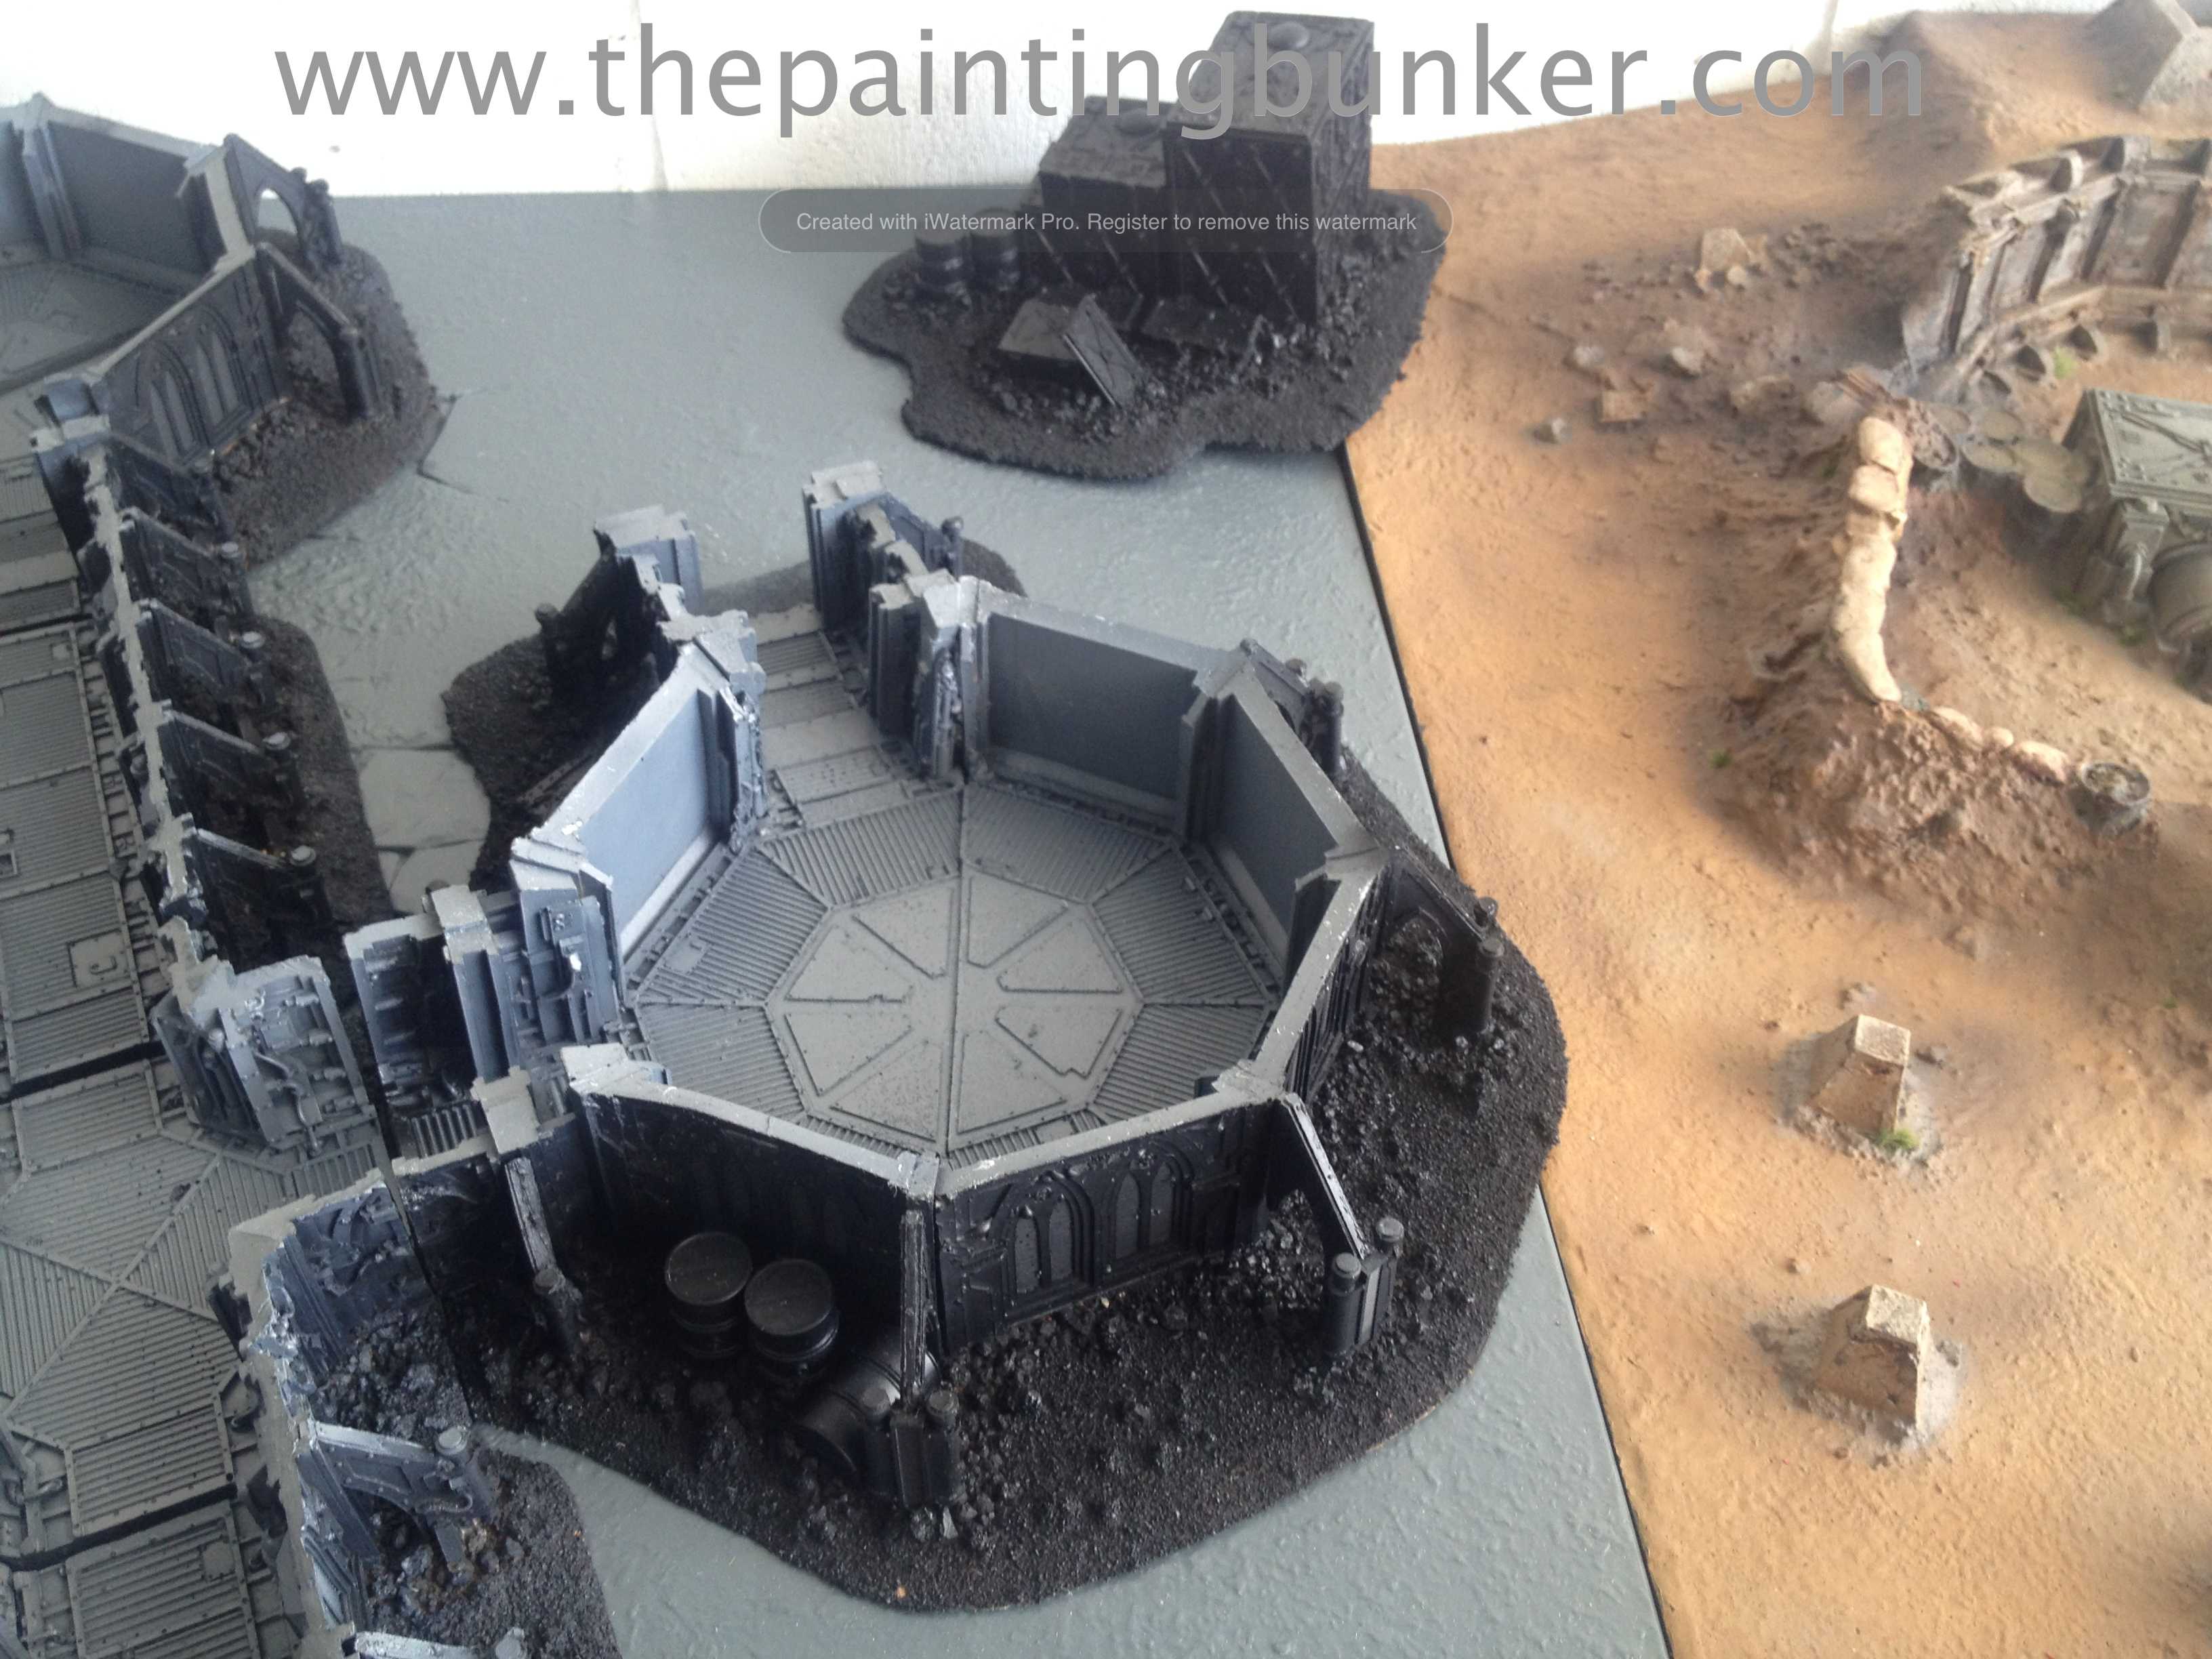
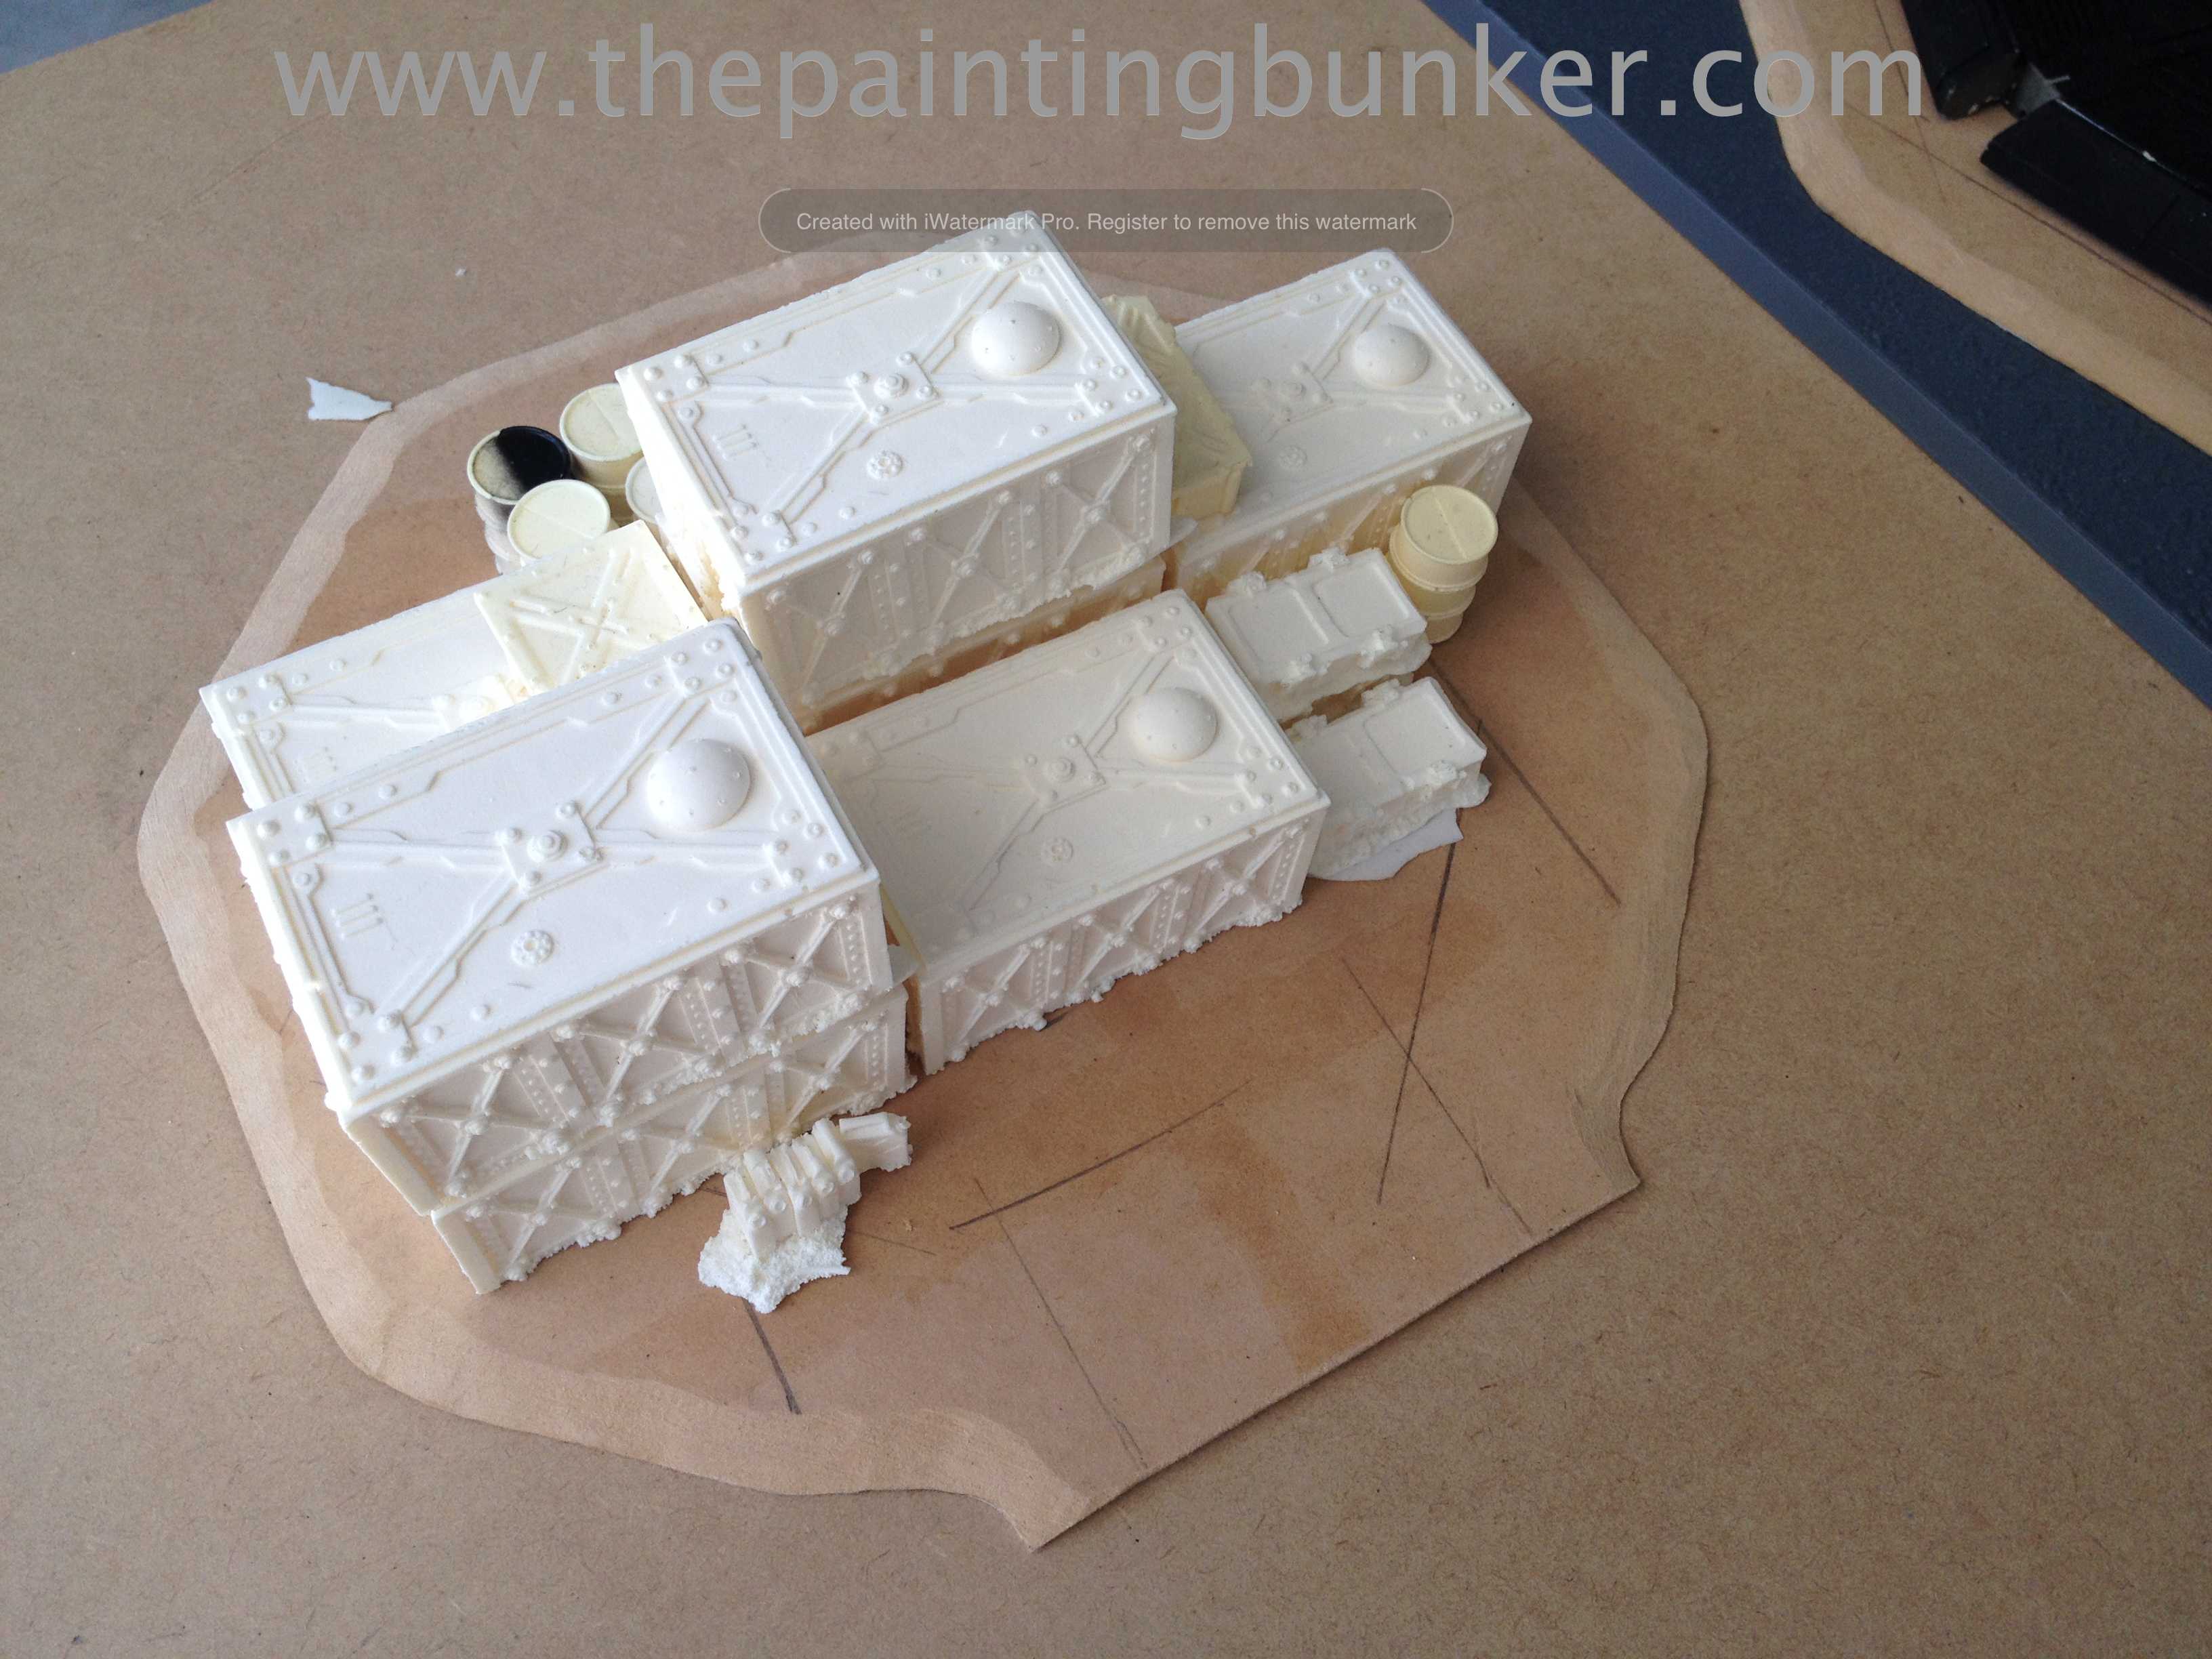
I’ve been waiting to tell you all about this for the LONGEST time. Earlier this year I actually acquired an unassembled (mostly) and unpainted Anphelion Base. For those of you that don’t know, the Anphelion Base was an extremely ambitious piece of 40k terrain that Forge World made to accompany Imperial Armour IV – The Amphelion Project. These kits are very very rare. When they were released back in the early 2000’s they were over $1,500AUD to buy, and were notoriously difficult to assemble (this one lived up to that reputation) When I say difficult to assemble, what I mean is, during assembly, most of the time you feel like smashing it to little pieces using a hammer.
So my idea for the base was to make a table that represented some sort of abandoned Adeptus Mechanicus research station, with an entrance to an underground laboratory just nearby. I’ve been wanting to use the Forge World Imperial Strong Point I painted for my Carcharodons for some time. This seemed like the perfect opportunity. It will act as the entrance to the subterranean laboratory.
Now, this series of blog post is going to be slightly different from my usual ones. I’m actually going to include work in progress photos along with commentary. I’m doing this for two reasons. The first one is this is such an awesome model, I want you all to be able to live vicariously through this blog during the assembly of this amazing model. The second reason is, I’ve not found many comprehensive blog post on the inter-webs on this model. I’ve seen a few pics of other modellers here and there, but no ‘this is how I built and painted the Anphelion Base’. So, in the interests of prosperity, I’ve taken it upon myself to provide the inter-webs with just such a post.
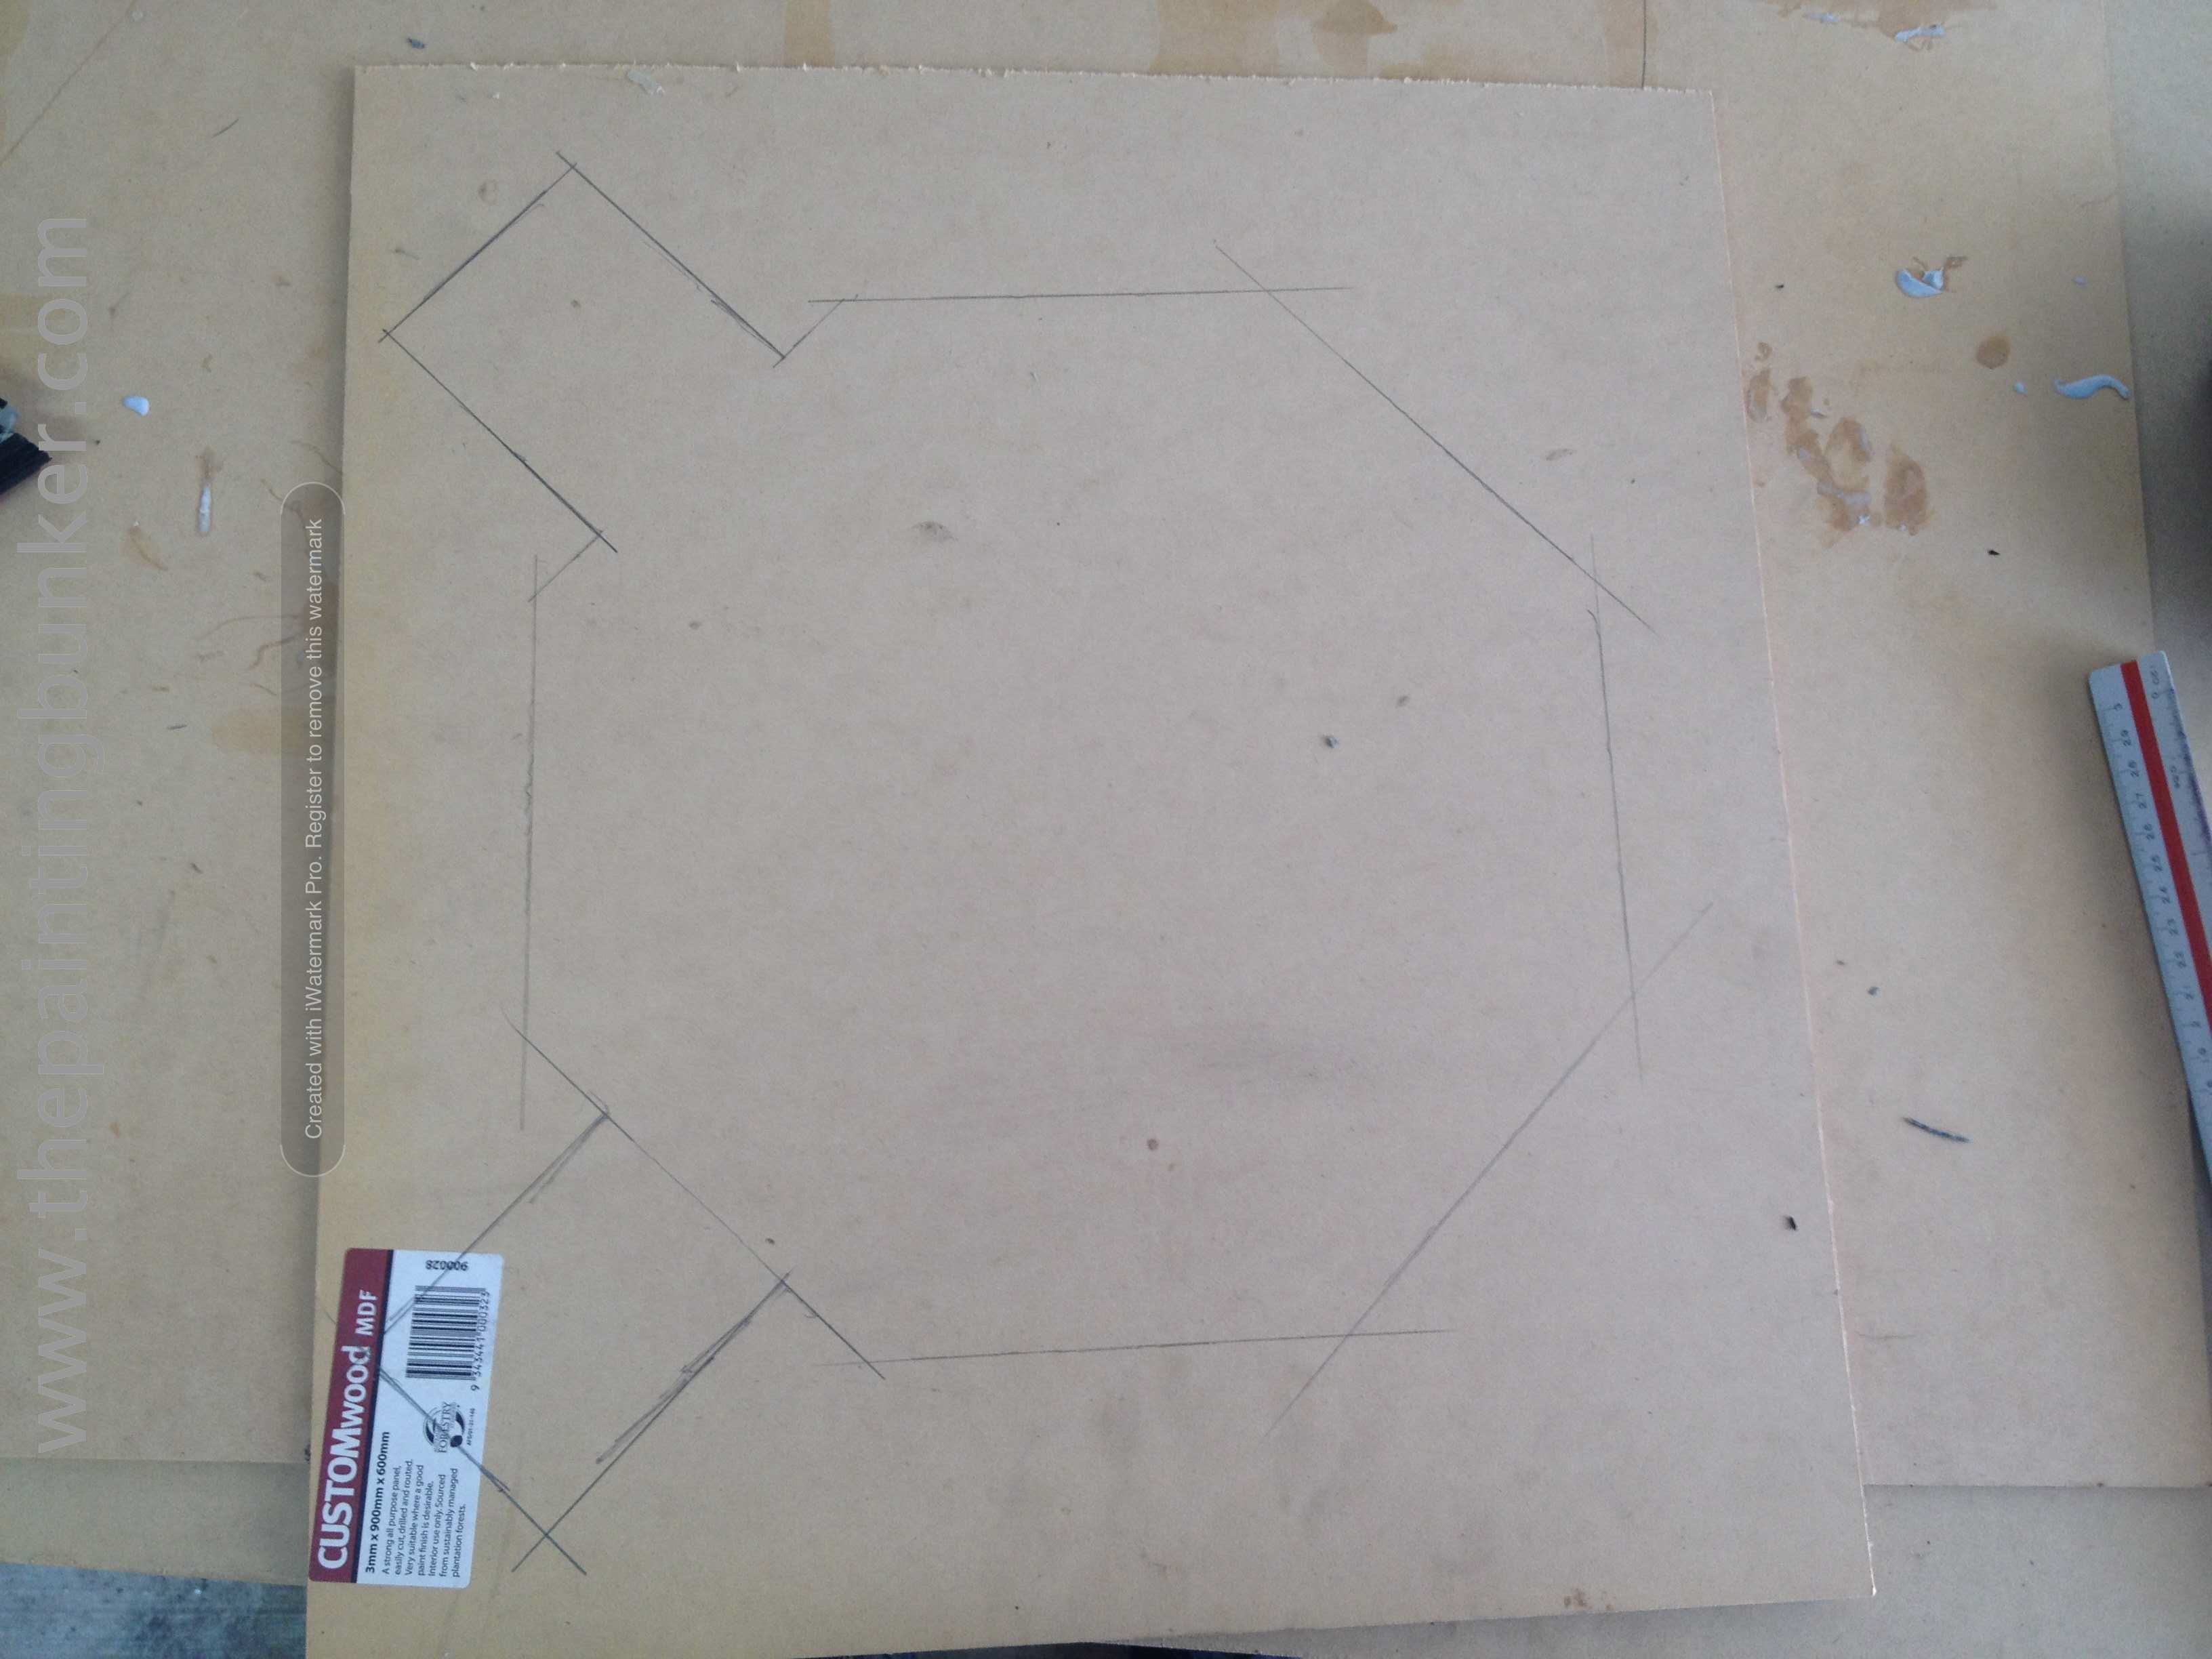
The first step is to get the layout how I wanted it. One thing I knew about this kit is that 1. It was going to be mounted on MDF (Craft wood) and 2. I was going to have to make molds of certain parts because with what I had, I couldn’t make the layout I wanted.
Lets start with the MDF base. One thing that really irritates me about scenery mounted on MDF is the lip. The base for the building or whatever gets cut out of MDF and thats it, just really harsh shoulder between the board and the model base. I didn’t want my piece to have this issue, I wanted to make sure that the edge of the MDF was made more into a ramp so that minis can balance properly, and its aesthetically pleasing on the table.
The first thing I did was draw outlines of all the various modules of the base on to MDF. This included the ‘buttresses’
I then added about 20mm around the module to allow for the ramped lip etc
Then marked up the MDF ready for being cut out
The halls were a much easier prospect…
As was the intersection…
Then it was time to cut them all out
One problem I didn’t anticipate was the wide base of the hall going into the narrow base of the intersection. I had to put my thinking cap on for this one…
I ended up just making a small modification to the hall base to allow for a smooth transition between pieces.
So now the hall goes into the module and the intersection smoothly.
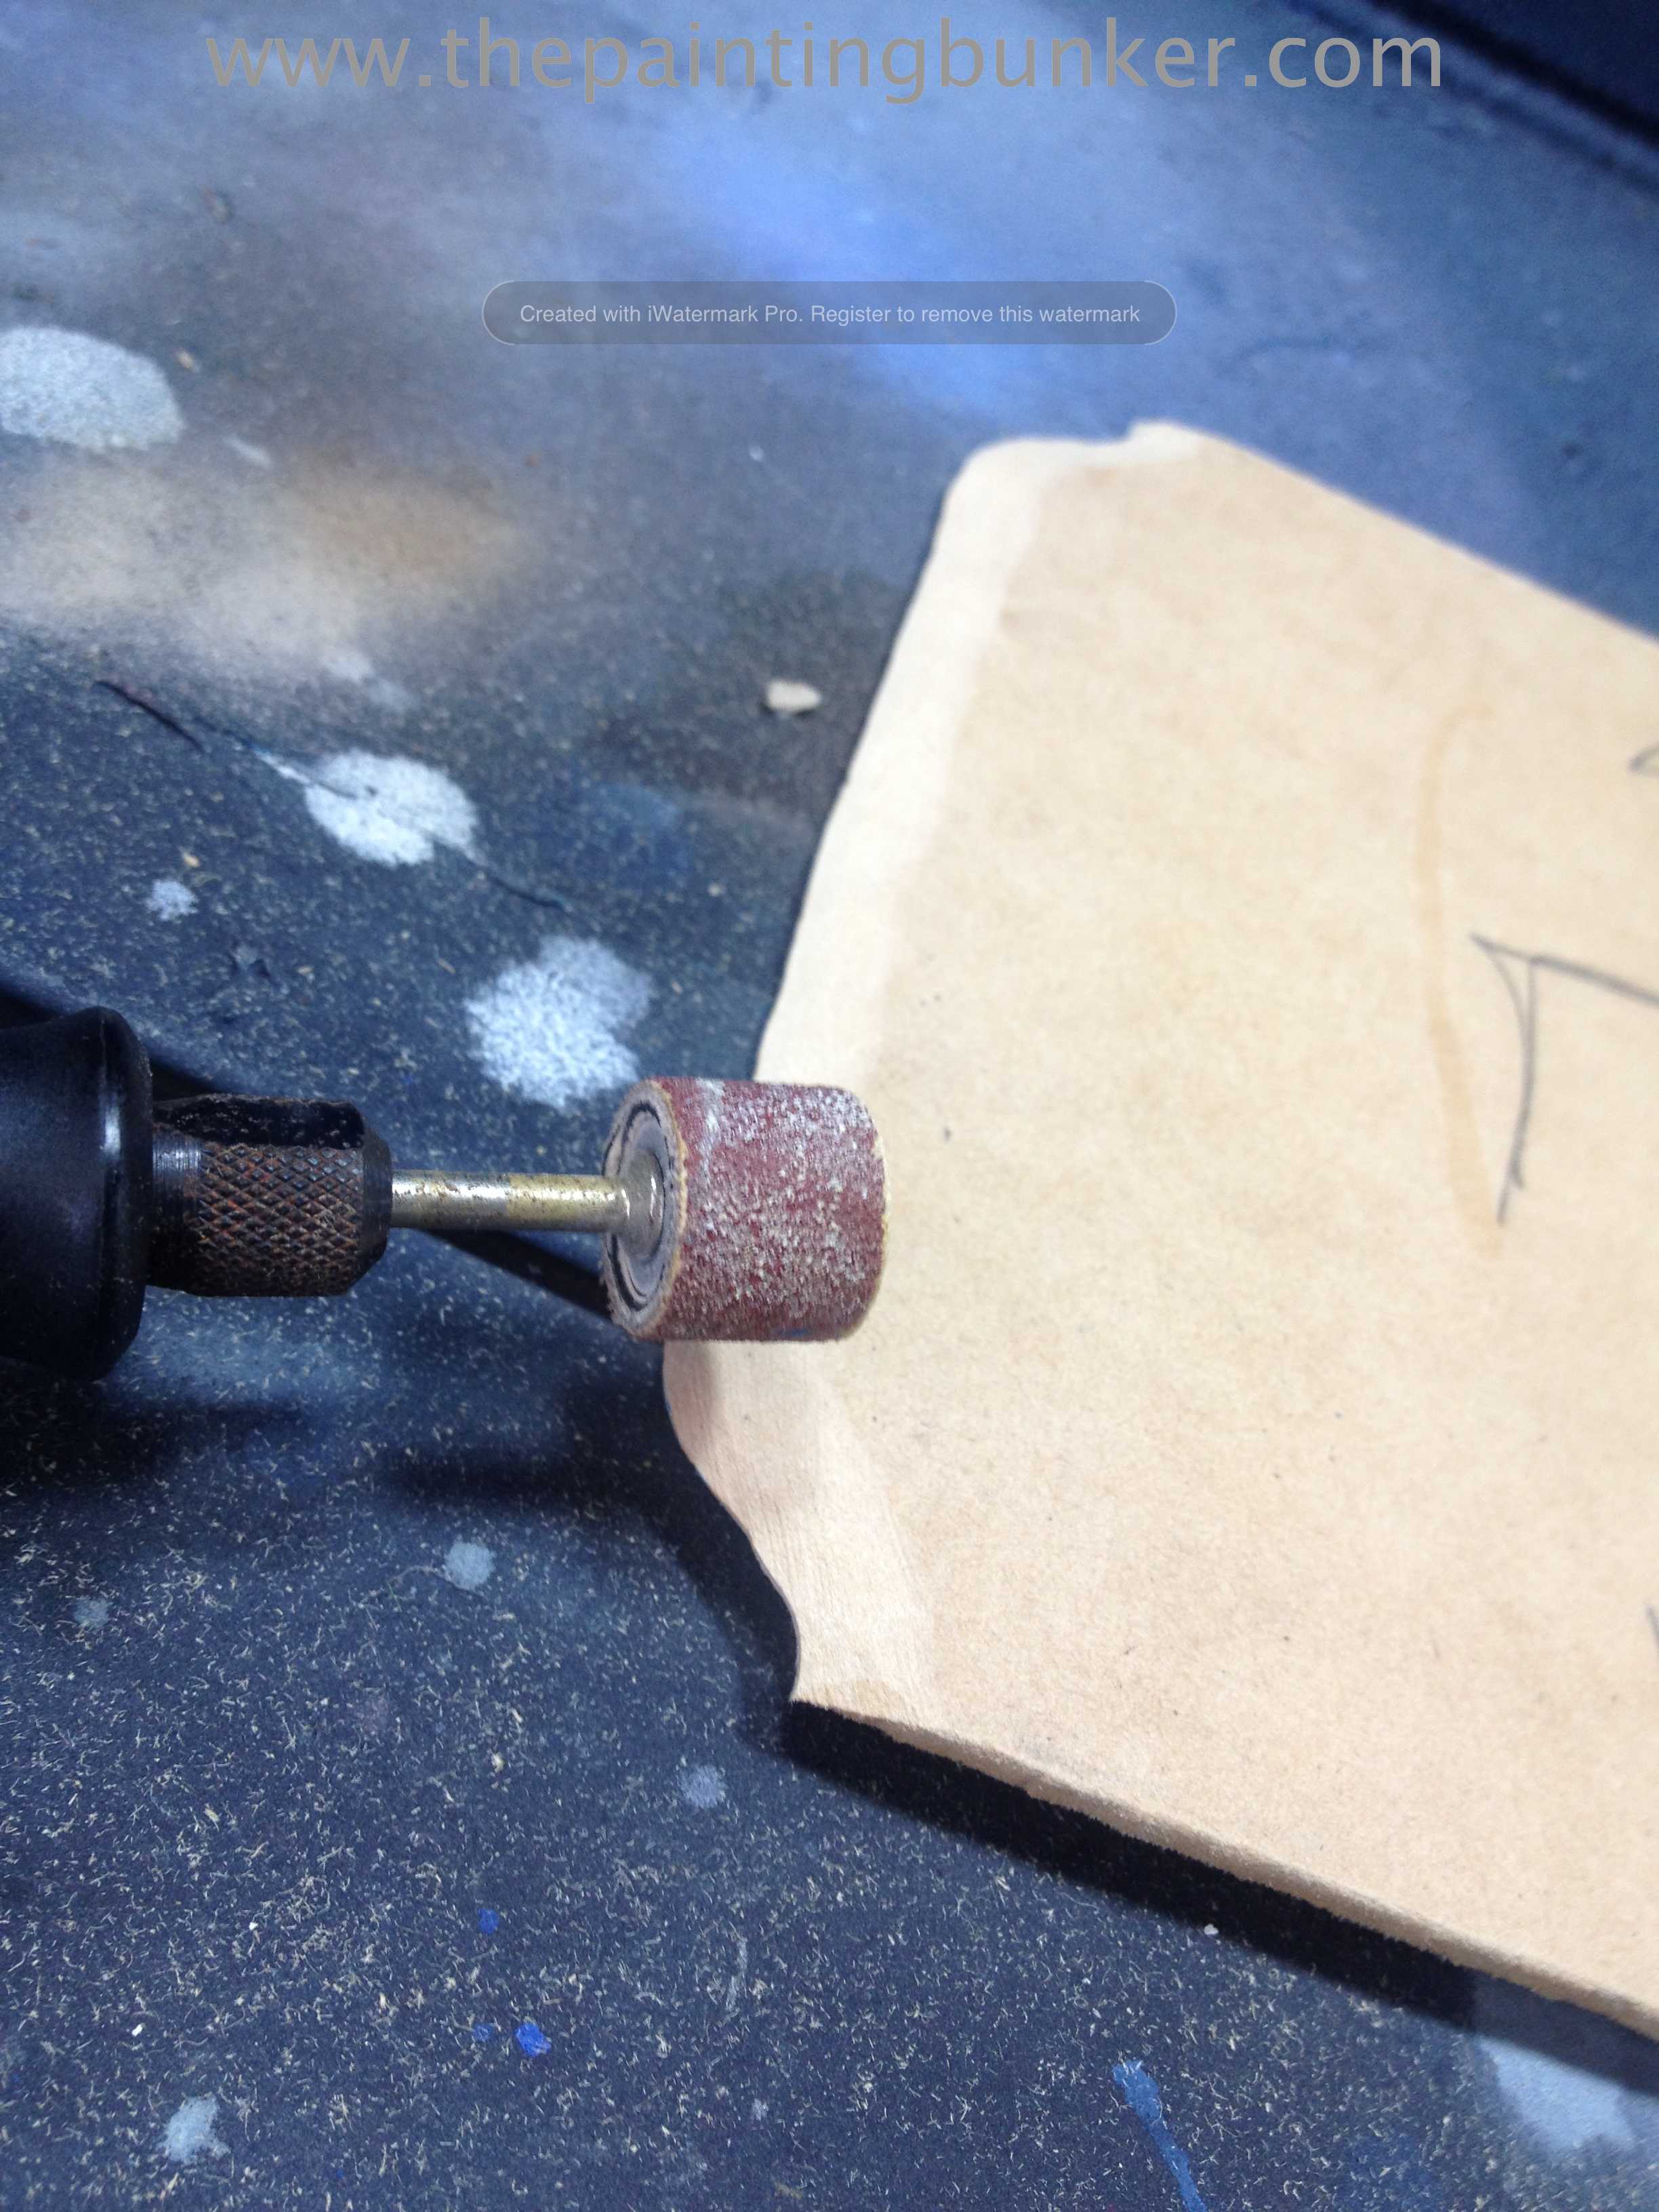
Next up with the very messy job of sanding the ramp onto the lips of all the bases.. epic job. I wouldn’t recommend doing this unless you have a good dust extraction method and dust mask. MDF is seriously bad stuff to breath in. Maybe thats why no one bothers to make a better lip transition?
Nice
After I’d done this, I went back to all the joins and ‘aligned’ them. Which basically involved going back to each one and making minor modifications to ensure the joints overlaped and joined smoothly.
Just another pic of a fixed up joint
The MDF bases of the base all organised. This didn’t take as much time as you’d think. The results will be well worth it in the end.
So I also wanted some scatter terrain too. I made a mold of the ‘containers’ so I could have a few floating around the base. You’ll also notice the landing pad has two ramps indicated on the base. So yeah… I’ll mold that section too.
So I mounted the scatter terrain on MDF bases too. I also added a few barrels etc to give it some more visual interest.
There you go, the Anphellion base is now ready to be glued onto the MDF, then undercoated. I don’t know if its clear in the photos but if you look closely you can see the that the layout I’ve come up with is different to the actual models that I’ve got. So I’ll have to make molds of the pieces I need. This will be a pretty big job too. I won’t do a post on the mold making process as thats a series of post in its self!. You’ll just have to believe me that it happened and I achieved the desired results. In future posts though you’ll notice the molded sections because they’ll be white.
Ok, thats it for now, until next time. Thanks for dropping in
So this is 2013’s entry into Armies on Parade. It consisted of a ‘turned’ force of World Eaters space marines, accompanied by their new allies. Daemons of Khorne. Specifically, the amazing Blood Thirster made by Forge World and some Bloodletters.
This year GW decided not to have a Games Day in Australia. So they decided to still do the Armies on Parade competition, however photos of the winning entries from each store would be sent to head office and put up on GW’s website for everyone to vote on. Yet again I won the store comp but didn’t win the overall comp. I hope GW decided to have a Games Day for Australia this year. Even though I live 1,000km away, its well worth the expense and effort to get there.
Well, I’ve been promising one for some time. Today is the day that it finally arrives! A 1,000 point 30k game between the traitorous World Eaters against the brutal Iron Hands.
So some background.
On New Years day I got a call from a good friend of mine. He lives in Townsville (about 1,600km north of Brisbane). It turns out he is on holidays at Noosa (about 80km north of Brisbane) and was wondering if he could drop in for a catch up, seeing as he was down this way. I was thrilled that he’d contacted me and eagerly invited him over. Keepy is a very accomplished modeller himself having won several painting awards and competitions (one of which I was a judge for) Below are some of his very impressive models.
As you can see, Keepy is a great painter and his conversions are skilfully executed. I really like his work. Hopefully we’ll see some more models from him shortly (hint hint)
If you think Keepy should also have a WordPress blog to share the awesomeness, you can effect a partition and cast your vote below. I’ll make sure he gets it.
So, knowing that Keepy was heading my way, I asked him if he had an army with him so we could have a game. Everyone takes an army with them on holiday right?, right? Sadly he didn’t but he suggested that we have a game of 30k using my World Eaters and Iron Hands. I thought this was the best idea I’d heard in 2014 (keep in mind it was about 8hrs old at this stage)
With this news, and knowing that Keepy would be about 1 to 1 1/2 hrs way I thought it would be a good idea to document this epic clash for all time in this battle report. Below is the sorted tale of the clash, names and dates have been altered to protect the innocent.
Disclaimer:
All characters appearing in this work are fictitious. Any resemblance to real persons, living or dead, is purely coincidental.
The armies
World Eaters consisted of
HQ
Legion Praetor with an Iron Halo, Paragon Blade, Plasma Pistol and Digital Lasers – Using the Rite of War “Pride of the Legion” (because I don’t yet have painted any actually legitimate Troops choices… )
Elites
Contemptor Dreadnought with two power fists, built in heavy flamers
Troops
Terminator Squad (5) with 4 power fists and a heavy flamer
Rampager Squad (9)
Heavy Support
Heavy Support Squad(5) with 4 plasma cannons
The Iron Hands force consisted of
HQ
Legion Centurion with the Forge Lord Upgrade
Elites
Dreadnought Tallon (2) both with Multi Meltas, power fists and heavy flamers
Troops
Legion Tactical Squad (15)
Legion Tactical Squad (15)
Heavy Support
Heavy support squad (5) with 5 missile launchers
Fast Attack
Legion Javelin Attack Speeder with a Multi Melta
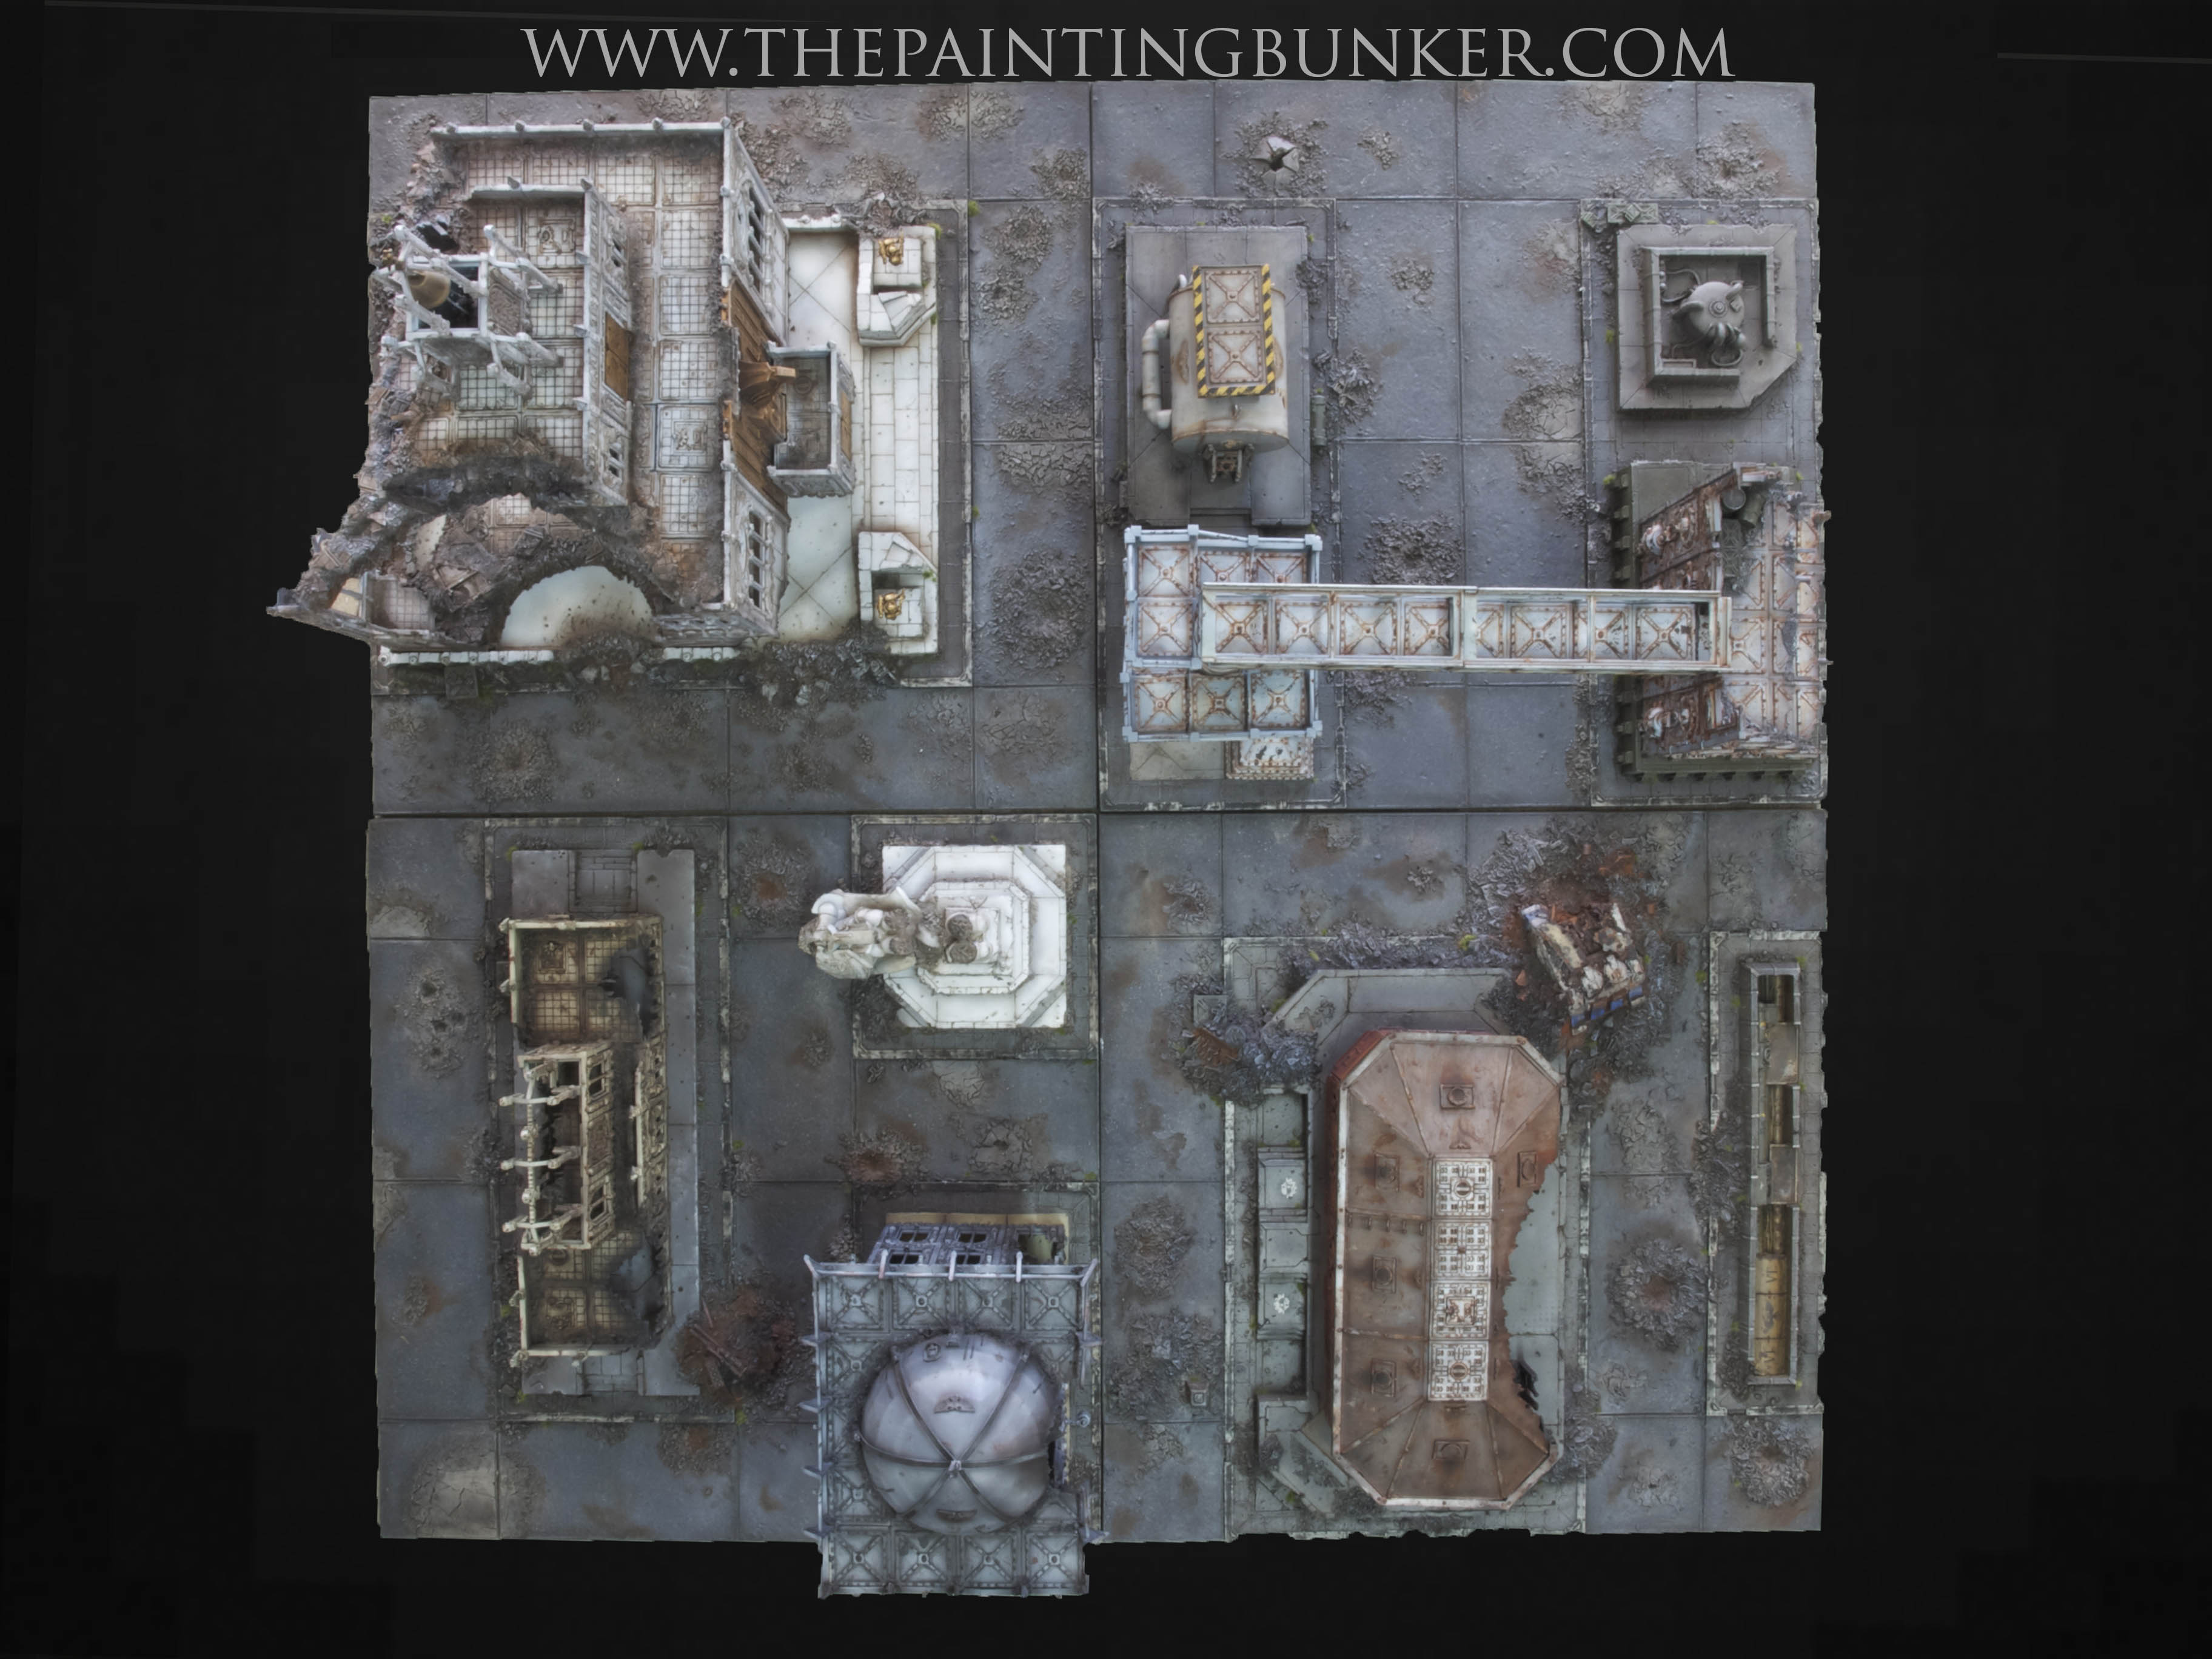
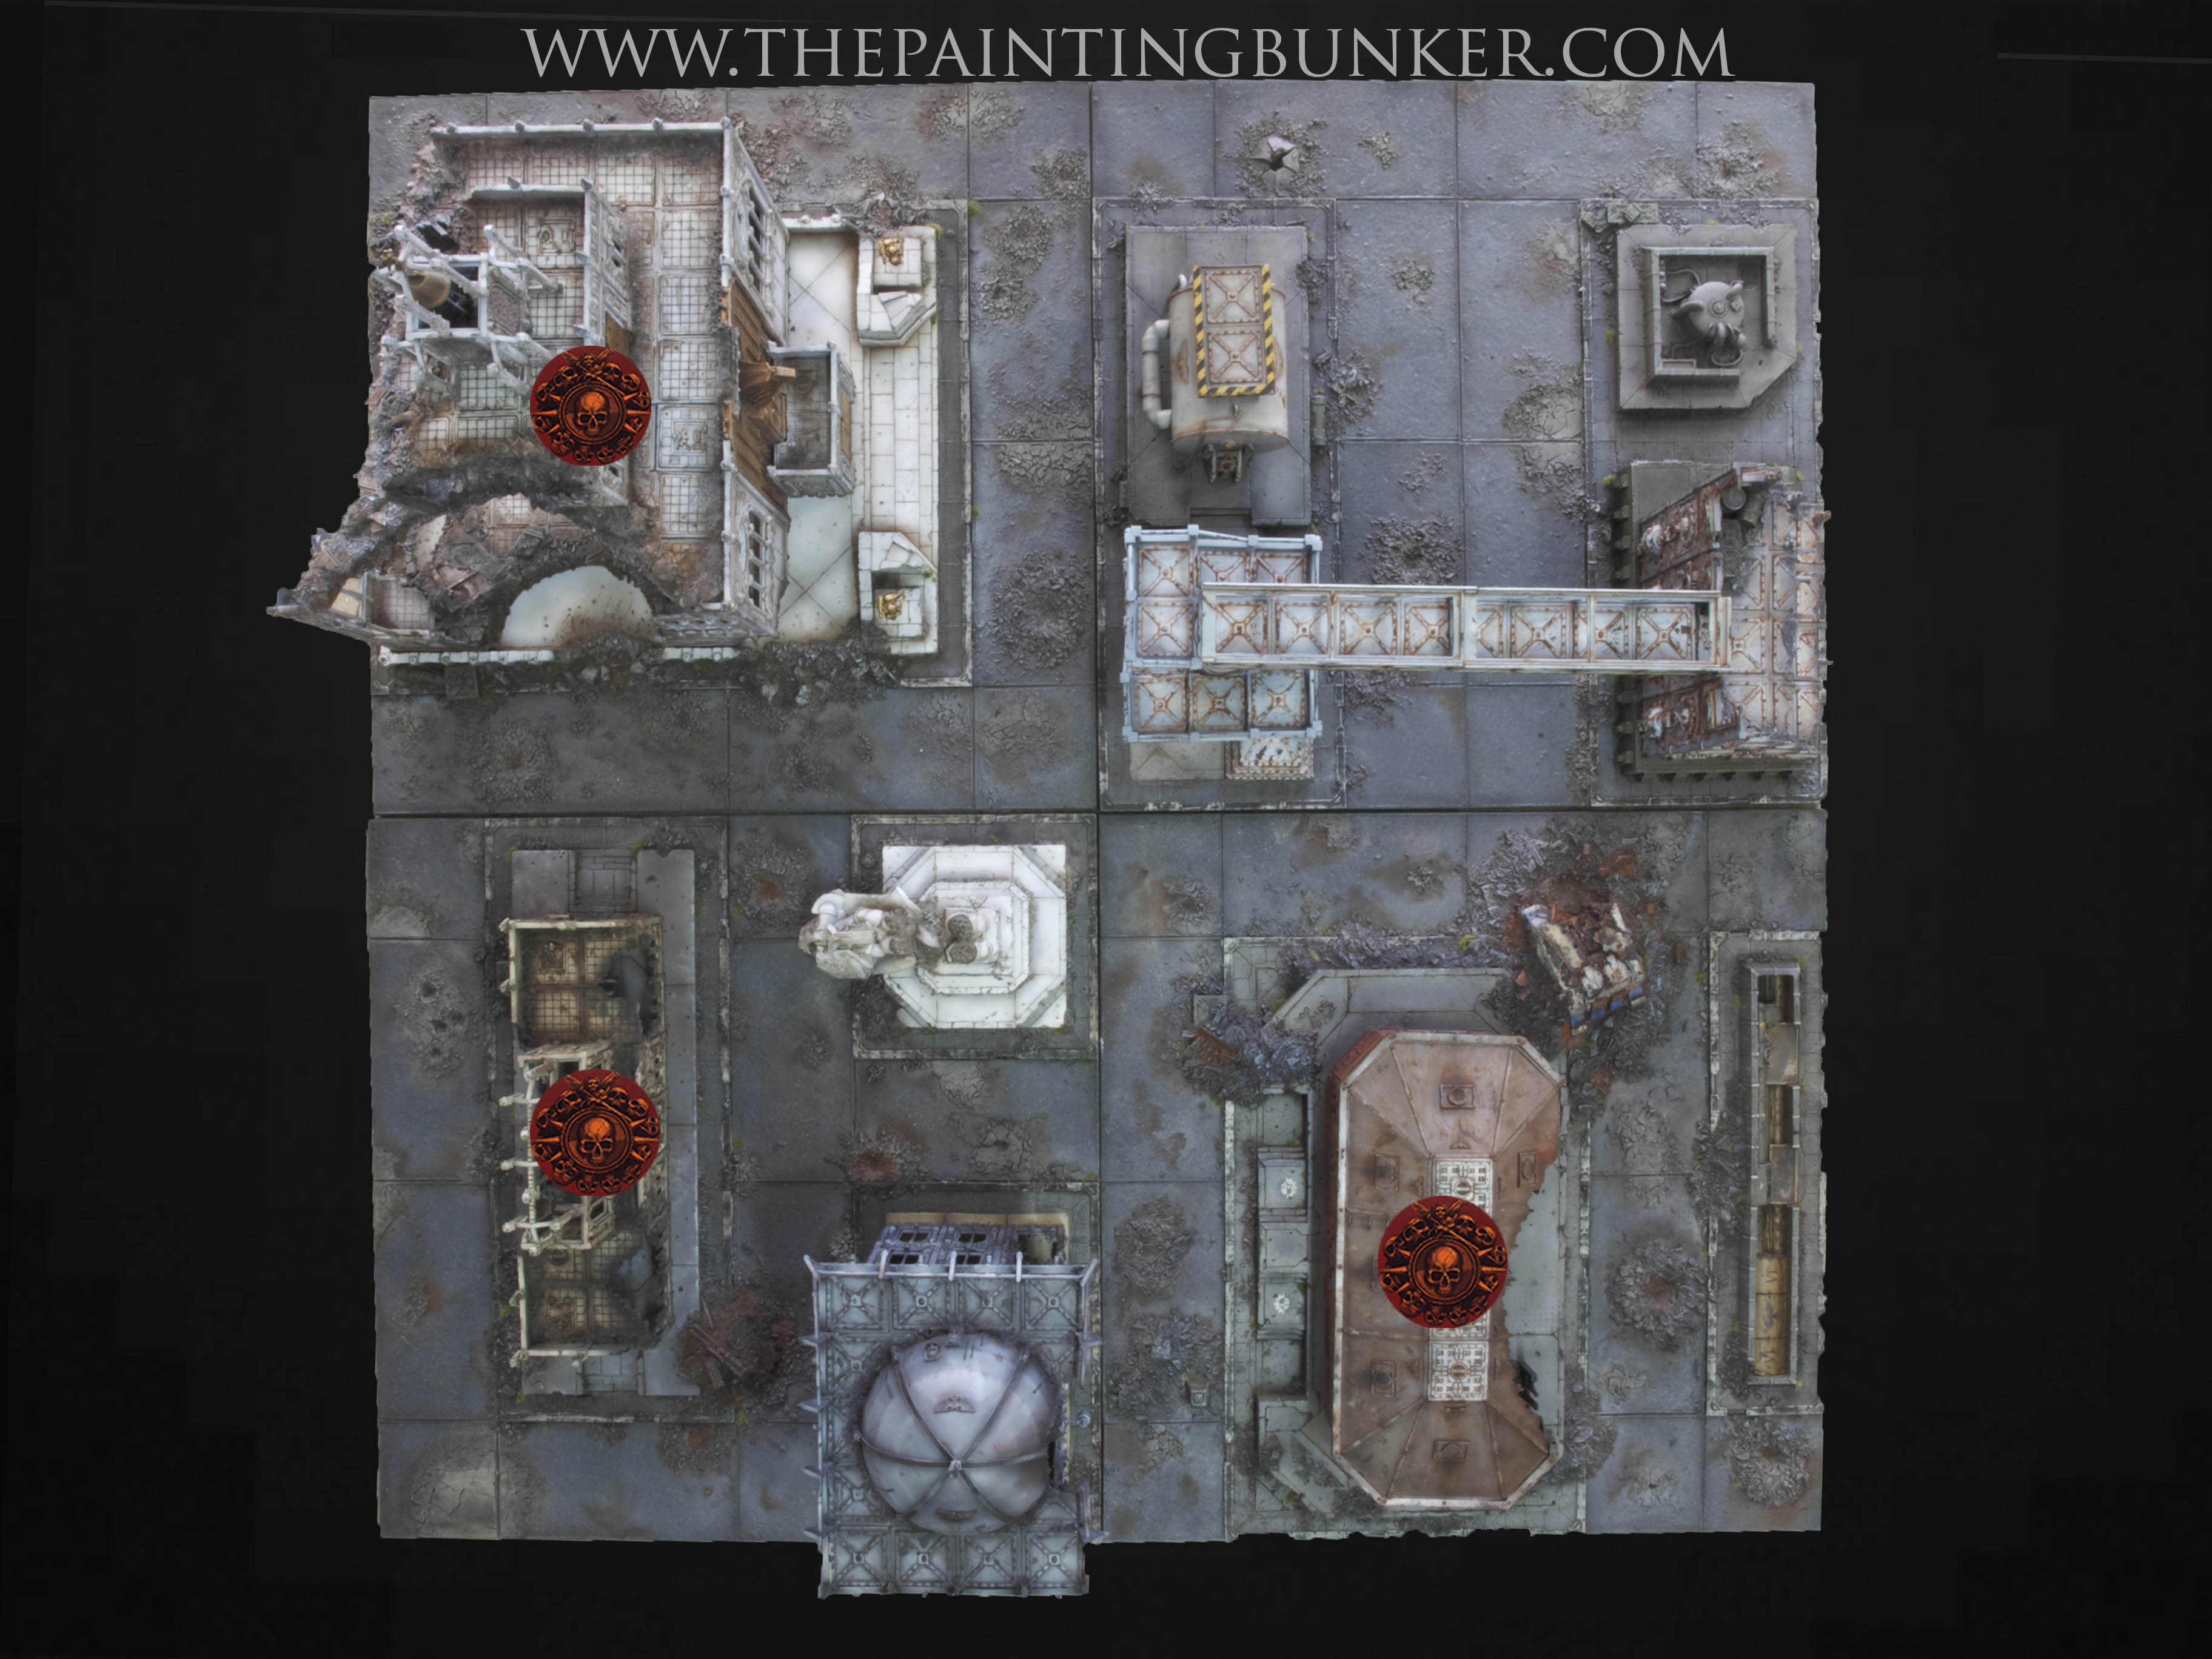
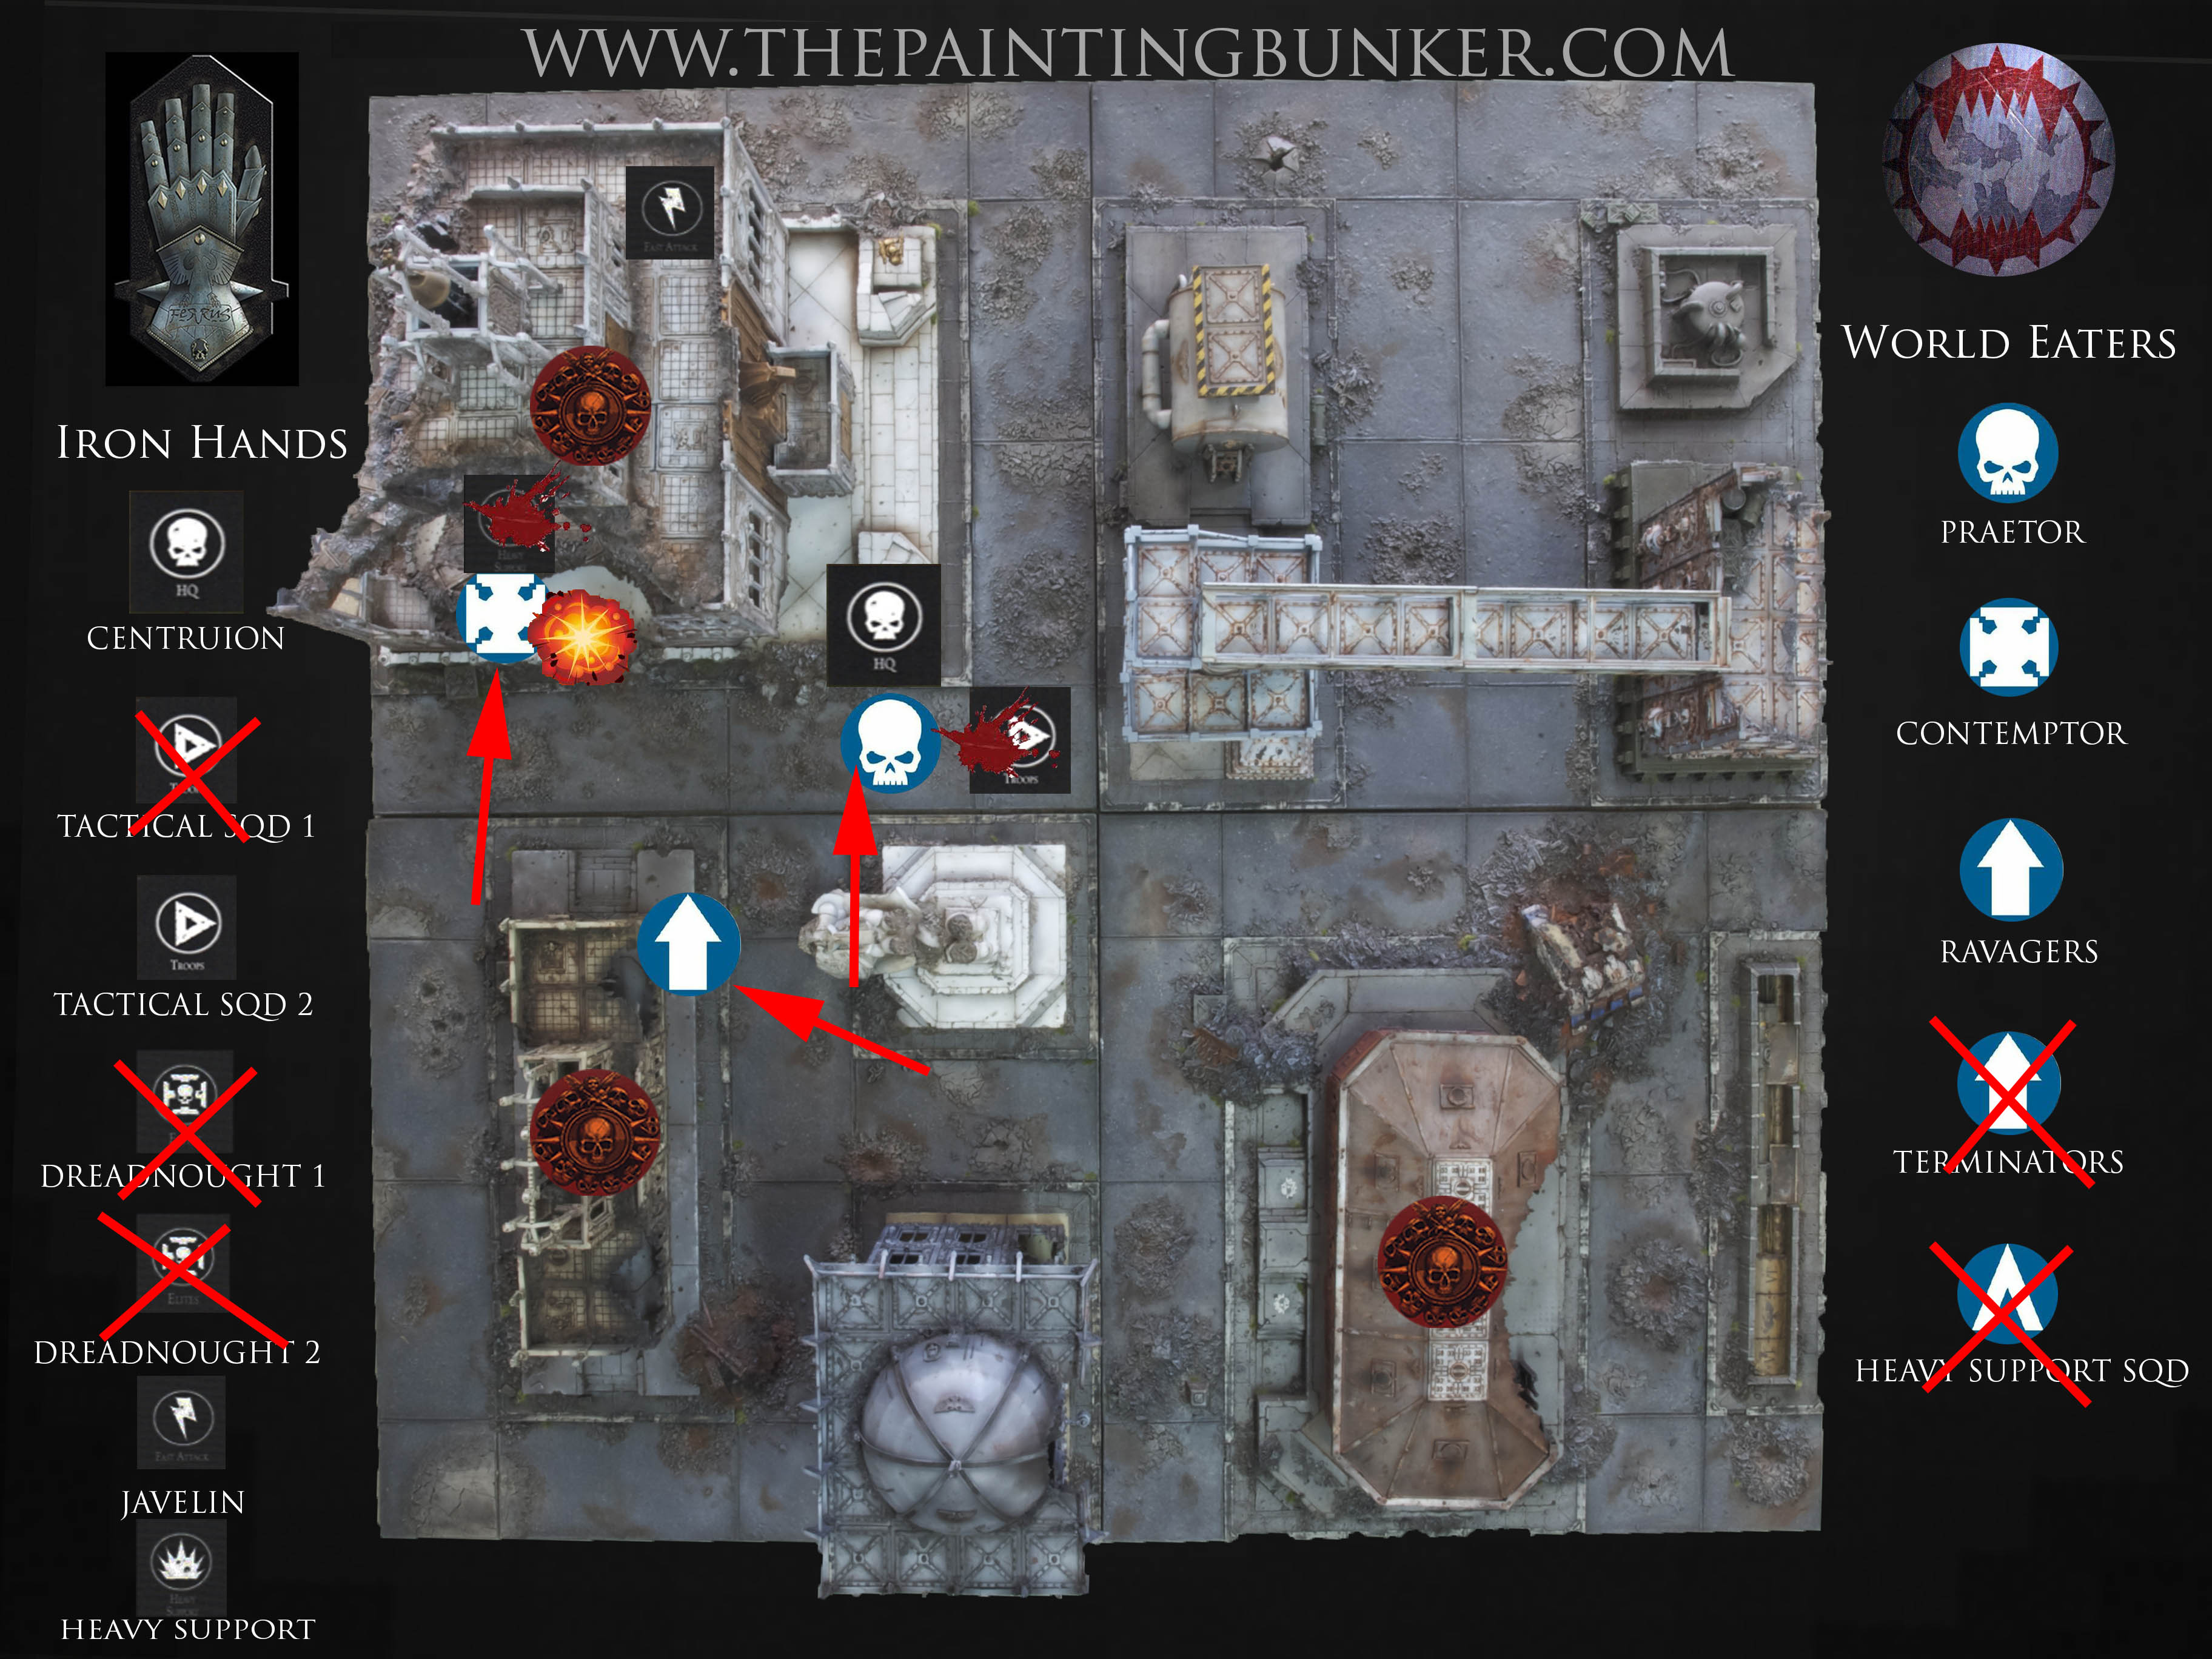
The Battle Field that this epic conflict would be fought over
Being only 1,000pts we oped for a 4 x 4 table. Being such complex terrain it would give us plenty of opportunities to manoeuvre.
We began the pre game admin, rolling for mission, deployment and warlord traits. During this phase, my dice rolling luck was true to form. Rolling three ones in row when determining who got to choose sides, who deployed first, and warlord traits. (the last one wasn’t so bad though)
So for the mission, we rolled a five (well Keepy did, I could only roll ones, remember) This mission is an objective mission, each worth three points. Anyone unit can claim or deny an objective and each enemy unit totally destroyed or broken at the end of the game is worth a VP. First Blood and Slay the Warlord are in effect too.
For the deployment type, keepy rolled a three. Search and Destroy. The map looks like this…
For the World Eaters warlord trait I quite appropriately got Bloody-handed. This meant my Warlord and any unit he joins cause Fear – nice
The Iron Hands Warlord trait was Void Walker. The Warlord has Adamantine Will and allows one unit of infantry to deep strike…
We then placed out D3 +2 objectives. I was in charge of the roll. Predictably, I rolled a 1. So we had three objectives to deploy. When determining who would deploy the first objective, Keepy won the roll off. Because I rolled a one…
The objectives had to be placed on the ground floor of a building, and 12′ from a table edge and each other. We had to fudge this a little to get it to work right, but you get the idea.
So, as I mentioned Keepy won the roll for choosing the deployment zone and who deploys first. Keepy chose the top left corner, so that meant I got the bottom right. Keepy also chose to go first. He figured getting the first opportunity to inflict causalities on my small, elite force would be a good plan.
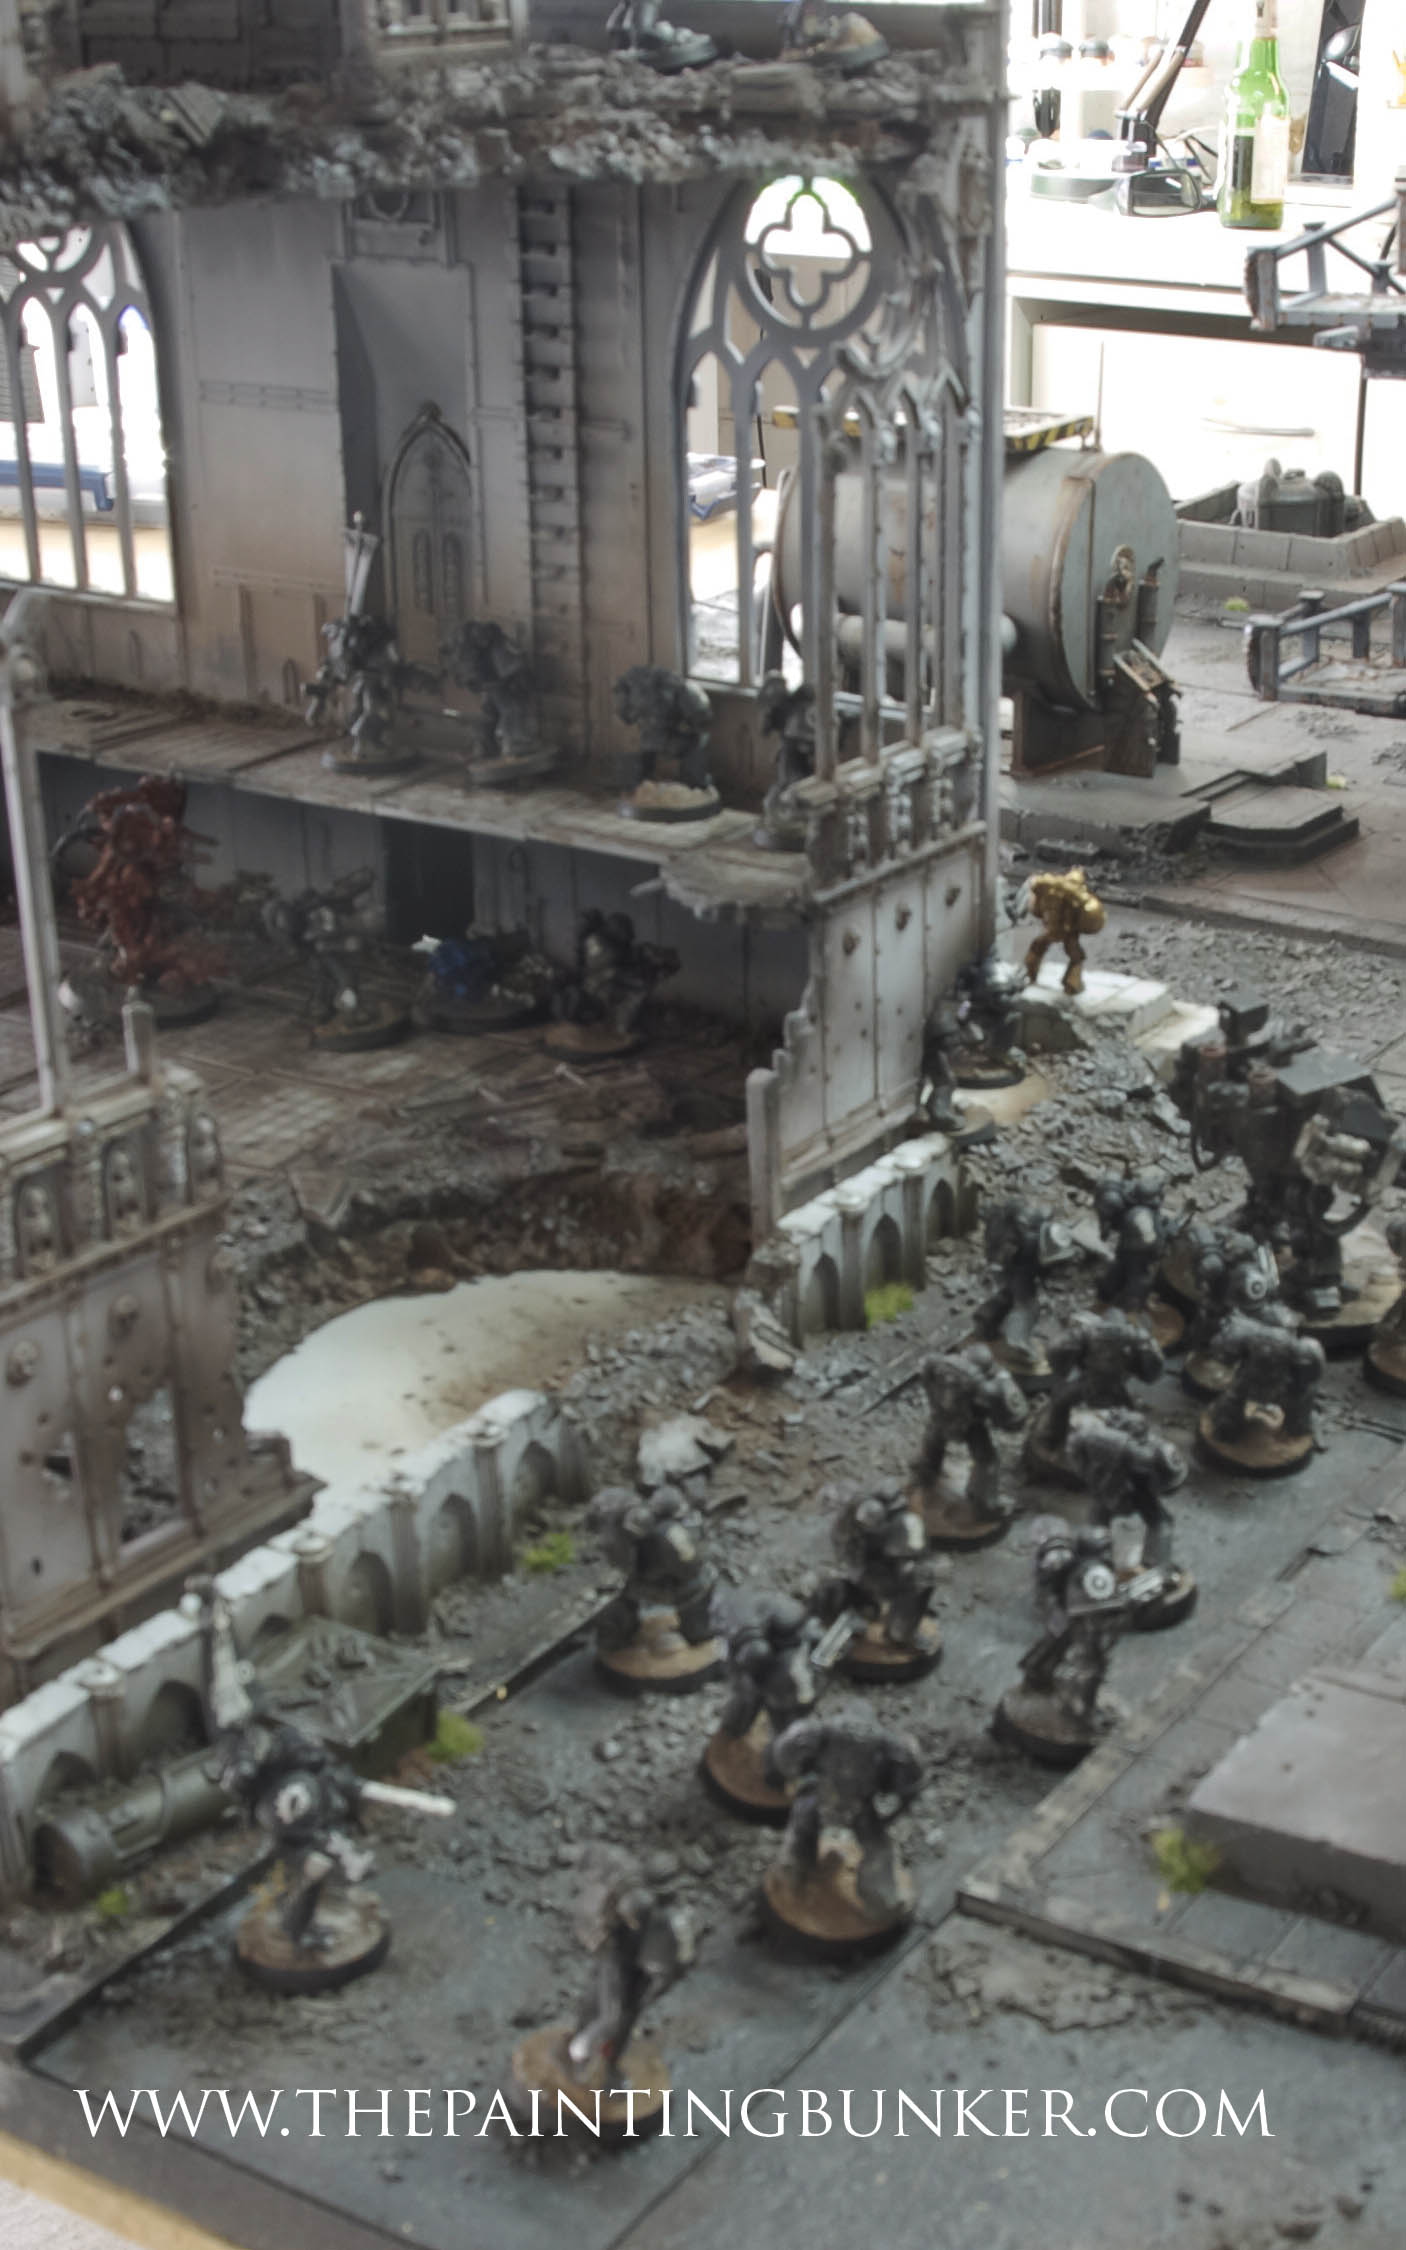
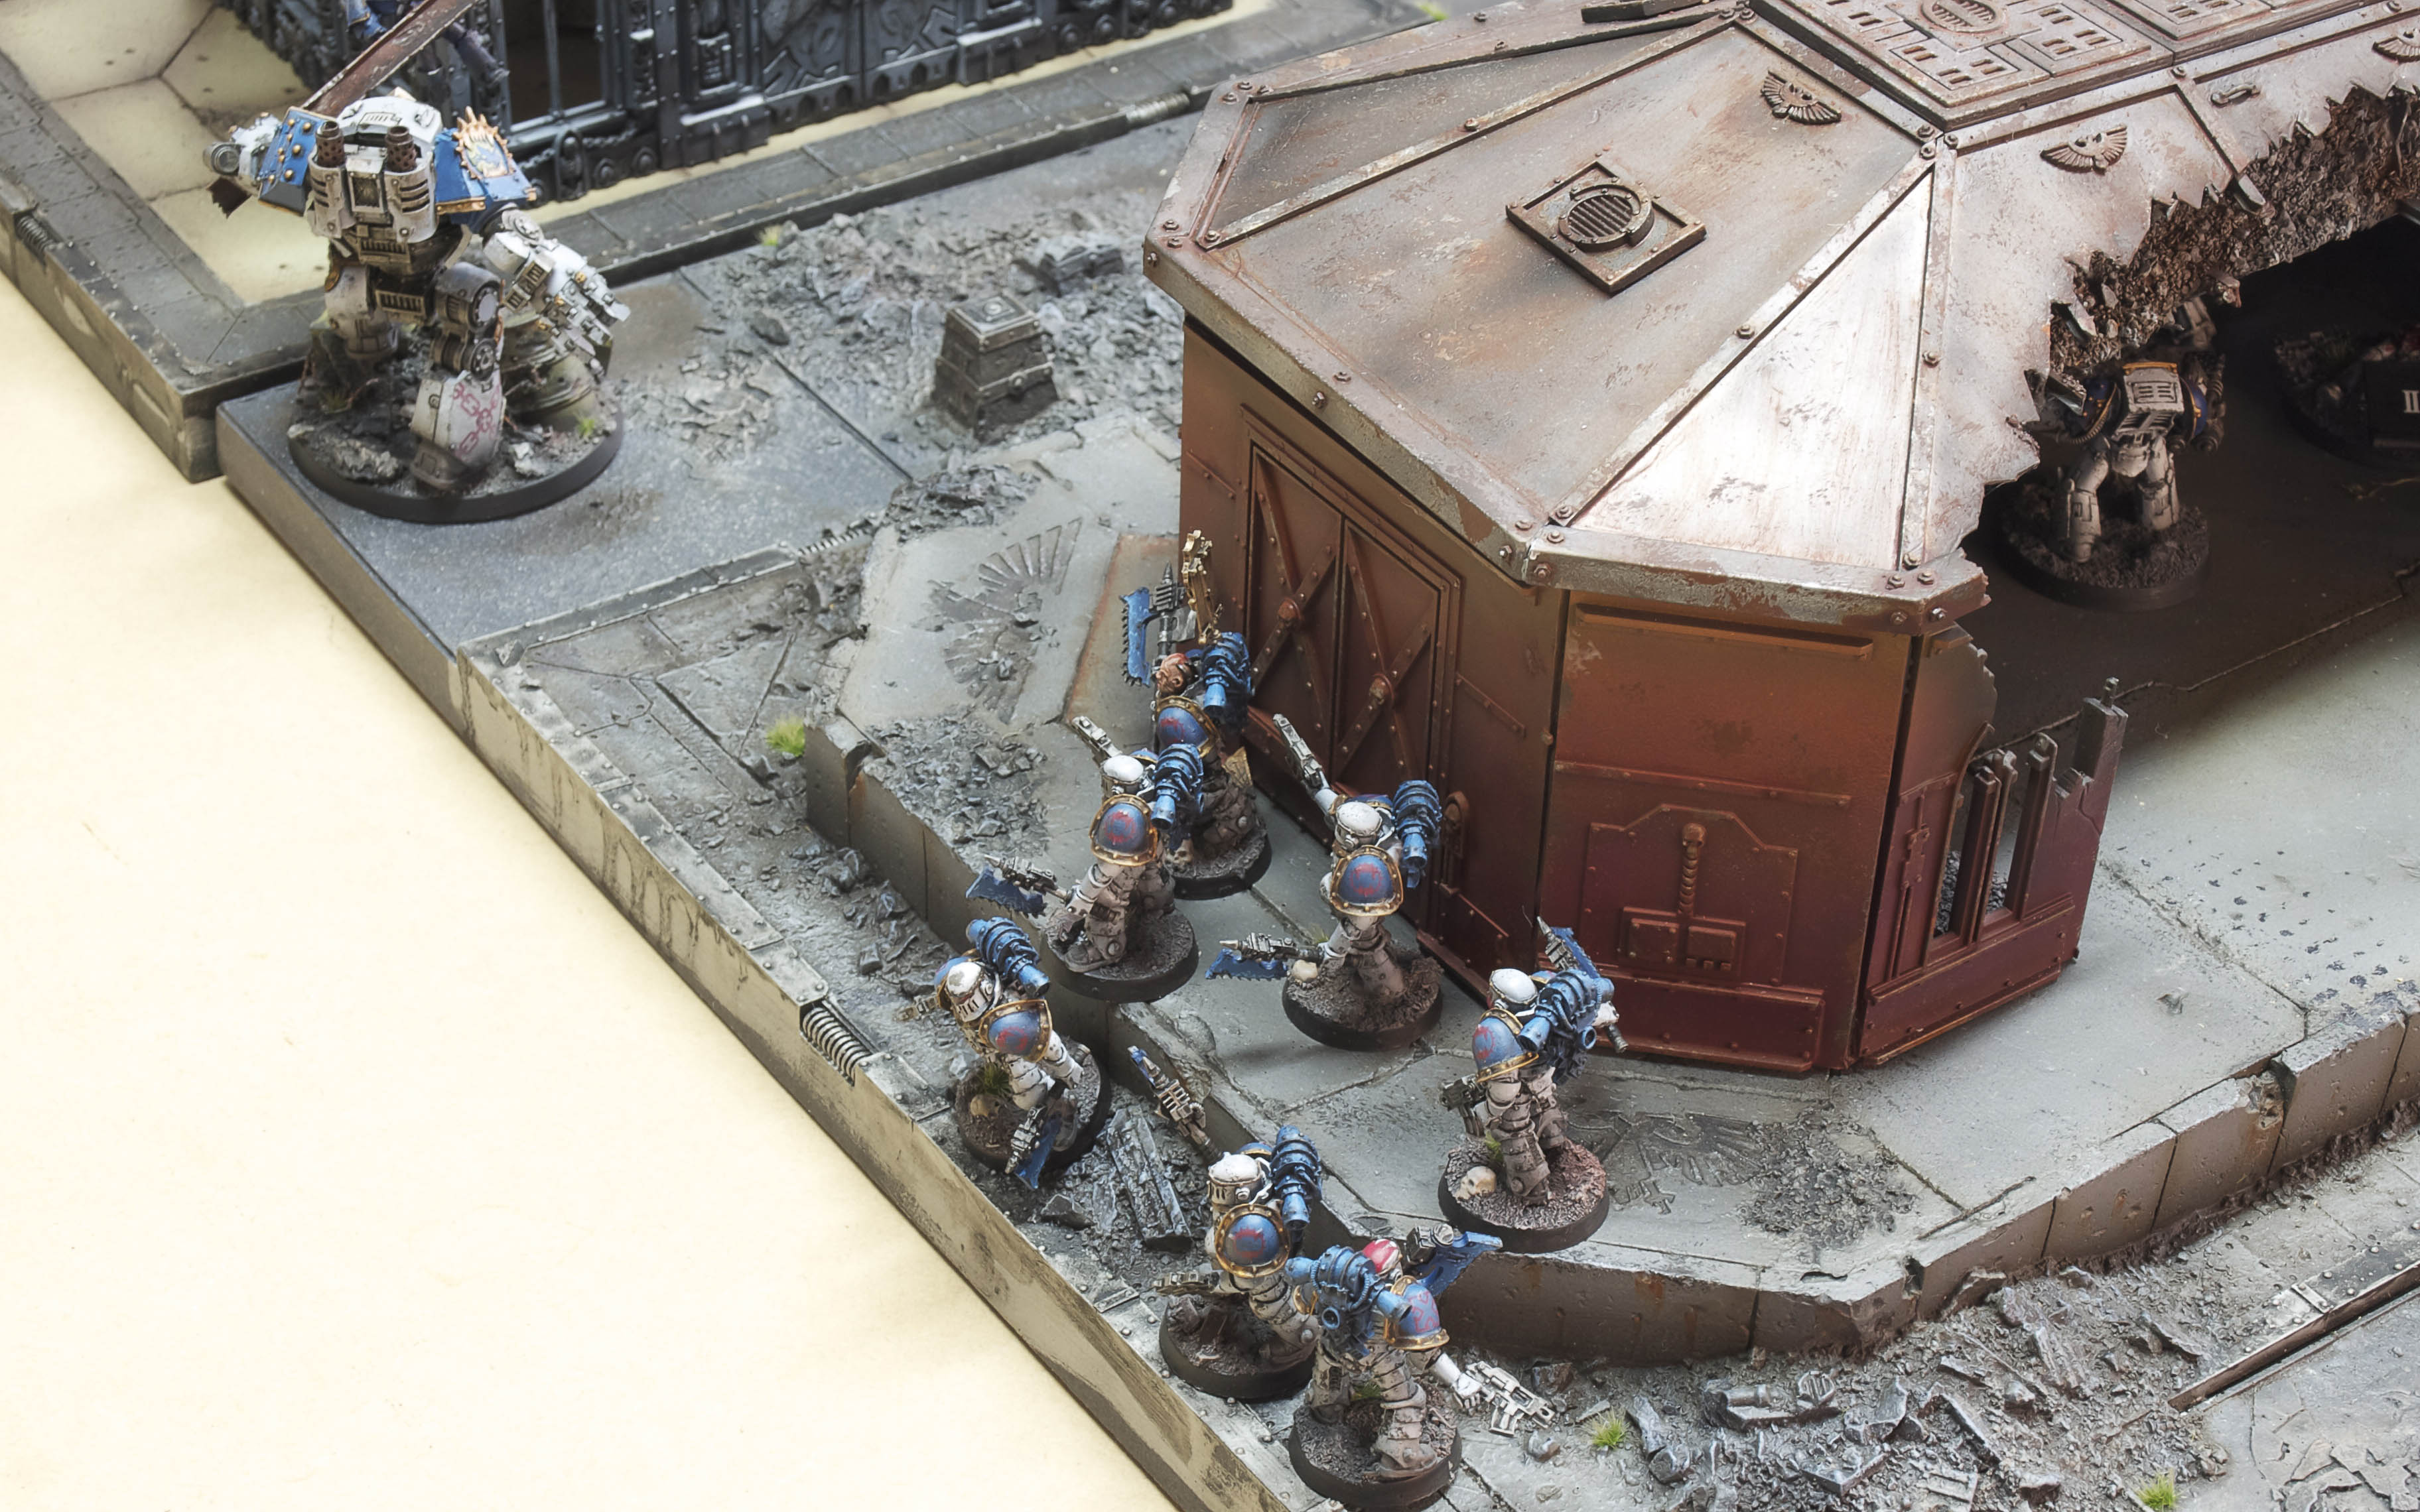
Keepy, as I’d predicted, deployed quite aggressively. His force had a much larger foot print on the table than mine and he used it to this advantage. Seeking to dominate the centre of the board to restrict my freedom of movement. He placed his heavy weapons on top of the Cathedral so he could employ them at maximum range, probably at my heavy weapons. I was very anxious about the missile launchers. They had very good observation and fields of fire, and really dominated the ground. They were my number one high value target. If I could eliminate them it would mean my units wouldn’t have to worry about being picked off as they moved towards taking the objective in the bottom left hand board.
My scheme of manoeuvre was to secure the objective in my deployment zone with the Terminators and Heavy Weapons. The heavy weapons would keep his forces at a distance and the Terminators would be used in the close fight if it went pear shaped. Meanwhile, the Contemptor, Praetor and his Rampagers would move up the flank to secure the unclaimed objective. I had to watch his dreadnoughts though. They were both armed with Multi Meltas. This would spell disaster for my Contemptor if I got too close. Which was exactly what I was going to have to do at some point. My only real plan to combat this was to try and separate the two dreadnoughts so that only one could take a shot, and with any luck… miss.
Iron Hands Deployment
Those pesky missile launchers on top of the Cathedral. Worrying
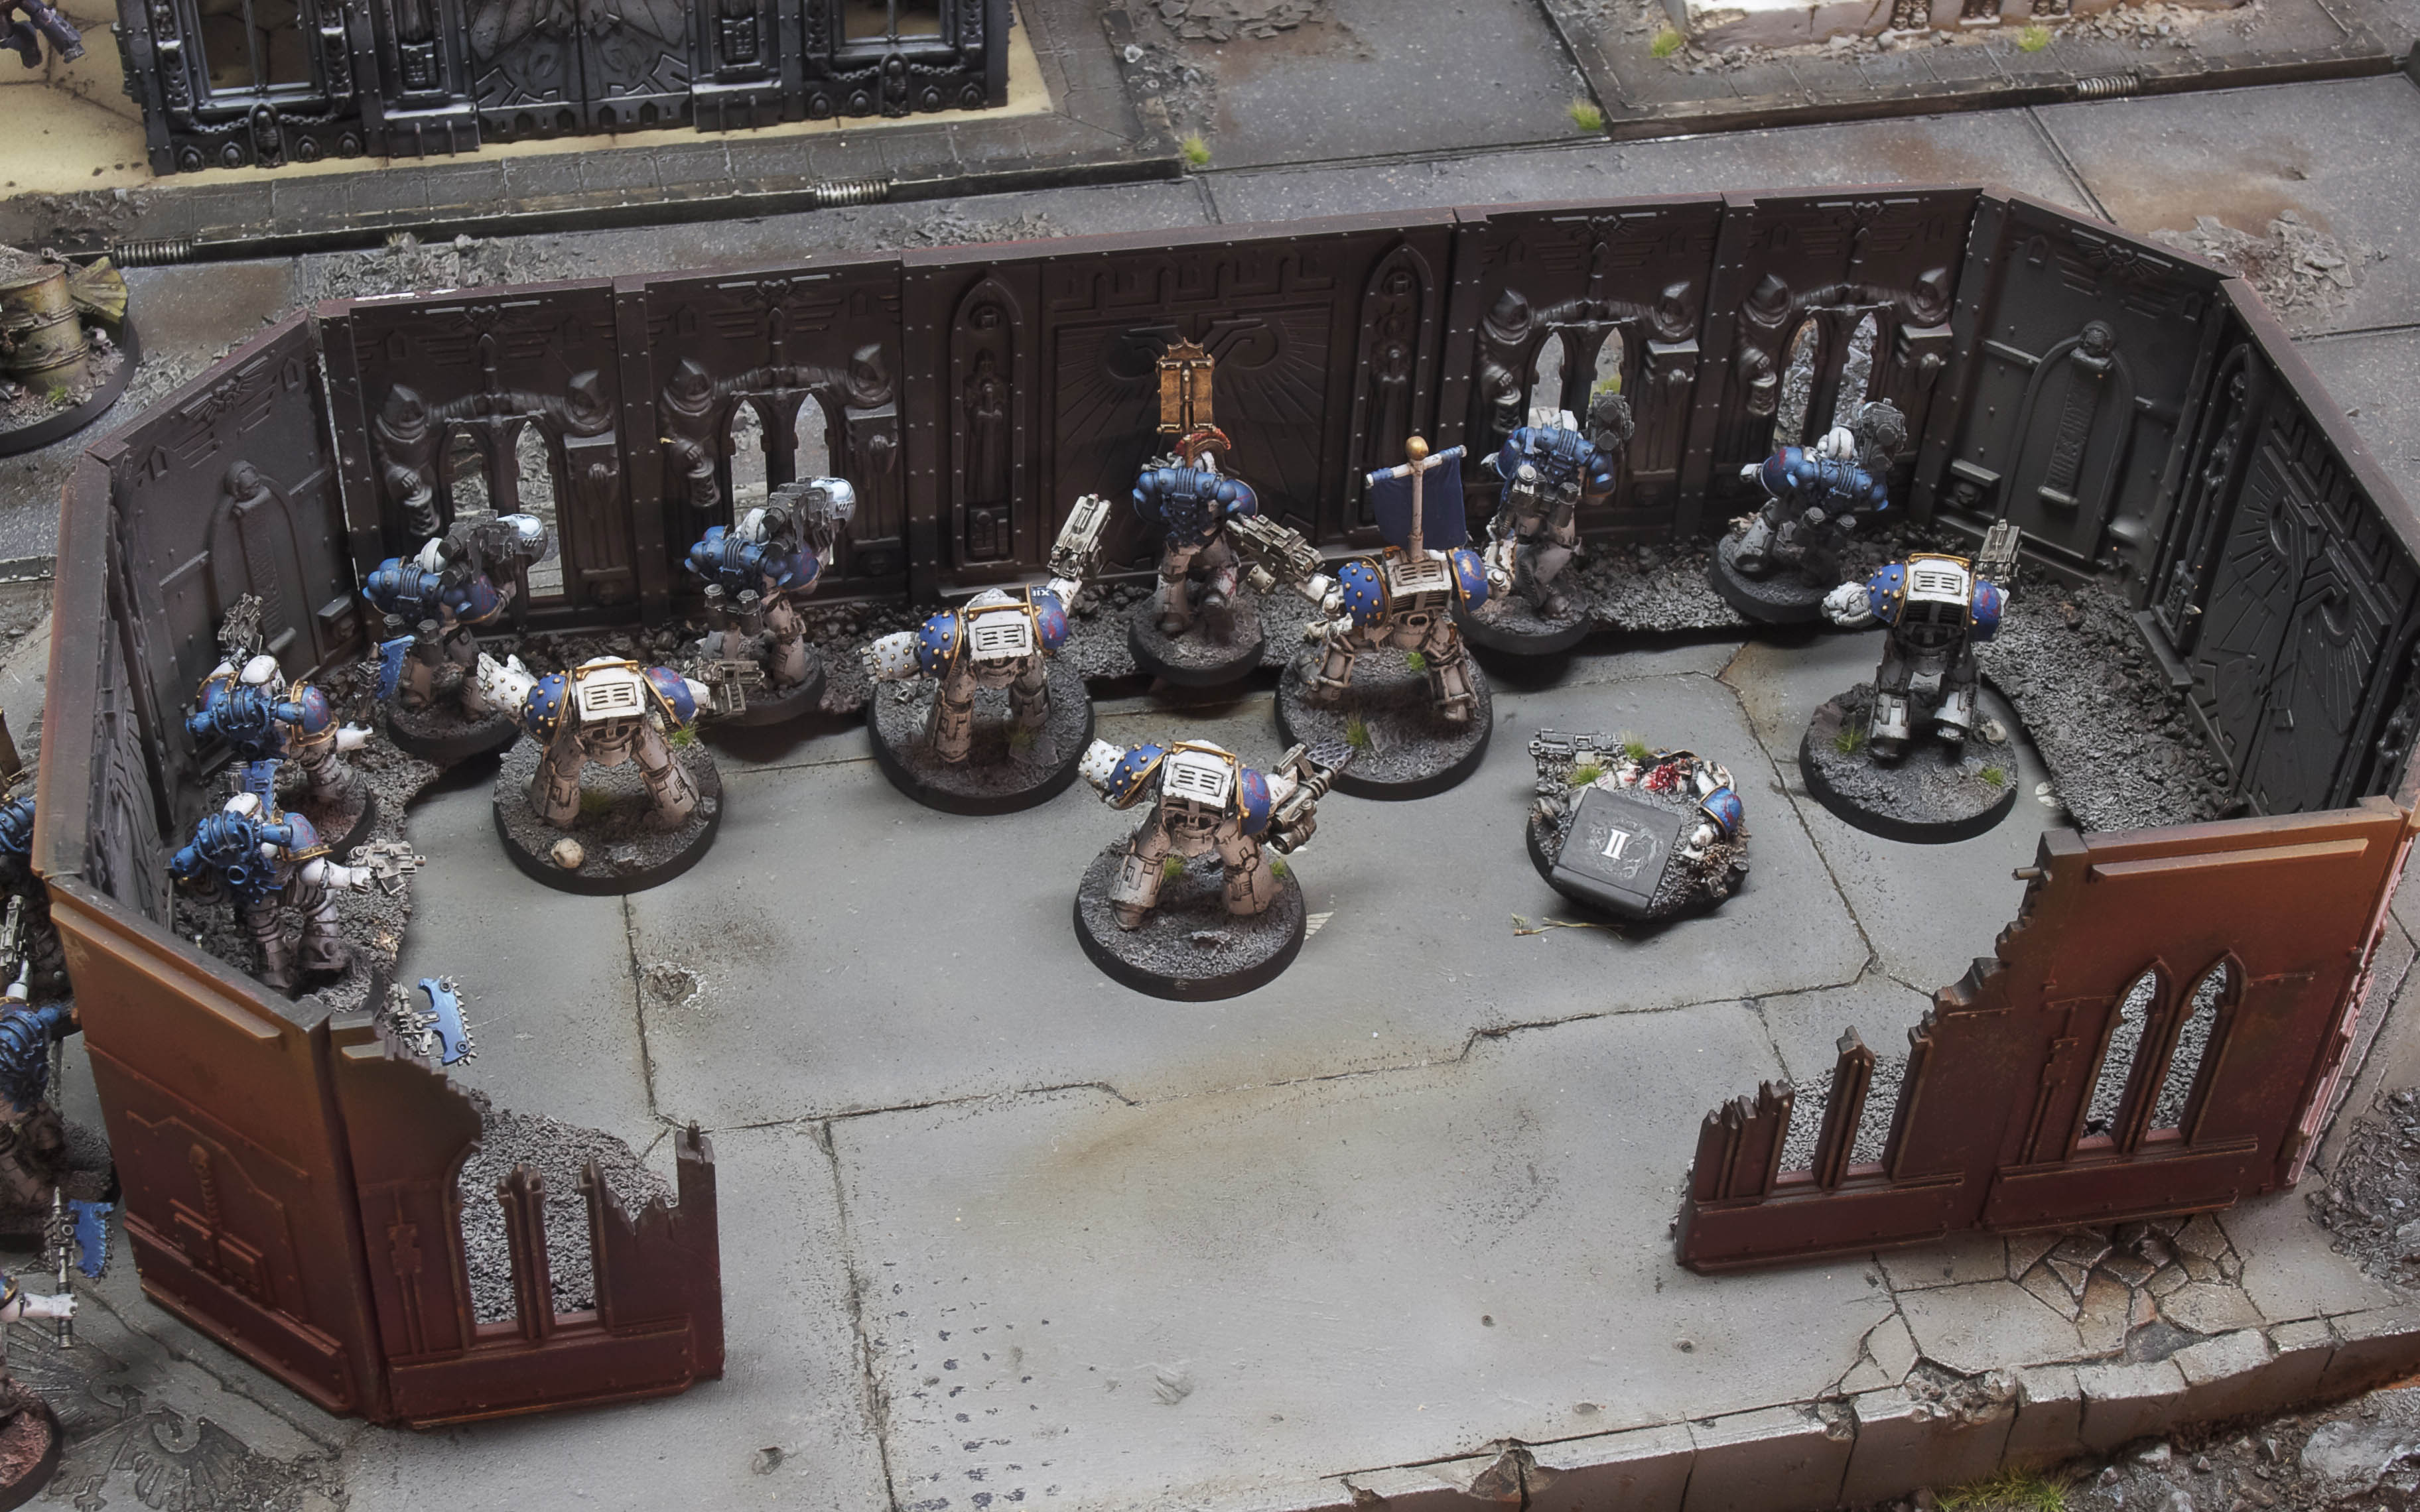
His Forge Lord guarding the objective, supported by a Tactical Squad
The Heavy Support Squad and Terminators secure the building with their heavy weapons and strong defensive ability. The building providing superior cover and concealment
The Praetor and his Rampagers remain out of sight for the expected first turn barrage. The Contemptor leading the way up the flank.
I roll to steal the initiative…. miraculously I roll a 6! The World Eaters seize the initiative and get first turn! This has really put a spanner in the works for Keepy!
First Turn – World Eaters
Sticking with my plan, I moved the Contemptor up the flank along with the Praetor and his Rampagers. Due to the Contemptors fleet special rule, I managed to get him a full 12″ up the flank. Sadly, the Praetor and his Rampagers had to move through some difficult terrain and even with their run, only managed 6″ This got them almost to the other side of the street though. In the shooting phase, there was really one one thing to do. Smoke those missile launchers! The Devastators let rip, wounding four Iron Hands, and killing three. This then caused a break test… which they failed! Not only did they fail, but they ran back 10″. In their panicked state they actually ran off the edge of the Cathedral and the two remaining had to take an impact test. Amazingly, they both lived!
My shooting phase couldn’t have gone any better if I’d planned it that way. I was feeling pretty content with myself. I’d managed to neutralise my number one high value target in the first shooting phase and my out flanking manoeuvre was running smoothly.
First Turn – Iron Hands
The Iron Hands were not worried about their heavy weapons retreating at the surprise attack from the distant building. They continued their relentless, methodical march towards the objective directly ahead. After the devastators retreated, the Javelin moved up to take a better look at what caused the casualties. Spotting the threat they opened up with their twin linked cyclone missile launcher, killing one. Reading the battlefield, the Tactical squad open up where the enemy devastators are located, but fail to inflict any causalities. Then the Dreadnought sees an enemy devastator in a window and fires his multi melta, turning one heavy weapon gunner into bubbling pool of ceramite and dissolving, unrecognisable tissue.
The enemy devastators were buoyed by their recent kill of their counterparts and passed their moral test.
The Iron Hands move up to dominate the ground
The Contemptor leads the way up the flank, with the Praetor and his Rampagers closely behind.
Victory Points at the end of Turn one
Iron Hands :- 3 World Eaters :- 3
Second Turn – World Eaters
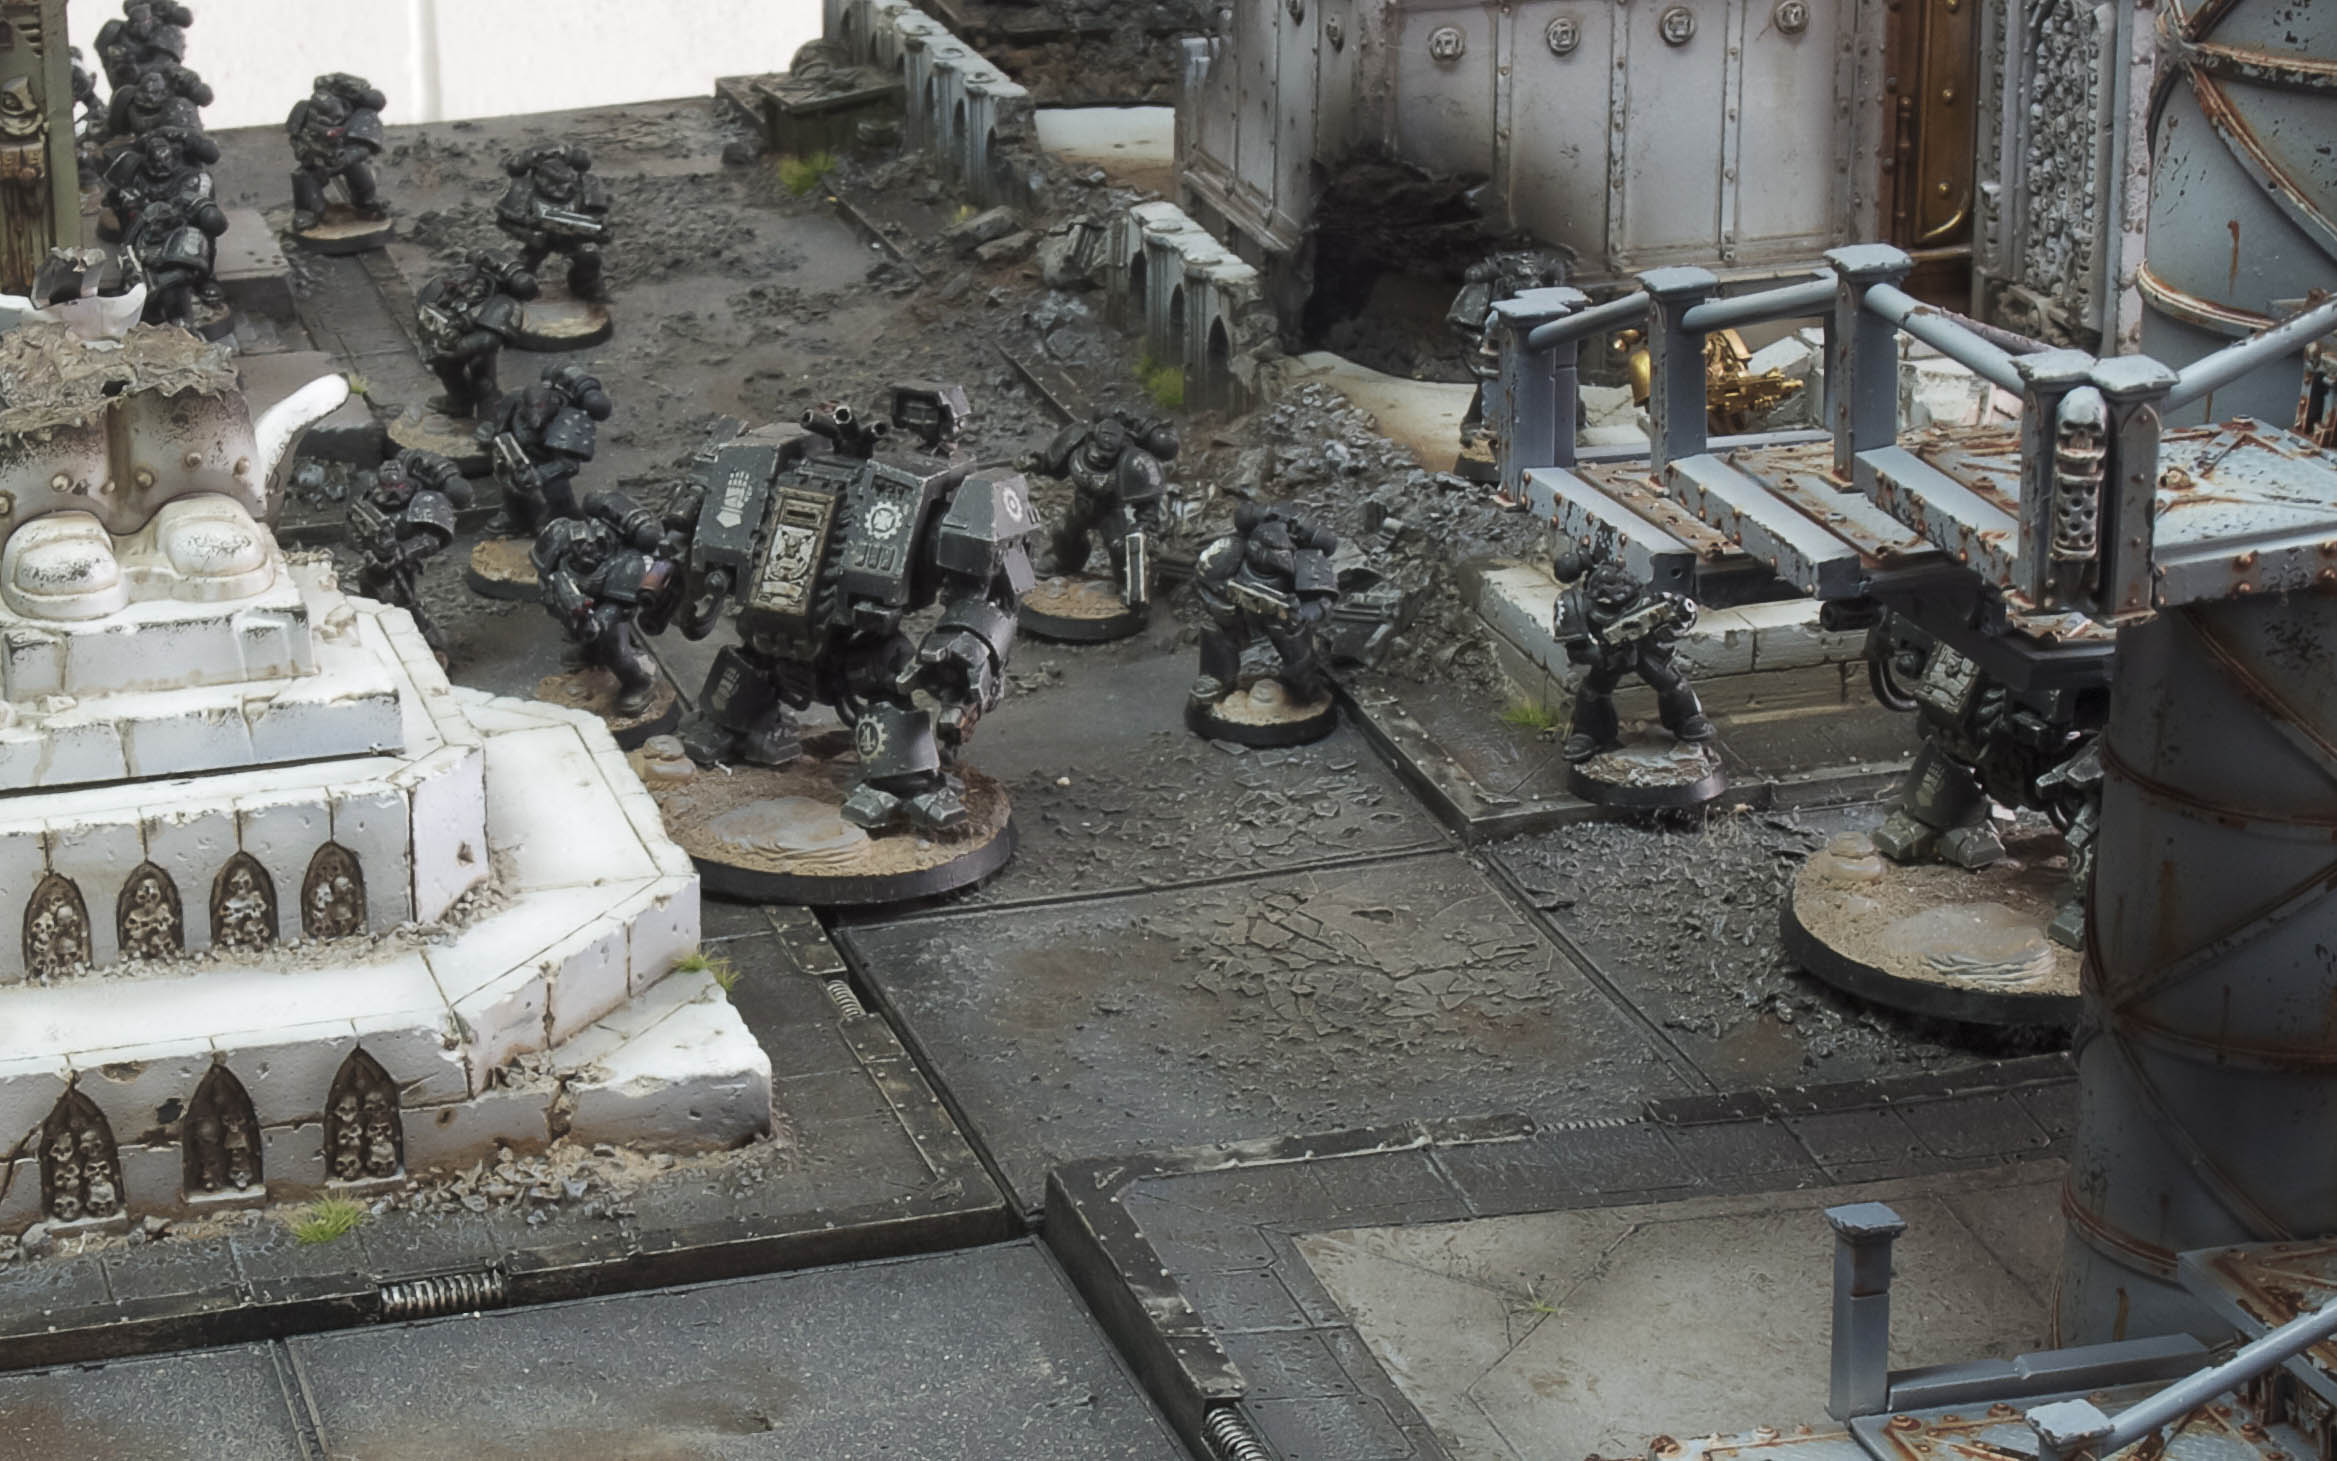
Again, the Contemptor, along with the Praetor and Rampagers continue their swift out flanking manoeuvre. This is now beginning to shape the enemies forces. A distinct split is forming between the two Tactical Squad and Dreadnought battle groups as they go in opposite directions.
The devastators see another high value target present itself in the exact same sport where previously there stood an enemy devastator squad. Taking their opportunity, they shoot. Hitting the Javelin in its propulsion system. Halting the skimmer.
Second Turn – Iron Hands
The implacable advance towards the centre of the board continues. With both Tactical squads, and one of the Dreadnoughts moving towards the forward objective. The other Dreadnought, sees an outflanking Contemptor Dreadnought moving through the buildings. Taking careful aim, he takes his shot. The shot hits home, however the weapon systems effectiveness is reduced because of the range. However he’s seen what the treacherous World Eaters are up to now. He won’t let them succeed at their plan. The devastators, now regrouped, move up the flank to offer support, they too see the outflanking Contemptor. They both make snap shots, missing wildly
Tactical Squad 1 open fire again on the enemy devastators, however they inflict no causalities. Tactical Squad 2 see other, immense figures moving around behind the Devastators and take shots at the brooding Terminator squad. Their shots bounce of the tactical dreadnought armour. Despite the crew of the Javelin having no propulsion system, they are still in the fight and take it to the enemy devastators, killing the Sergeant. Not perturbed, the maddened enemy devastators continue to fight.
The Iron Hands implacable march towards their objective
The World Eaters taking advantage of the cover, and the enemies lack of ranged weapons to move unhindered up the flank.
Victory Points at the end of Turn two
Iron Hands :- 3 World Eaters :- 3
Third Turn – World Eaters
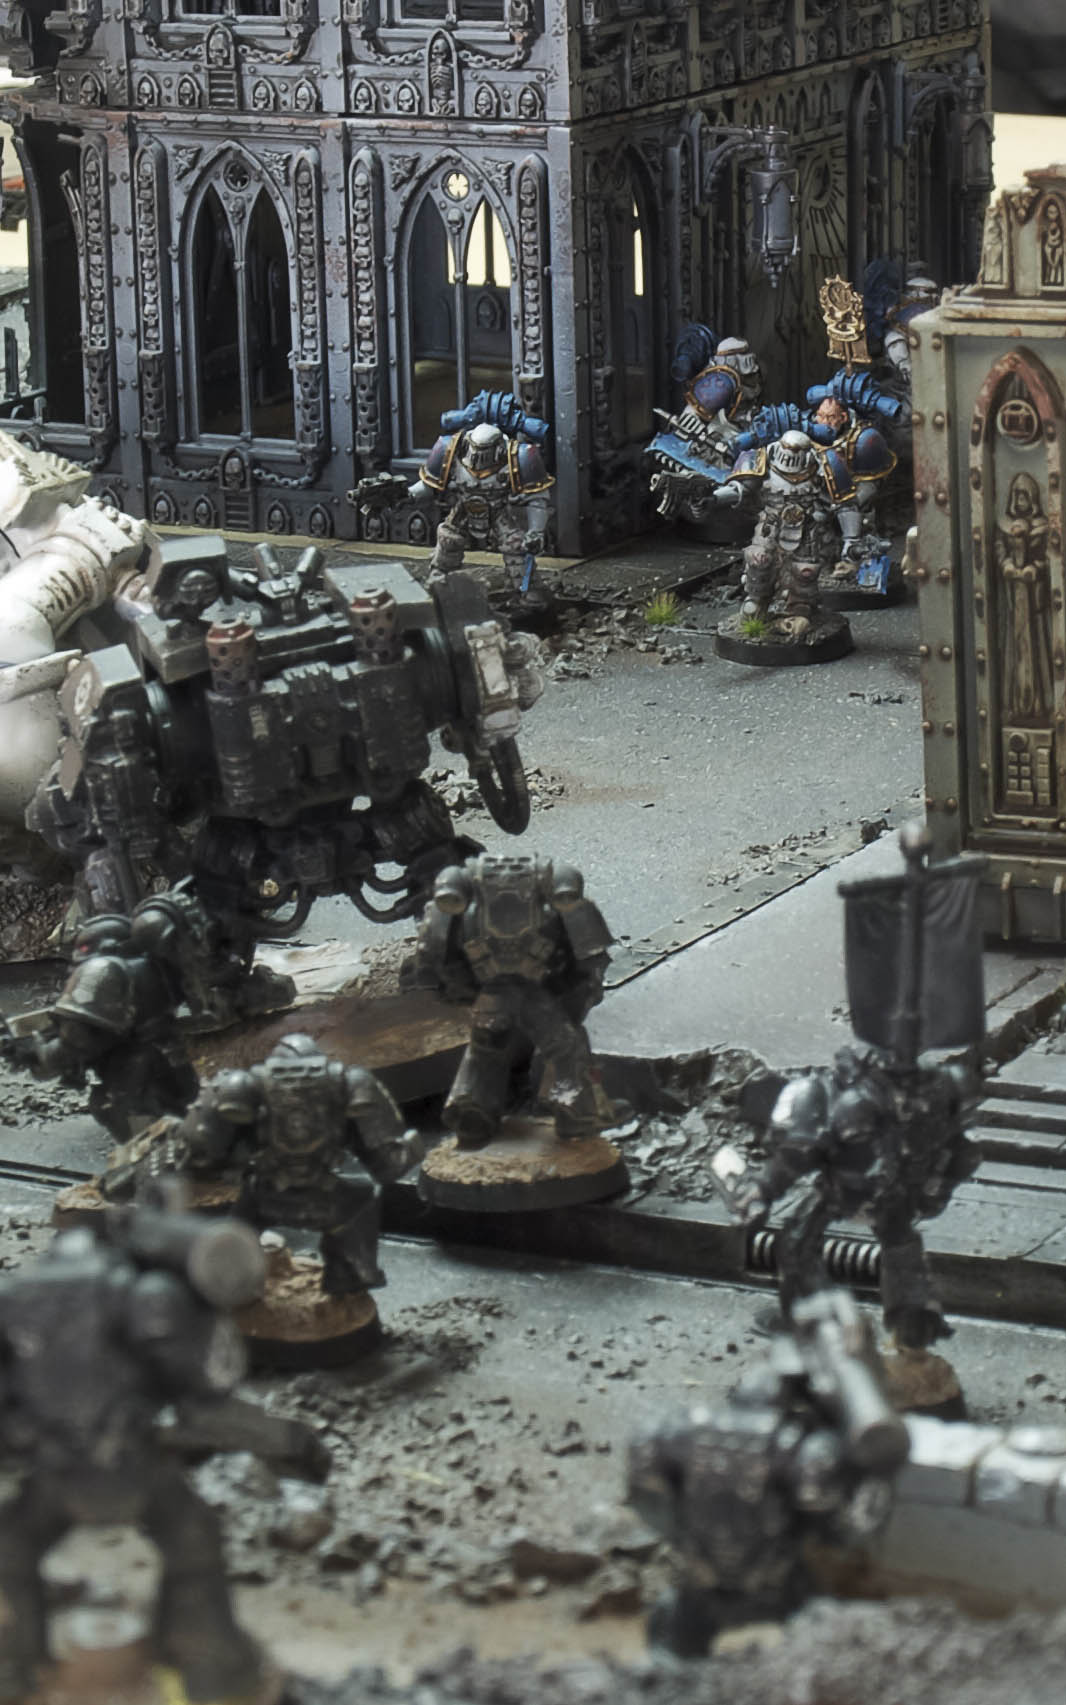
Sensing they need to act, the Terminators move out to face their advancing foe. Knowing that the Praetor and the Rampagers will be moving up from the flank into striking distance as well. To support their advance, the two remaining devastators incinerate three enemy line Astartes. Knowing the trap is now set, the Praetor and his Rampagers also take the opportunity to move up the street within striking distance of the enemies flank. The Contemptor now knows its time for him to run the gauntlet. One last advance before he can come to grips with the enemy…
Third Turn – Iron Hands
Now seeing the exact trajectory of the enemy Contemptors maneouve, the ancient Iron Hands Dreadnought moves up to the intersect his route. He wants to see close up the effect of his multi melta on the berserk World Eater Contemptor. Seeing the crazed Rampagers, lead by their fearsome Praetor, Tactical Squad 1 plant their feet into the ground, preparing to unleash a fury of disciplined bolter fire on their foe before they can close the gap between them.
Tactical Squad 2 see the hulking Terminators stepping out of the building and advancing towards them. Not to let the challenge go unheeded, they too brace themselves and prepare to rain unrelenting bolter fire on the traitor filth. To support his brothers, the Second Dreadnought moves to outflank the traitor Terminator Astartes, knowing that they’ll be able to take some punishment before being brought down.
Waiting until the last moment, the Dreadnought takes a shot at the Contemptor. However the World Eater, having centuries of experience behind him knew what the old enemy warrior was planning and stepped out of the way at the last second. Sending the super heated blast of air wide. The Dreadnought was now virtually defenceless against the Contemptor directly in front of him.
Tactical Squad 1 unleash a fury of bolter fire upon the running madmen Rampagers. The deafening sound of the bolter fire reverberating off the buildings. Were it any other foe other than an Astartes, non would have stood after the torrent. However, these were Astartes, driven mad by the Nails. Overwhelmed by their desire to close with the Iron Hands, injuries that would cripple even an Astartes, were simply shrugged off. Only two enemy warriors fell after the storm of bolts. The Iron Hands prepared to receive the inevitable charge that would now follow…
Over at the objective the Terminators stepped out of the building and were greeted with massed bolter fire from the Iron Hands. It was like stepping out into a blizzard. However the tactical dreadnought armour weathered the storm, protecting its occupants. The outflanking Dreadnought took aim with his multi melta at what appeared to be the Terminator squads leader. The super heated air dissolved the armour protecting the warrior inside, causing his flesh to bubble, boil and then liquify.
The Javelin opened fire once again in his duel to the death with the enemy devastators, however their cover saved them for what would have otherwise been fatal impacts.
The World Eaters Terminators weather a storm of bolter fire as they move out of the building
The insane Rampagers shrug off mortal wounds so they can get to grip with their foe
Victory Points at the end of Turn three
Iron Hands :- 3 World Eaters :- 3
Fourth Turn – World Eaters
They had all ran the gauntlet and survived. All what was left to do was for-fill the promise of the Nails and close with the Iron Hands in close combat. The Contemptor, Praetor, Rampagers and Terminators all move into assault range. The devastators fired a salvo at the crippled Javelin, however they fail to damage it.
The Contemptor charges at his forsaken enemy. The enemy dreadnought lets off one last shot with his multi melta before the Contemptor can close in. The shot hits the Contemptor square in the chest, however in a flurry of blue haze and sparks, the Contemptors Atomantic shielding foils the shot. The Contemptor grabs his foe with one massive gauntlet, and with the other smashes down into the loyalists sarcophagus. The fury of the blow is delivered with such force it passes straight through the armoured sarcophagus and into the Dreadnoughts power cell, causing a catastrophic failure. In a blinding flash the old warrior explodes in a shower of scarcely recognisable fragments. The World Eater hardly looses any momentum, the buzz of the Nails deafening in his head. Seeing his next victims across the street, he continues his advance.
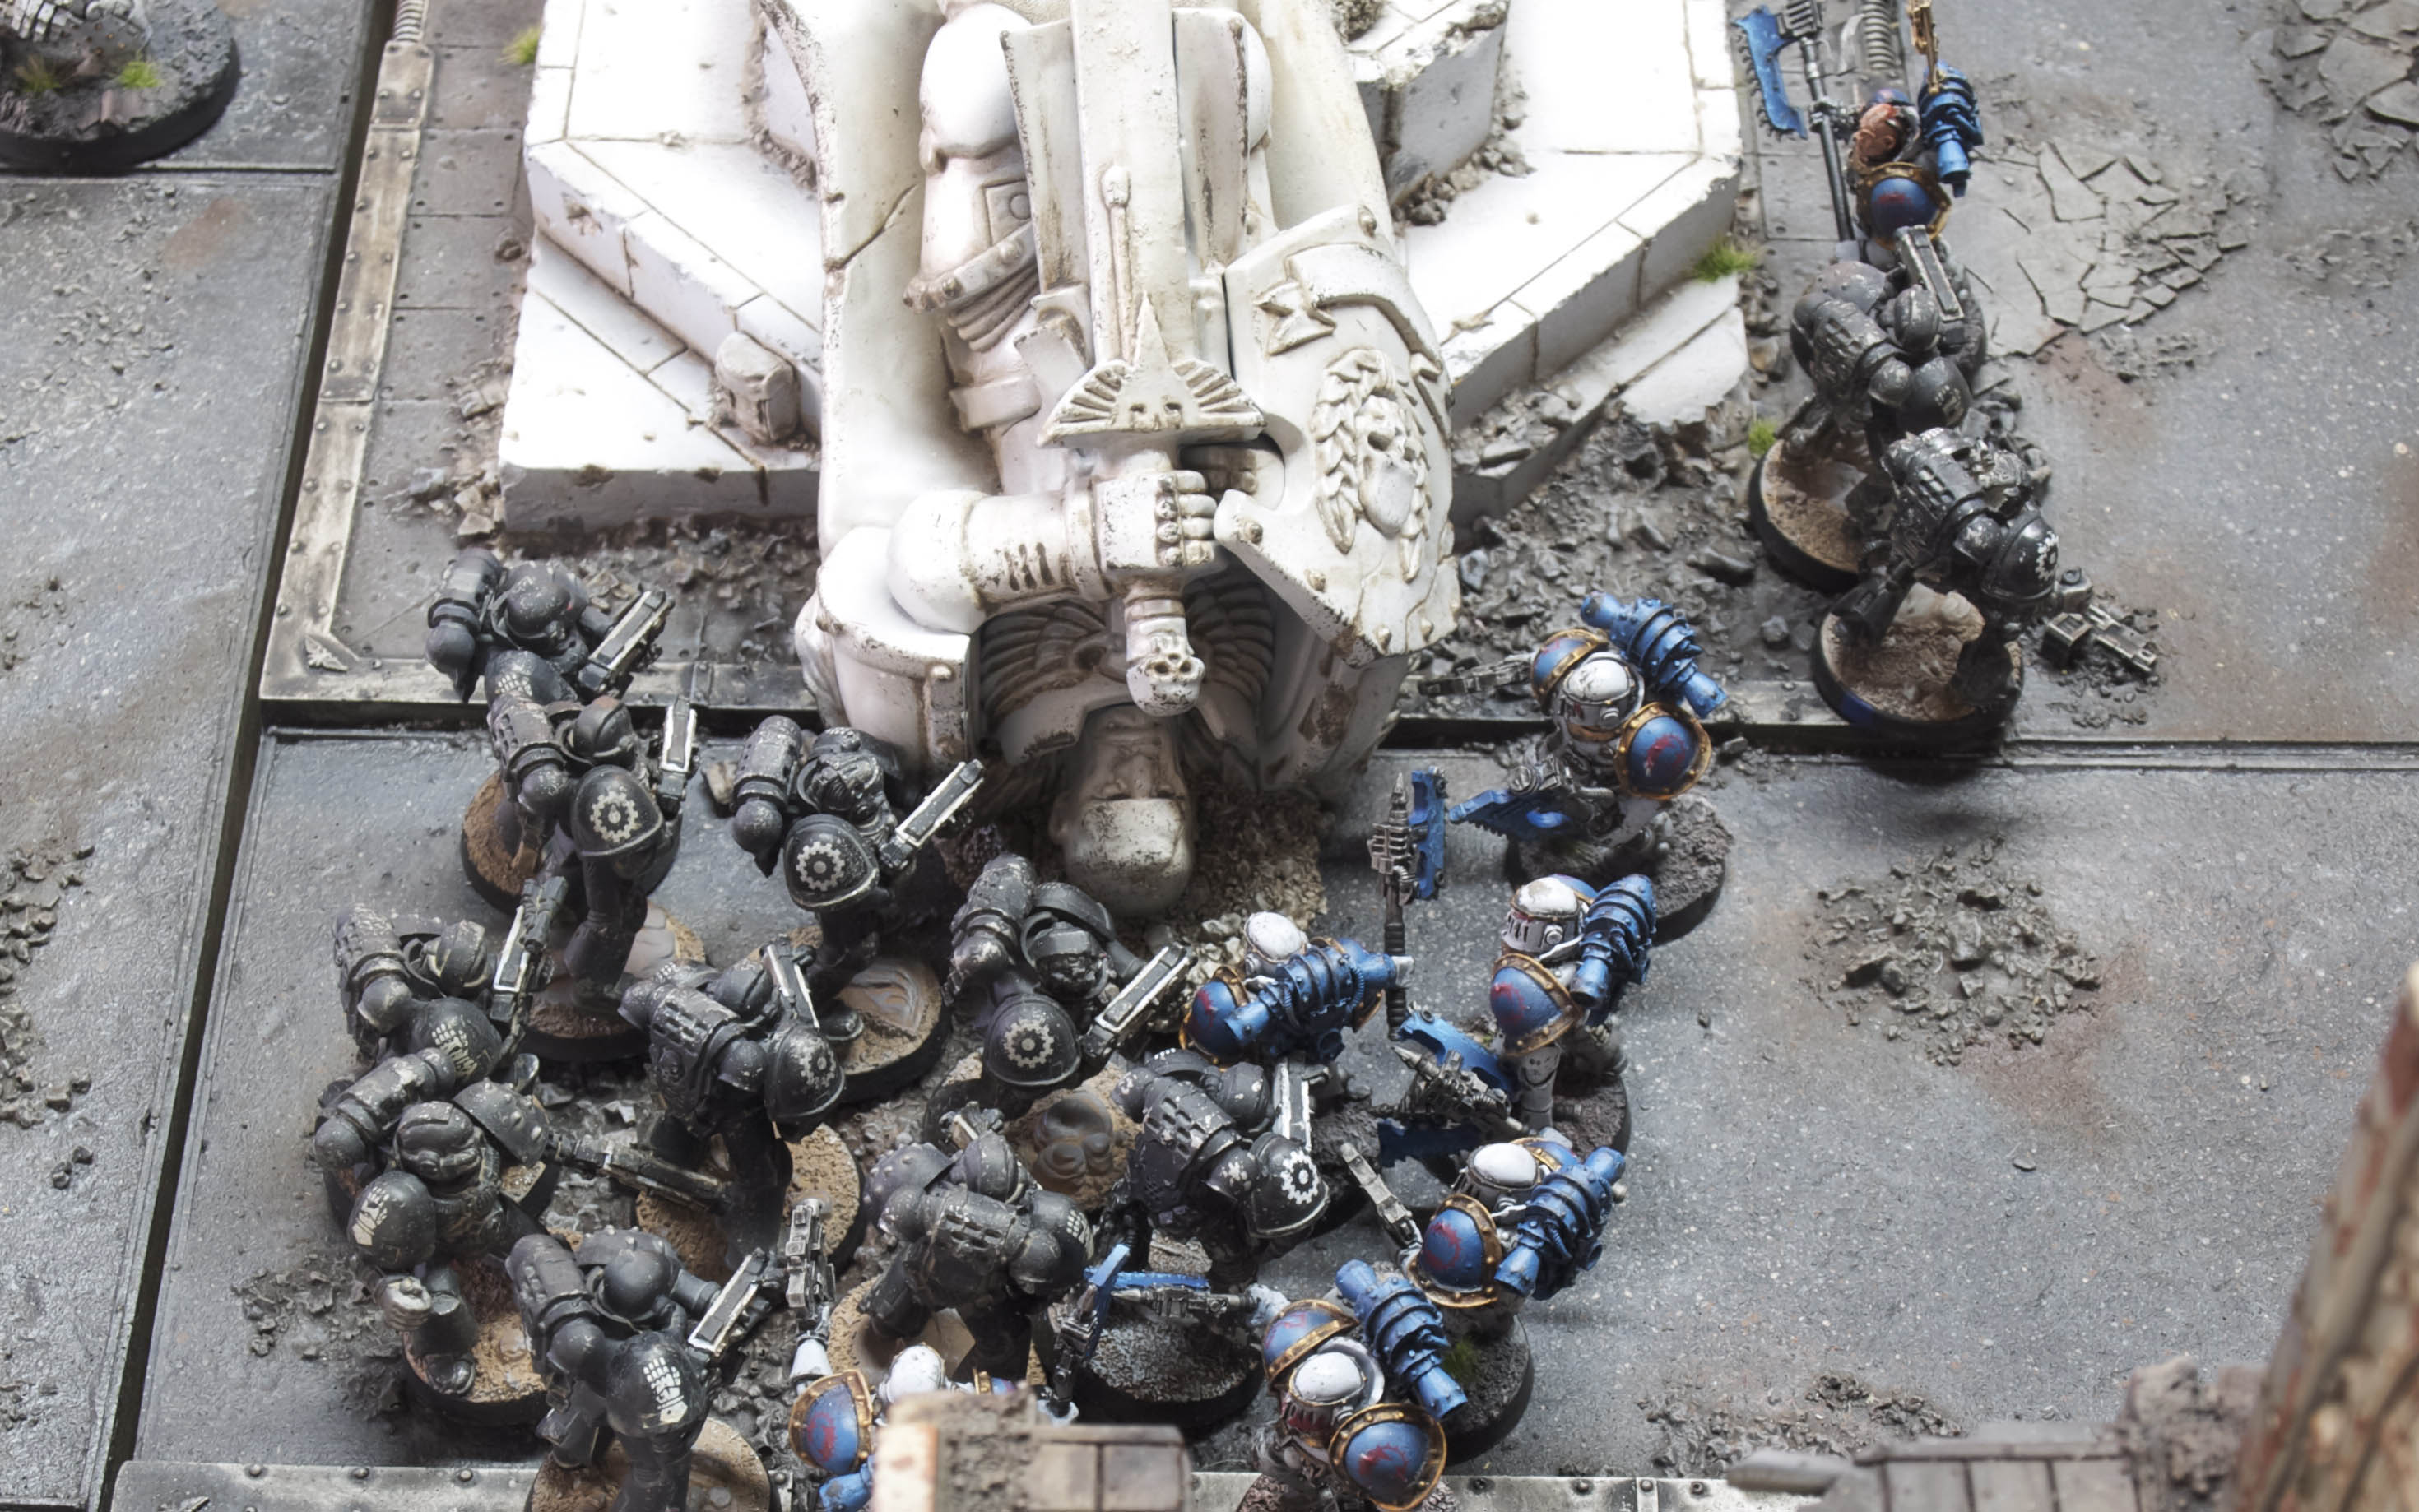
The Bloody Handed Praetor’s lets out a blood chilling war cry as he and his Rampagers charge the prone Iron Hands. The Iron Hands loose their mettle and fail the Fear test. In the ensuing combat, four of the Iron Hands fall, however still outnumbering their combatants, remain in the fight.
Driven mad by the felling of their squad sergeant, the Terminators charge their assailant. With preternatural speed, the Terminators easily dodged the clumsy swings of the Dreadnoughts power fist. With enhanced strength, the Terminators pound the Dreadnought, mercilessly dismembering it. The power plant fails, exploding so violently it kills one of the World Eater Terminators. Without so much as a moment to pause at the loss of their brother, the remaining three Terminators move towards the Tactical Squad eager to enact their revenge….
Turn Four – Iron Hands
Having seen the shear violence inflicted by the World Eater Terminators that ended a revered warriors service to the Emperor, the Tactical Squad move into assault range of the foul World Eaters, with the Forge Father adding his weight to the fight. Meanwhile, the Javelin lets off another salvo at the Devastators. This time the shots are true, killing the remaining heretics.
The Iron Hands devastators know their fate now. However in seemingly futile defiance fire a salvo of krak missiles at the insane machine. The shots hit, however bounce off the impenetrable hide of the blasted Contemptor.
The Tactical squad charge the Terminators. With blinding anger at killing a servant of the Emperor that had been given the greatest honour by the Machine Cult of Mars, interned in a Dreadnought chassis. They attack with uncharacteristic ferocity no doubt imbued by the desecration of felling the Dreadnought and the scale of the heretics betrayal. The traitor Terminators are wiped out in the uncontained rage and fury of the assault from the Iron Hands.
The Praetor and his Rampagers are now fully overcome by the white hot rage of the Nails. With terrifying ferocity that only insane men can muster, the Iron Hands Squad is butchered to a man. The Rampagers pausing to collect the skulls of the fallen Iron Hands as trophies worthy of their deeds. The Praeator breaks off from his Rampagers, ordering them to move up to the objective. He wants his own trophy, that of the Forge Lords.
Brutal street hand to hand combat
Victory Points at the end of Turn Four
Iron Hands :- 2 World Eaters :- 3
Fifth Turn – World Eaters
The Praetor issues a challenge as he charges towards the Forge Lord and Tactical Squad. Meant for the Forge Lord, the Tactical Squad Sergeant steps in and accepts instead. Foolishly wanting to demonstrate his combat prowess while he has the Forge Lords attention. The Praetor, laughing like a lunatic, accepts and in one stroke, almost imperceptible to the human eye, the Praetor cleaves the Iron Hand Sergeant in half from head to groin.
The Contemptor charges into the doomed Devastators. In a final act of defiance, the marines let off one more salvo. One of the krak missiles hits home, glancing off the Contemptors leg. Not enough though to stop charging behemoth. The Contemptor picks up the insolent marine, and snaps his spine and throws the rag doll corpse of the Astartes against the wall. The other Devastator marine fights on.
The Rampagers, resist their urge to kill, and move to take the objective.
Fifth Turn – Iron Hands
Sickened by the sight of seeing their Brother Sergeant cleft in two by the Praetor, the remaining Tactical marines attack in force, many of their number die at the hands of the madman, however in their rage, they inflict several wounds on the butcher. The Forge Lord fails to land a blow.
The Contemptor, almost annoyed, swipes the final Devastator marine out of his way. Sending the marine flying across the Cathedral, landing in an indignant, lifeless mockery of ceramite and flesh slumped in the corner. The Contemptor move towards the Objective.
A die is rolled at the end of turn Five. The games does not end, continuing for another round.
The Praetor kills at will. However he is outnumbered and takes several wounds himself.
Victory Points at the end of Turn Five
Iron Hands :- 2 World Eaters :- 7
Sixth Turn – World Eaters
The Praetor lashes out, killing more Iron Hands. The Forge Lord and the Praetor are now face to face. In the struggle, the wounded Praetor stumbles. The Forge Lord sees his chance, and with his cybernetically grafted servo arm, grabs the Praetor and with a sharp snap crushes the life out of the heretic. Seeing their opportunity the Tactical Marines follow up towards the objective being held by the Rampagers…
Sixth Turn – Iron Hands
It was now do or die for the Iron Hands. Take the objective being held by the World Eater Rampagers or die trying. The Iron Hands charge in, killing one Rampager in the initial combat , however the Rampagers wont be shifted so easily.
A die is rolled at the end of turn Six. The games does not end, continuing for another round.
Victory Points at the end of Turn Six
Iron Hands :- 4 World Eaters :- 8
Seventh Turn – World Eaters
The desperate close combat continues over the third objective. This time the Rampagers are outnumbered and out classed. The remnants of the Tactical Squad, bolstered by the Forge Father, bring a heavy toll to the Rampagers. Killing two. Outnumbered, and now being outclassed by superior force, the heretics fail their moral check and break. They’re unable to make a clean break and are slew by the Iron Hands sweeping advance. The victorious Iron Hands follow up on the objective and consolidate their position.
Seventh Turn – Iron Hands
The remaining Iron Hands consolidate on the Objective and secure a Draw.
In a desperate last attempt to secure victory, the Iron Hands charge the remaining World Eaters holding the Objective. Their efforts pay off, they kill two. The remaining heretics fail their leadership test and are wiped out in the sweeping advance.
Victory Points at the end of Turn Seven
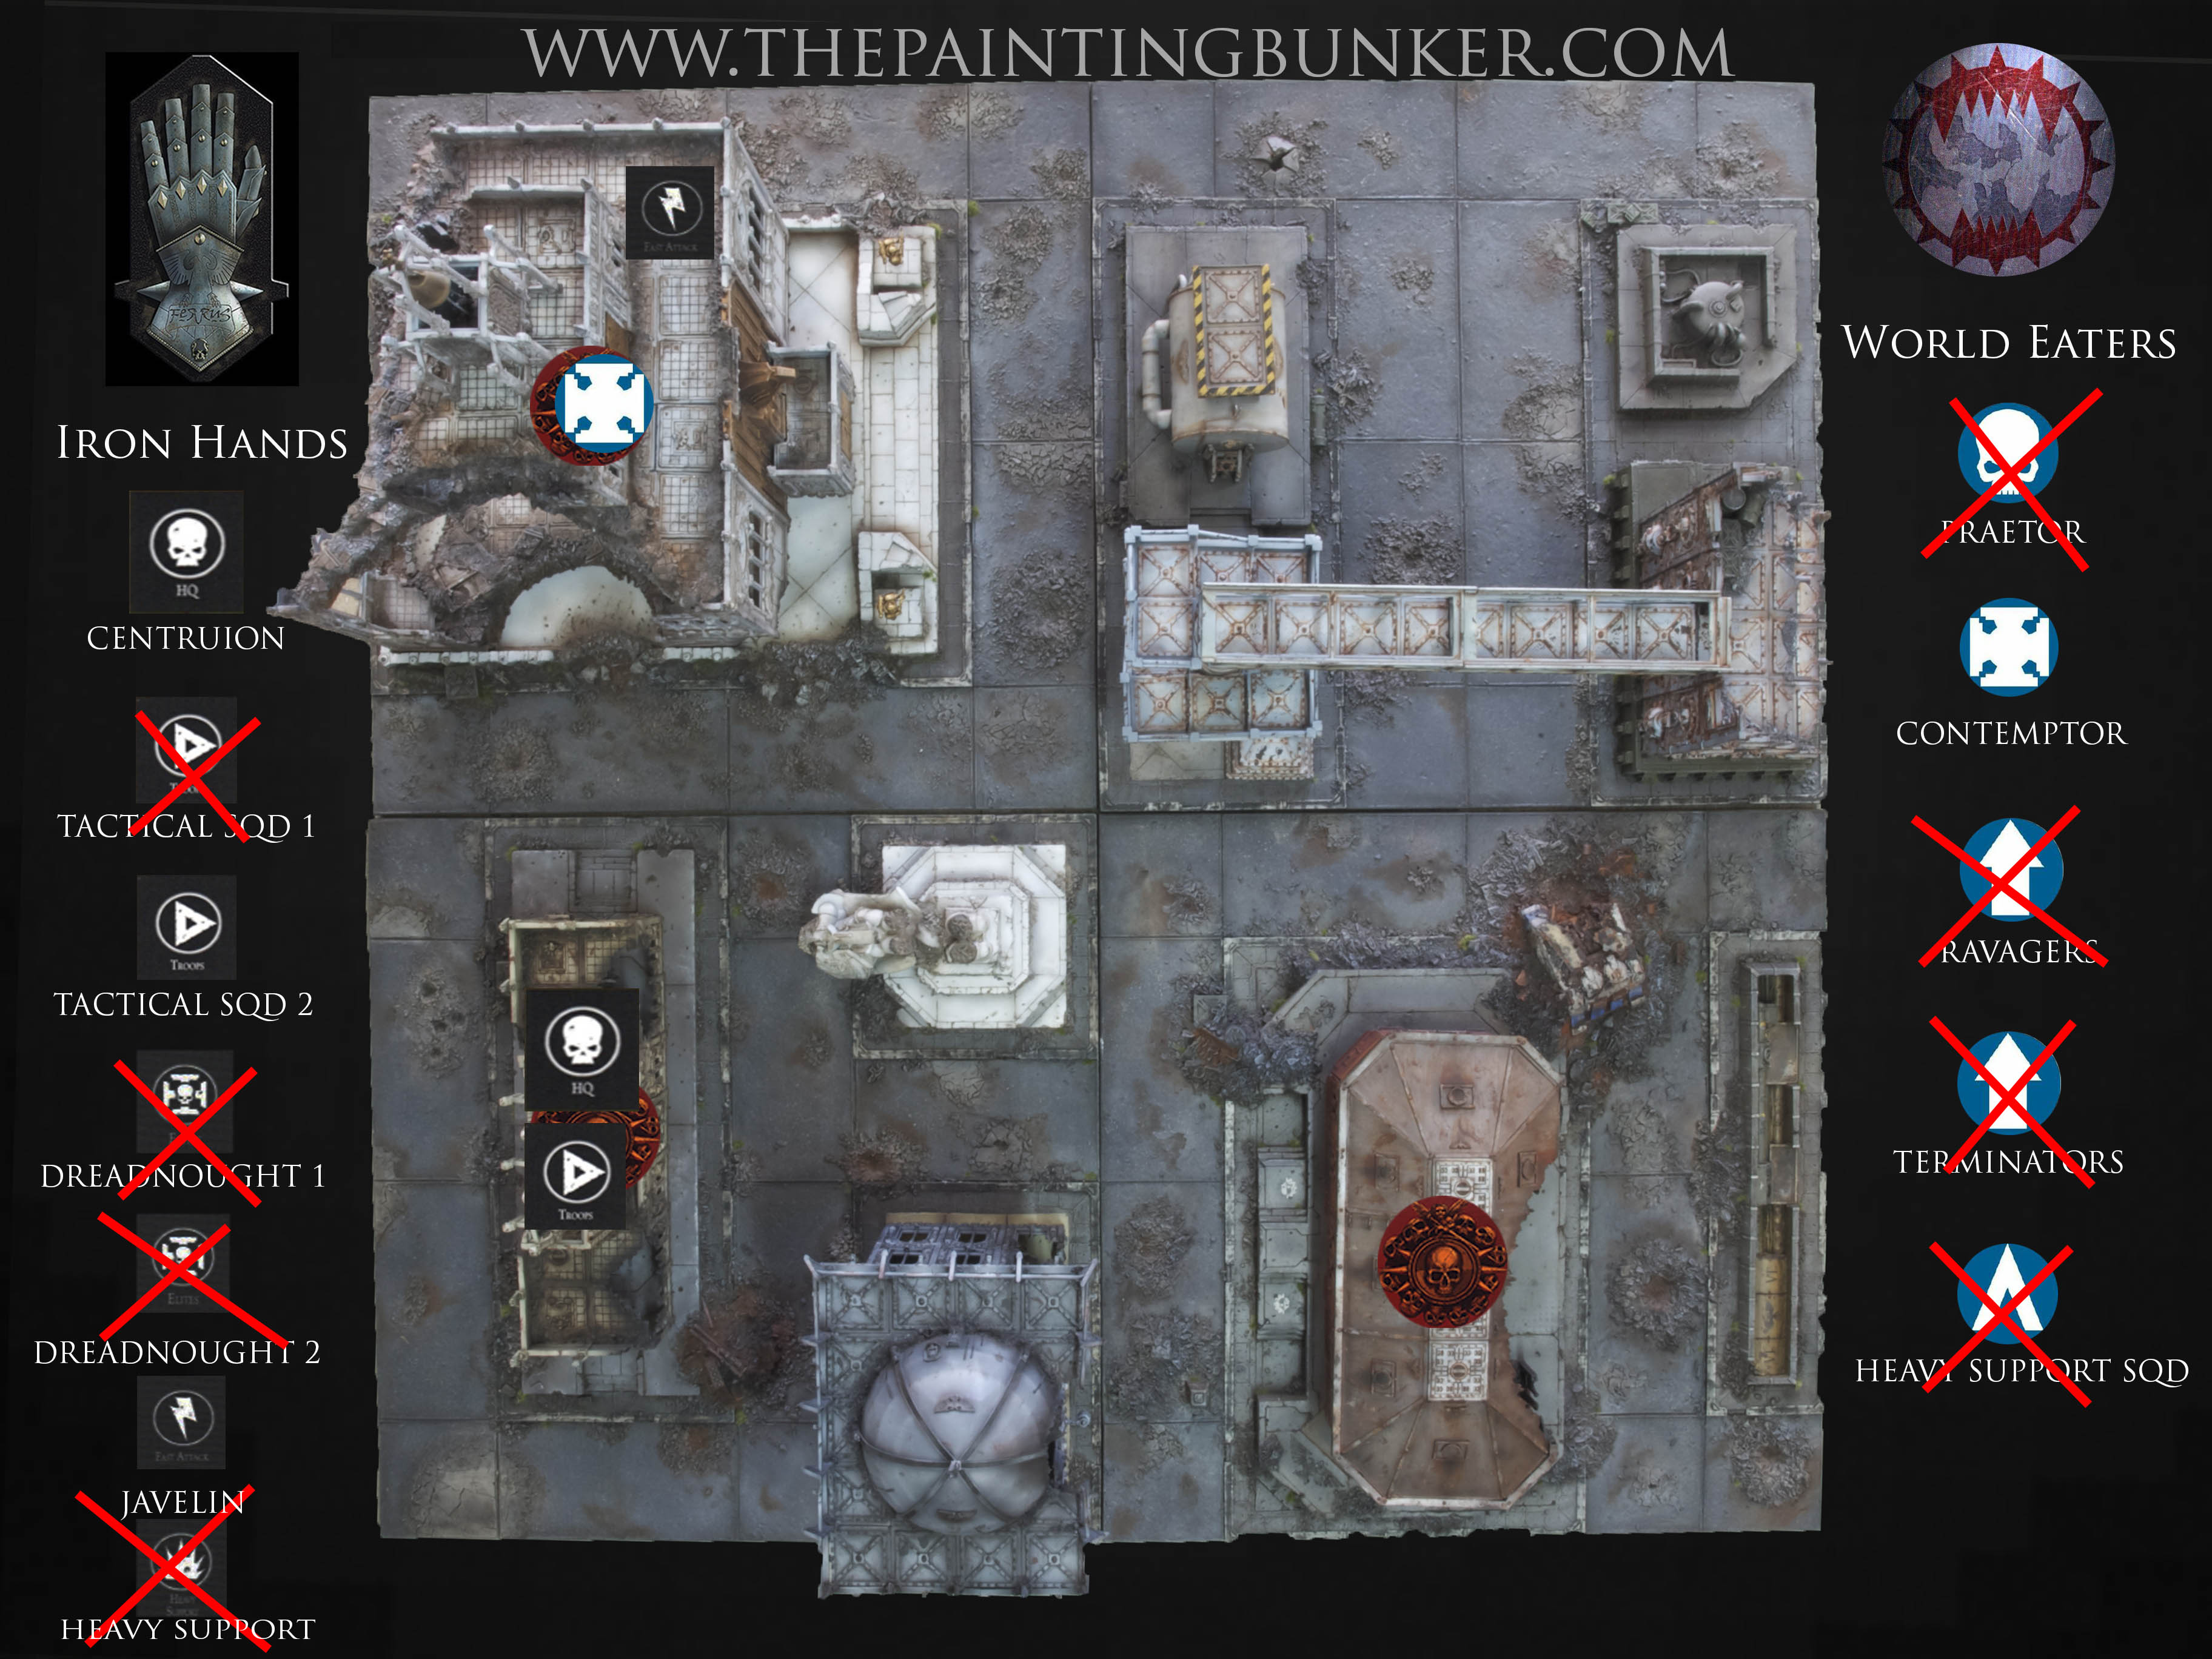
Iron Hands :- 8 World Eaters :- 8
Result :- A Draw!
Final wash up
What an epic game. Not only did it go for 7 turns, but it also was full of twists and turns no one could have anticipated. Who would have thought the humble Iron Hands Tactical Squad could have done so much damage? Finishing off a Terminator Squad, a Praetor & finally the remnants of the Rampagers. I have to admit, this is one of the things I really love about Horus Hersey games. The infantryman is king. Because of the way the points cost are structured, it favours vast infantry armies. If I had more models painted, I would have taken two 20 man Tactical Squads, each with an apothecary and a Master of the Signal. Tough as.
The other thing I like about Horus Heresy games is there is no meta game. There really is only one army list. It’s vast, and allows all sorts of army types to be produced, however it still is just one list. That both sides use. This to me combines my two favourite things in wargaming. Space Marines and tactics. Plus the models are simply fantastic. It is now very clear to me that GW and FW are going after very different markets and producing models to suit. FW design team reminds me of where GW was 15 yrs ago. Doing really cool wargaming models, not toys.
So, I hope you’ve enjoyed reading and seeing my first battle report. It’s been quite an effort to be honest. So you may not see one for quite some time. Make the most of it. I really enjoyed producing this battle report however. It was also really great fun actually playing the game with Keepy. It was a good game, and an awesome day. Thanks mate.


 Next up is our friendly neighbourhood Master of Signal (Centurion w/consul upgrade). I like this guy, both in game and model terms. Firstly, I like the D3 templates he can drop on marines heads. Nice. Plus, the model is pretty cool and reminds me of a Rogue Trader era model from WAY back in the day.
  These guys are just a must have for your Legion Tactical Squad. What more can I say.
 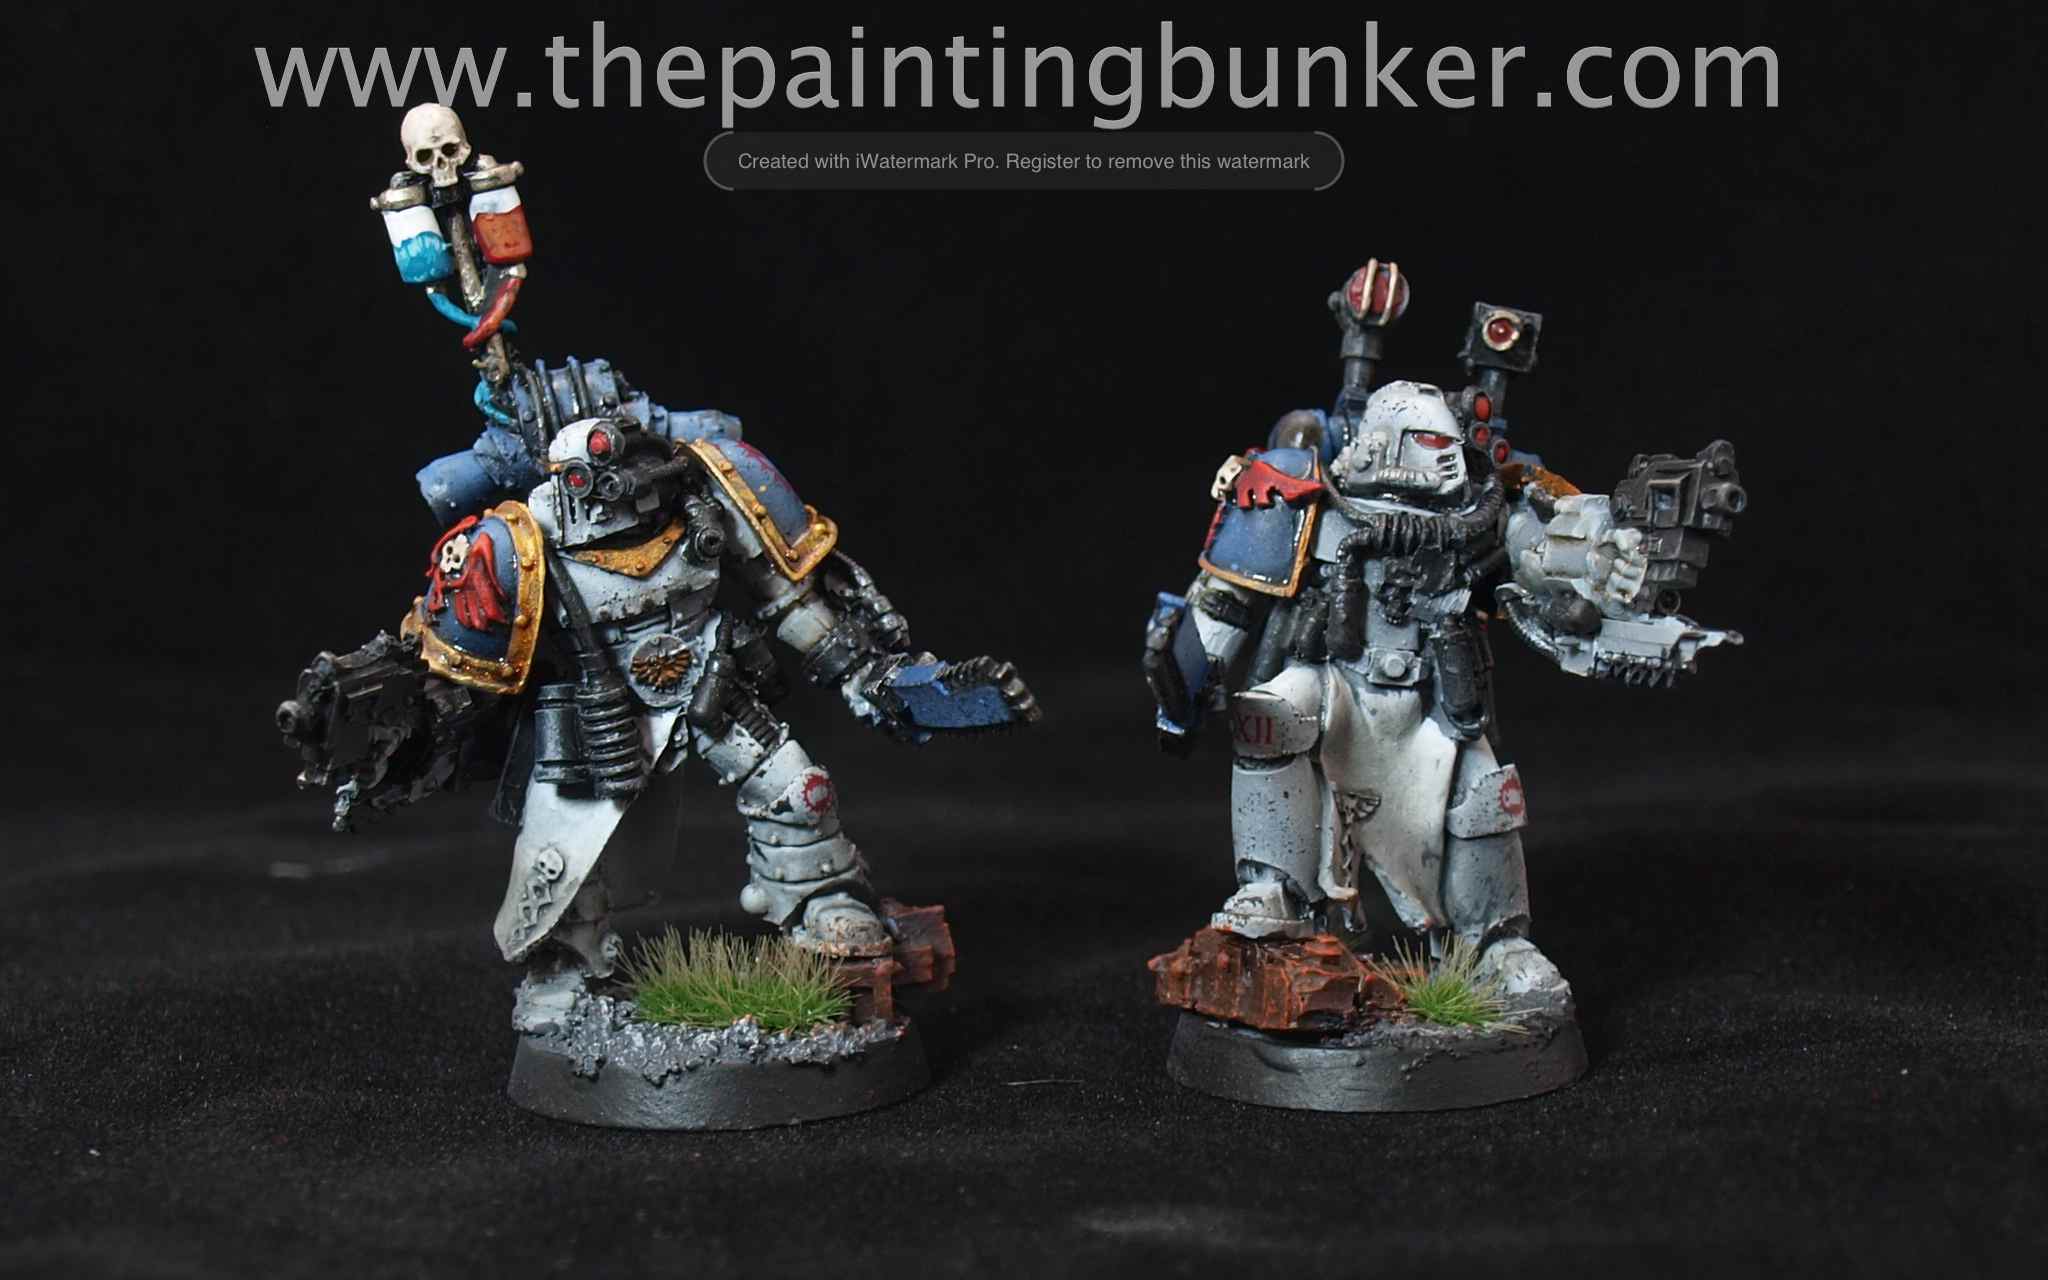 I don’t really know what I was thinking when I painted or even thought up the idea to have these fools in my army. Oh well, they’re done now. Legion Tactical Support Squad. Plasma guns are cool though. Hoses squads of marines.
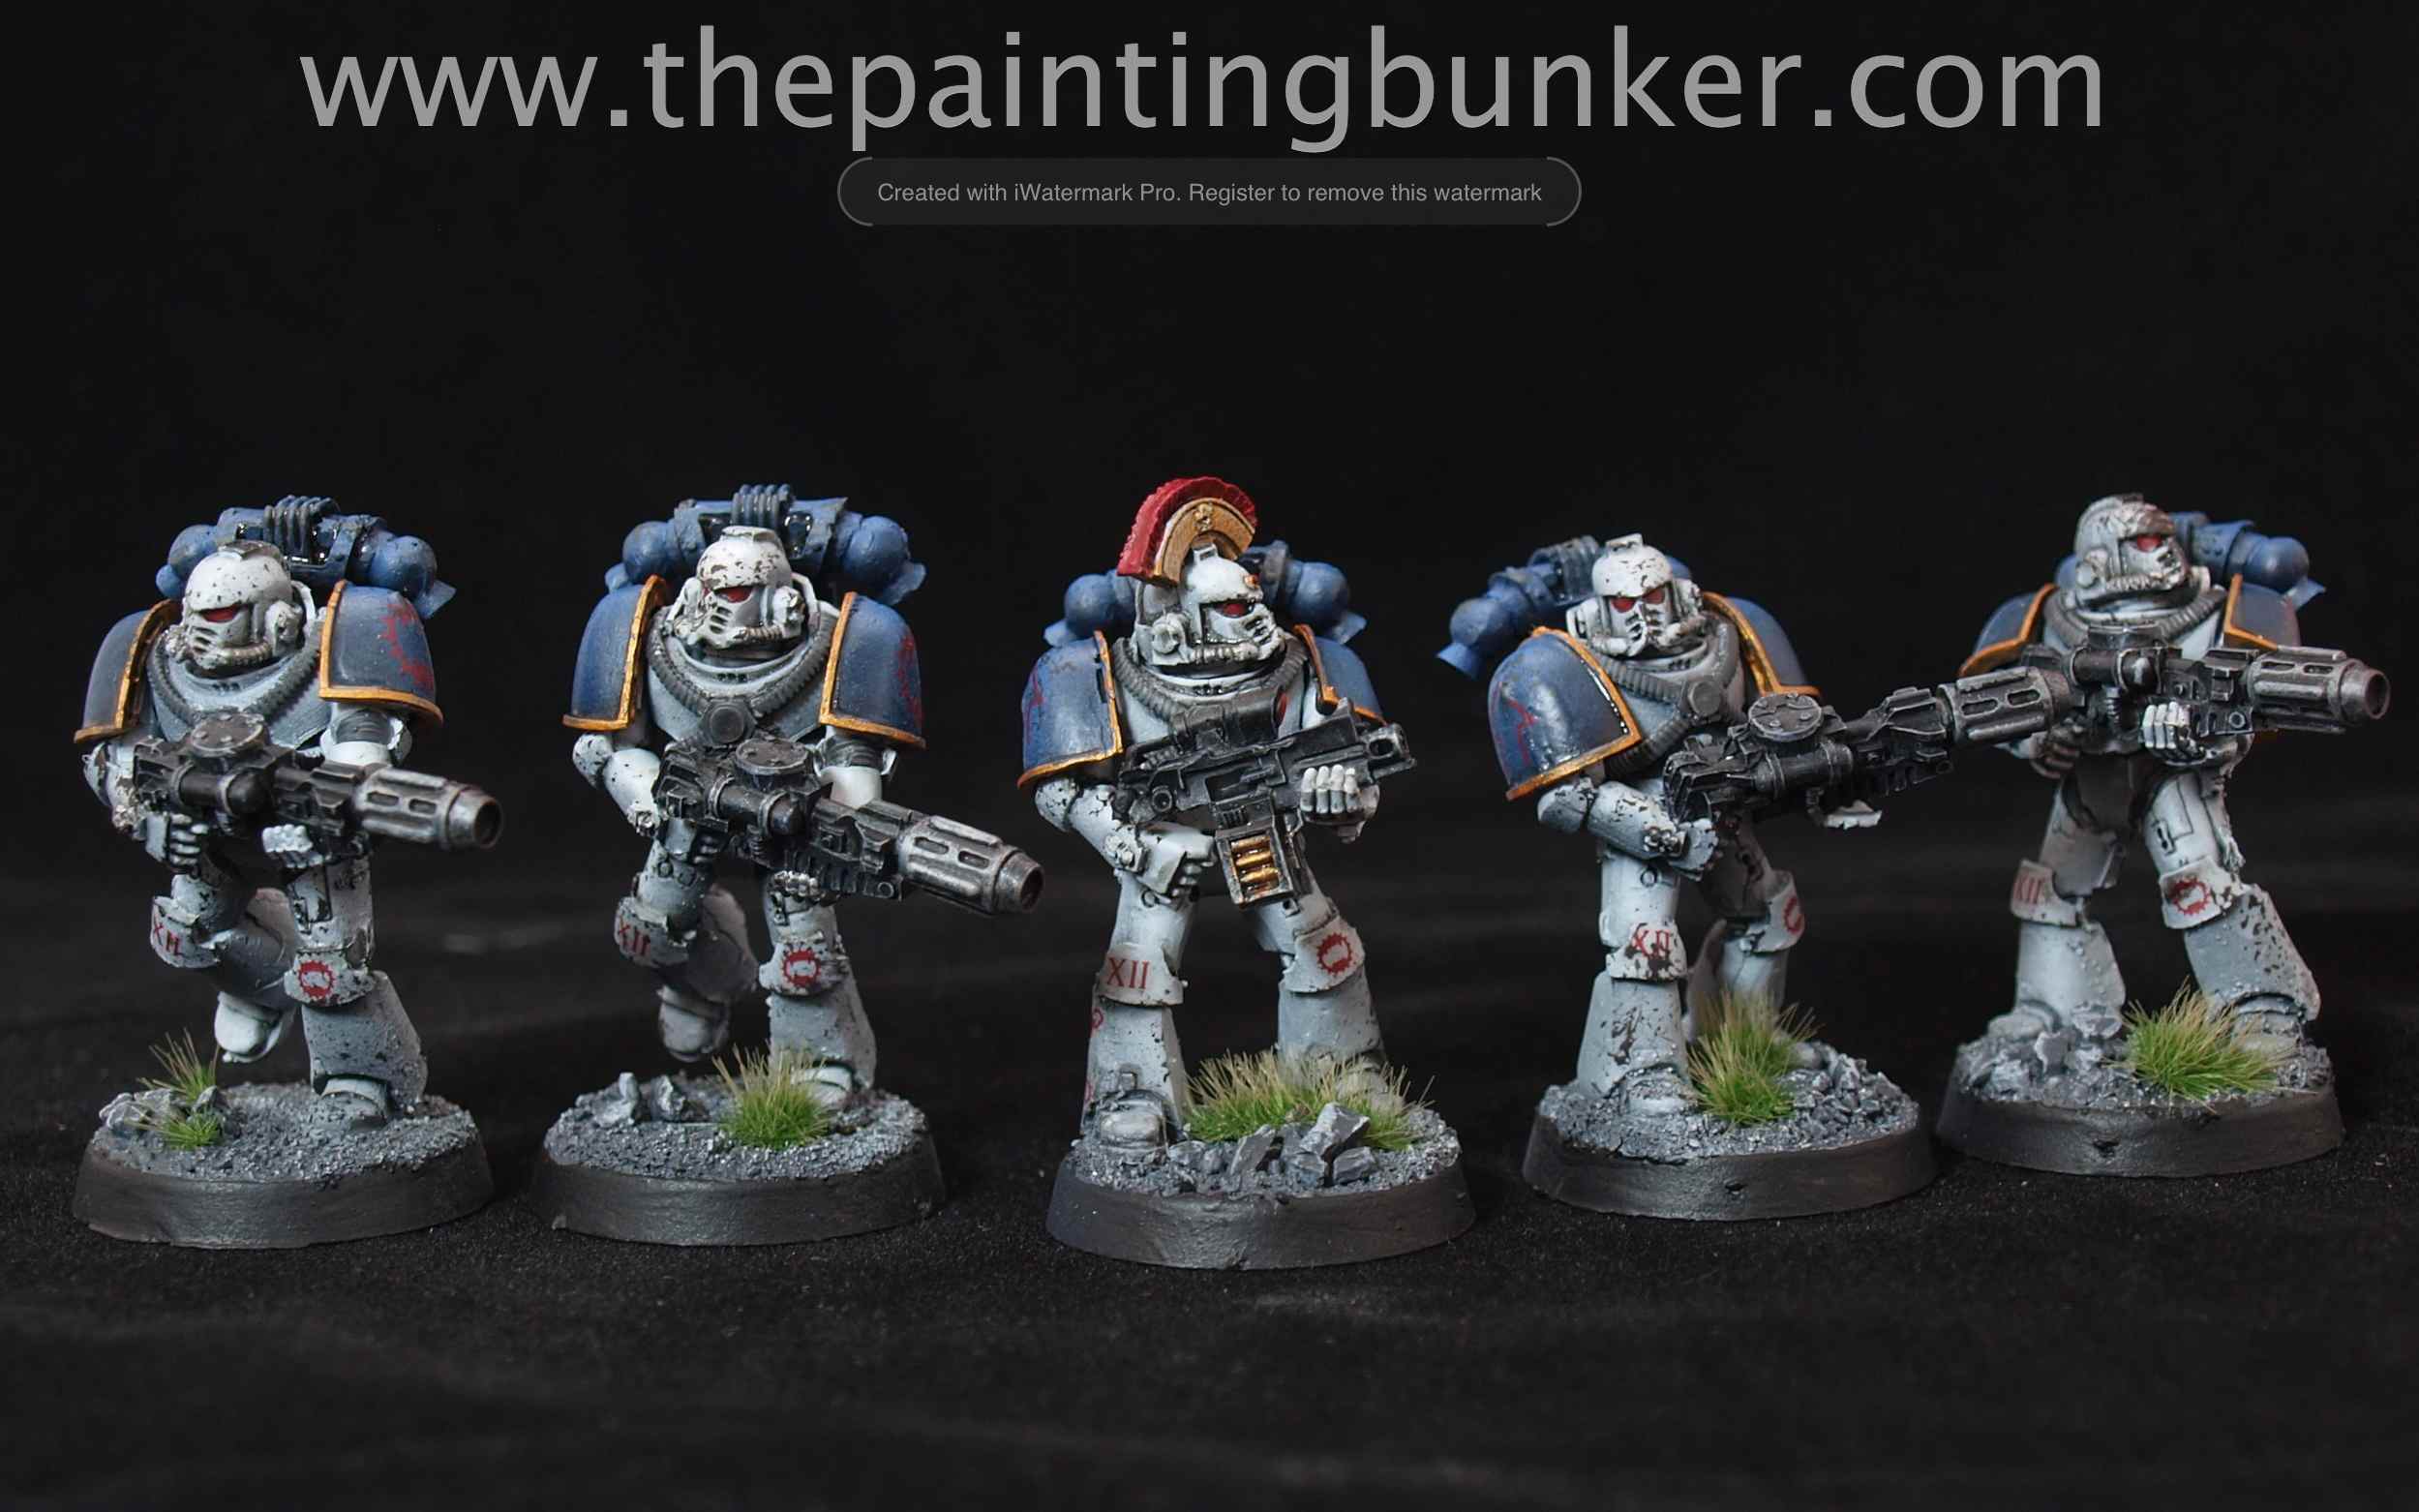
 Last but not lease, the work horses of the Legion, the Legion Tactical Squad. I aim to have three squads of 20 of these guys for the World Eaters. They’re just so versatile. Plus they look legit on the table. Nothing says ‘get off the table’ like 20 marines unleashing fury of the legion on a prone foe.
 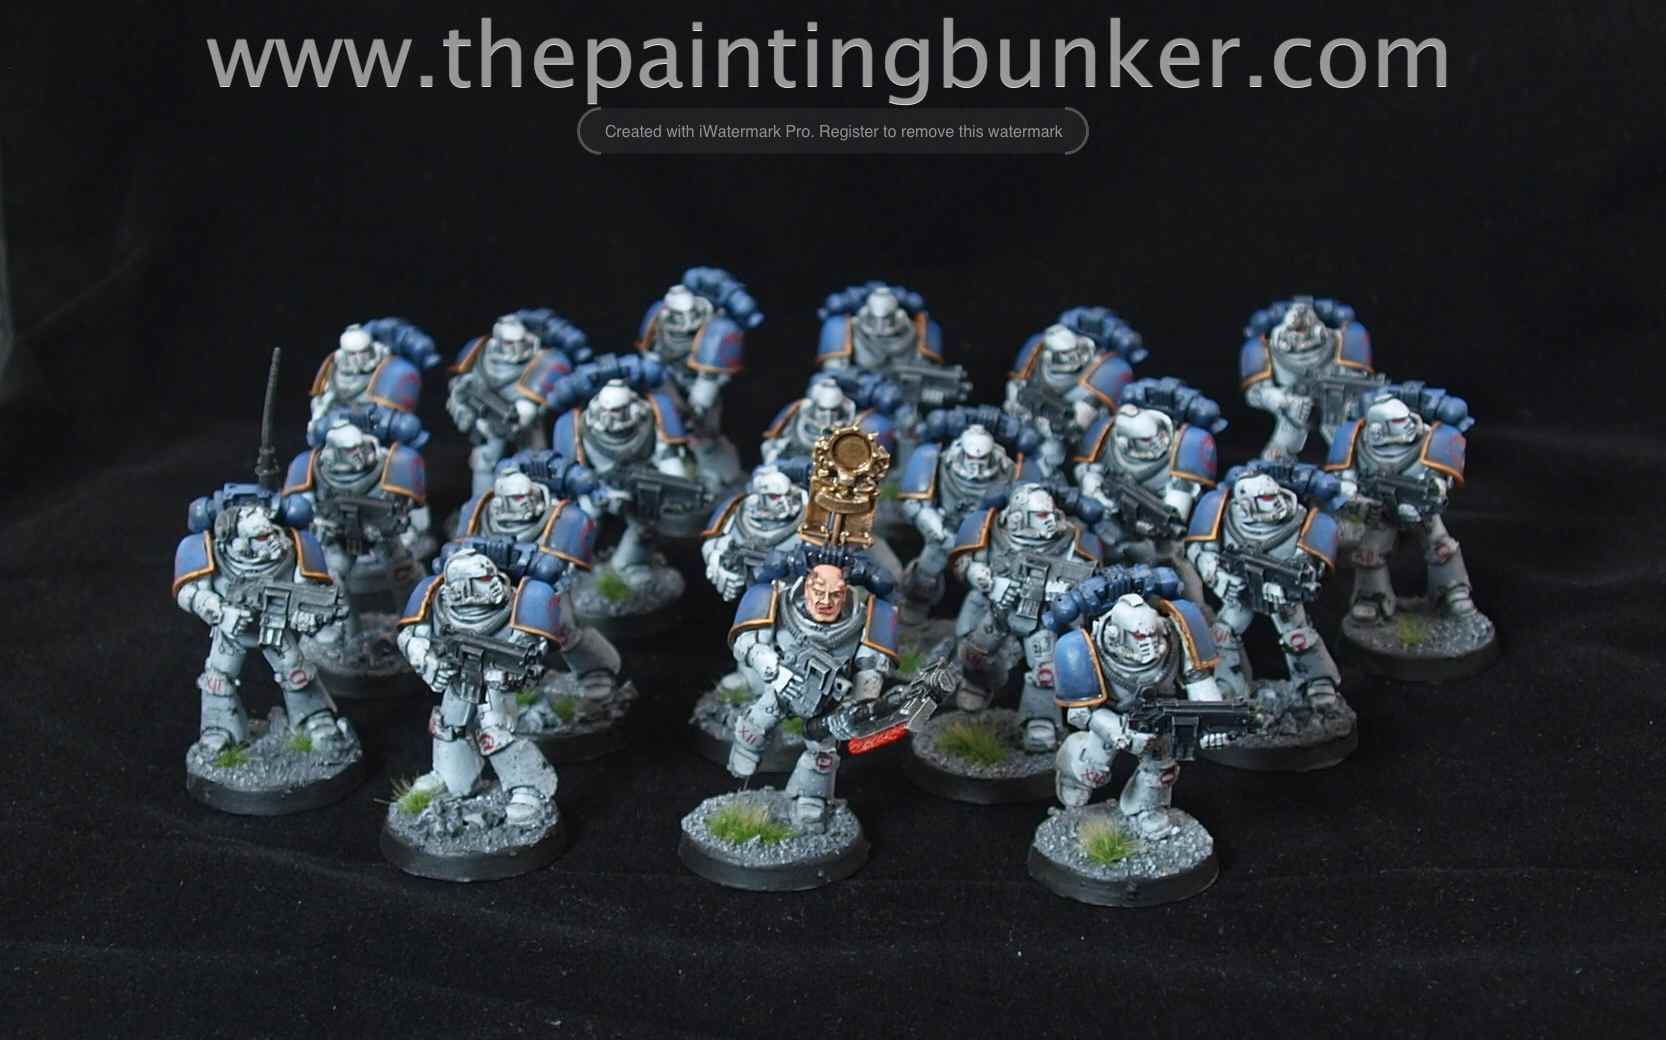 Well my friends, thats it for now. I’ll leave you with a little sneak peak on a small side project I’ve got going on… I’ll do a more thorough post on it in the future, but for now….