Archive for the ‘Uncategorized’ Category

Hi everyone,

Well, here we are.  For many of your reading this, Space Crusade is ground zero for you, what some may call a “gateway game”.  It certainly was for me.  I remember playing this game until the small hours of the morning when I was in my early teens.  If Stephen, Michael, Graeme and Keith are reading this blog, I attribute my lifelong interest in wargaming to those evenings spent playing this game.

Over the years I’ve become somewhat of a collector of games and minis.  Espeically Rogue Trader and 2nd Ed 40k minis and source books.   Recently I was at a friends place who had a copy of Space Crusade floating around.  We decided dust it off and roll out a few games.  Even today, it’s actually a very playable game.  I thoroughly enjoyed it, so I thought it would be fun to get a copy (my original copy being lost to the dim, dark past)  I’m going to give it a paint job, using contemporary painting standards and techniques and I’m sure bust out a few games from time to time.

There are plenty of examples of this game for sale on eBay, however its hard to find a good one.  After a few weeks of monitoring auctions, I found a copy that looked in pretty good nick.  At the time, I felt I really took a bath bidding on the auction.   However once it arrived, I realised that I actually picked up a copy as what you may regard as in excellent condition.  It even had a brochure on other games that Milton Bradley made back in the 1990s.

Interestingly, and much to their credit, Games Workshop seem to be going back in this “gateway game” introduction philosophy.  That is, making stand alone boxed games that give new players a ‘peek’ into the 40k/30k universe.  These boxed sets providing new players with a foundation force should they decide to explore the hobby futher and take on the more detailed rules set that is 40k/30k.  It is pleasing to see, especially after some of GW’s misadventures over the past few years.  Getting into 40k for a new gamer would be a daunting prospect at best, whereas picking up a self contained boxed set, with a 40k lite rules set that is ready to go isn’t.

I have to admit, I’ve been playing a few games of Betrayal at Calth recently (I’m painting the minis, and have gone all out on them: subject of a future post).  I have really enjoyed the game play, the rule set being analoguous to 40k, however a lot easier to pick up and very manageable for new players, or veterans alike who just want a fun ‘beer and pizza’ game.  Whats more, if new players want to explore 40k after purchasing BaC, they have a solid starter force ready to go.   One final remark before I get back to the actaul topic of this post.  The game play of BaC.  I really like the “activation” style of game play, within a turn, rather than the strict turn style game play of 40k/30k.  Not only is an activaiton style more tactical (and realistic, within the confinds of a tabletop game), but it also is more interactive with your opponent and doesn’t lend itself to “alpha strike” armies that strict turn based games encourage.    Incidently, activation style game play is a feature of the Epic Armageddon system I’ve been playing a lot of too lately.

Back to the task at hand.  Space Crusade… what a cool idea.  Space Hulk lite, with all the cool baddies from the 41st millennium and three squads of tooled up space marines from popular chapters cruzing around a space hulk shotting them up!

Let’s take a closer look and refresh our memory at the awesomeness that is Space Crusade…

IMG_4197The box art.  Totally hilarious now, even comical.  The commanders face… reminiscent of the face of the Salamader Space marine on the cover of “Space Marine” (arguably the first 30k game, interestingly produced in epic scale).  Of course, the face of the Salamander on the box art, much like our man here, is irrefutably based on Al Picino’s character in the movie classic “Scarface” during that [in]famous scene “say hello to my little friend” as he fires a 40mm HEDP round from his under mounted M203 at a bunch “home invaders”  (respect to the castle doctrine).
IMG_4198Me and my buddies back in the day…  So wholesome, the looks of wraped enjoyment while ‘purging the alien’.  Space Marines: the defenders of homogeneity since 1986 (GW).
IMG_4199 IMG_4200 IMG_4201 IMG_4202The board sections, way a head of their time.  They’re showing their age a little now, but are still solid.
IMG_4203“Assembly Instructions” contained on the underside of the box lid.  Very helpful….
IMG_4233
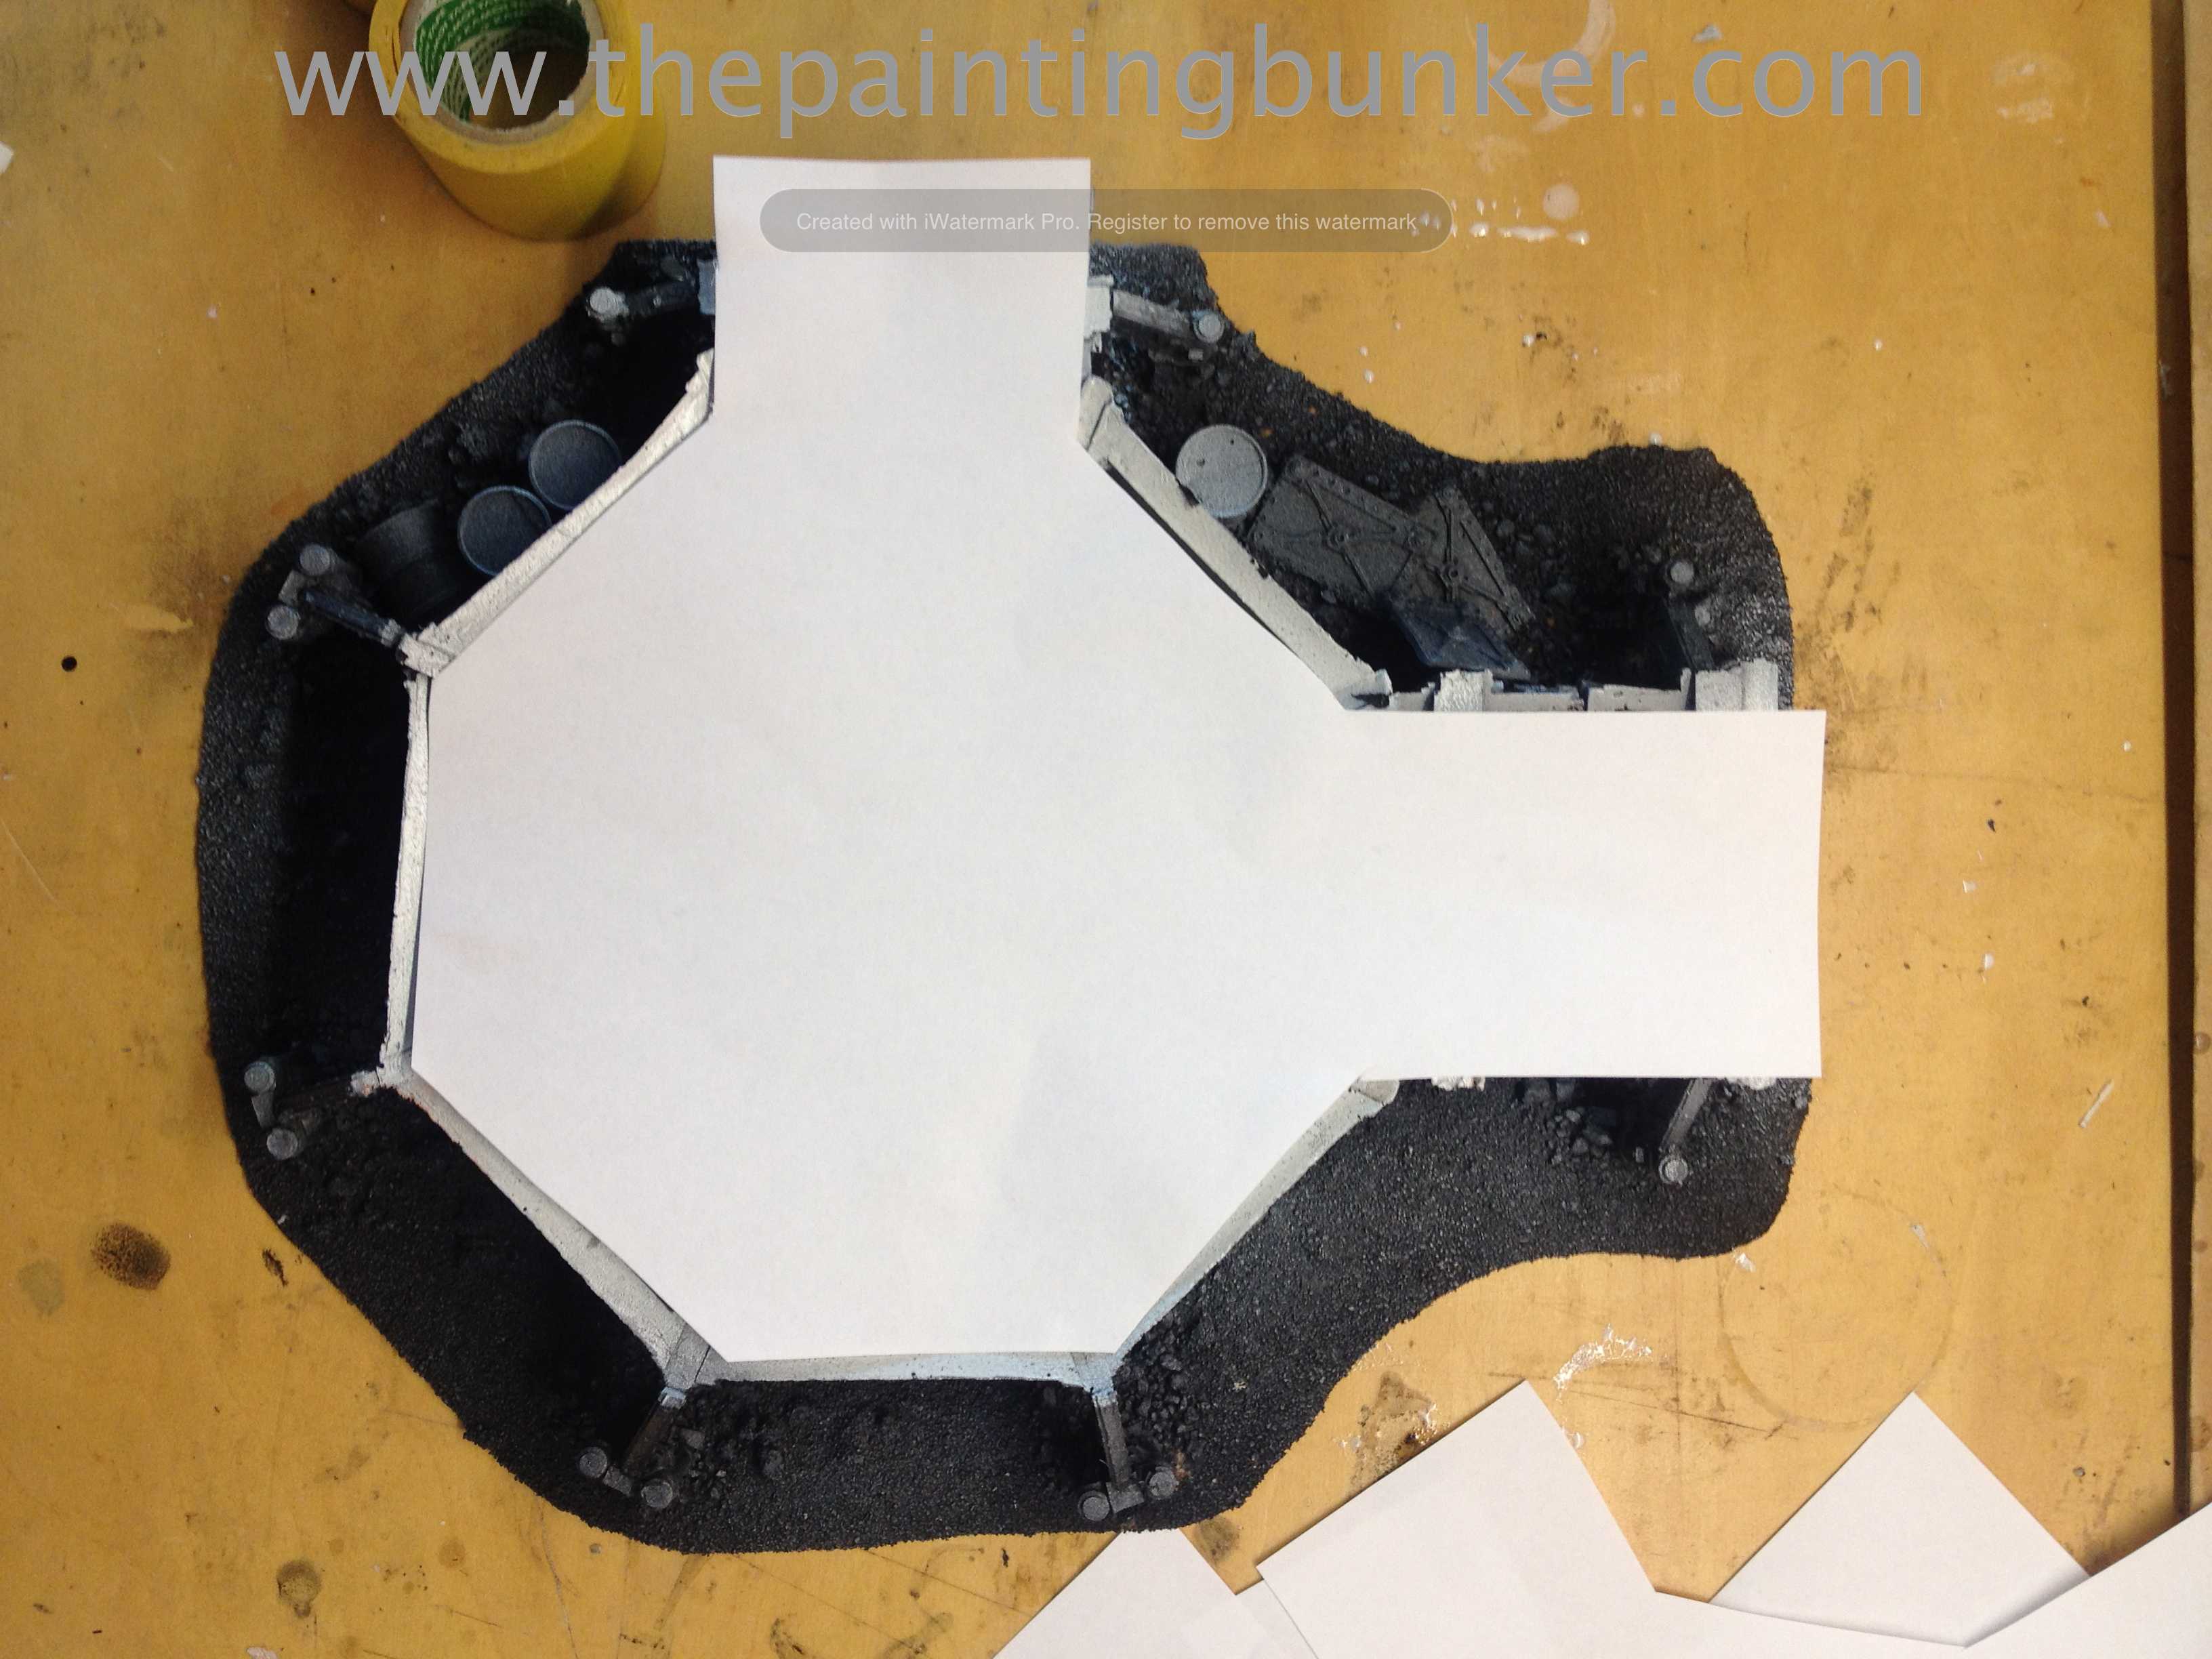
As apart of my re-boot of this game, I’m making some new bases for the models.  I’ll cast enough of these up for the entire set.  Just random bits of stuff from my bits box.  The bolter casings are from Secret Weapon.  Nice touch.
IMG_4234How far we’ve come.  Space Crusade Marine circa ’92.
IMG_4237Like I mentioned at the start of the post, the example I ended up winning at auction was so complete it even had this little pamphlet still in the box.  

IMG_4240Battle Plan: Don’t leave your boarding torpedo without one…. IMG_4241The custom dice, now a standard feature in all stand alone boxed sets.  IMG_4244Painting guides for your marines.  Pretty camp now, but mind blowing back in the day.
IMG_4245 IMG_4247 IMG_4248 IMG_4251Mike McVey blesses us with what used to pass for a painting guide.IMG_4197Well team, there you have it.  Don’t expect me to roll this one out at a great rate of knots.  It’s just a little project I’d like to keep going and drop a post on every now and again.

Now, I’d really like to hear about your Space Crusade story or, how you got into 40k/30k story.  So, if you’re reading this, drop a quick (or lenghtly) comment, I know I’d love to hear it, and I’m sure other readers would too.  So, don’t be shy.

Chat soon

John

Hey Everyone,

Bet you weren’t expecting that!  Well, I’m moving house soon and re-assessing what I need and don’t need.  Although collecting these armies has been a real joy, its time to give them their marching orders and assign the to a new posting.  My plan is to put them on eBay, however a friend of mine suggest (very thoughtfully) to put them on my page first incase someone wants to buy either all of the Iron Hands, Titans or Guard.  You see, if I put them on eBay, I’ll be breaking them up.  The post code that they’ll be sent from is 4067, Australia.

So, whats on offer I hear you ask.  I’ll start with the easy one.  The Titans.

You get the Reaver and two Warhounds pictured.  If you want to see them being assembled and painted, click here and here. These Titans have been featured on Forge Worlds Facebook page (when it existed), in two magazines (national and international) that I know of and the Reaver and the Warhounds have also won awards in few painting competitions (local and state).  The internals of the Reaver and one of the Warhounds is painted too.

They’re pretty heavy and big, so if you live overseas, be prepared for a pretty hefty postage cost.  However if you’re game, so am I.

Please note that only offers over $2,000+P&H will be considered.  Expressions of interested can be made by messaging me though my Facebook page – click here


IMG_2635 Forge World Reaver Titan 1 via www.thepaintingbunker.comOLYMPUS DIGITAL CAMERA OLYMPUS DIGITAL CAMERA OLYMPUS DIGITAL CAMERA OLYMPUS DIGITAL CAMERANext up is the Iron Hands

It is important to note that if you buy this army complete, it’ll come with Battle Foam trays that suits everything listed below.  If you want to see this army being assembled and painted, click here and here

Heres what you get

  • 1 x Iron Father (GW metal Techmarine, the one without a helmet only available through the online store)
  • 1 x Tech Marine (modern one with the large servo arm contraception on his back)
  • 1 x Librarian in Power Armour with force sword
  • 4 x Tactical Squad – these all come with either a Drop Pod or Rhino (the Rhino has removable top doors to accept a Razorback turret) – The heavy weapon in the squad is magnatised and will take either a Multimelta or Missile Launcher, the special weapon is magnatised and will take either a meltagun or flamer
  • 1 x 10 man Devastator Squad – all with magnatised missile launchers
  • 1 x 10 man Assault Squad with jump packs – various Sergeant arm weapon options are magnatised
  • 5 x 5 man Terminator Squads – they all have their arms magnatised and come with thunder hammer and storm shields. The other magnatised arms allow for the usual storm bolter/power fist combo with cyclone missile launcher, heavy flamer and assualt cannon options too.  There are a few chain fists in there also.  Finally, there are enough lightening claws to make up two squads.
  • 1 x Vindicator
  • 3 x Landspeeder – these have all, yes all, weapon combinations magnitised.
  • 1 x Landraider redeemer
  • 4 x Dreadnoughts – all have magnatised standard armaments that come with the kit (twin lascannons, assault cannon, missile launcher and powerfist) and also a magnatised multimelta (from forge world)
  • 5 x Iron Clad Dreadnoughts – again, all weapon options, including hunter killer missiles, are magnatised
  • 1 x Forge World Iron clad with power fists (I used to use this a proxy for Bray arth’ ashmantle)
  • 6, yes 6 x Forge World Dreadnought Drop Pods – The Lucius Pattern ones.
  • 2 x Forge World Deathstorm drop pods (missile launcher variant)
  • 1 x Forge World Storm Eagle
  • Lots of random bits, including about 2-3 parks of the GW Iron Hands upgrade kits in white metal and just general random marine parts, some Forge World dreadnought twin autocannon arms and razor back turrets (all unpainted of course)
  • Enough Battle Foam trays to fit all this in

Please note that only offers over $3,200+P&H will be considered.  Expressions of interested can be made by messaging me though my Facebook page – click here

_DSC0755 _DSC0768 _DSC0762 _DSC0773 OLYMPUS DIGITAL CAMERA OLYMPUS DIGITAL CAMERA OLYMPUS DIGITAL CAMERA OLYMPUS DIGITAL CAMERA OLYMPUS DIGITAL CAMERA
Iron Hands Stome Eagle 4 Iron Hands Stome Eagle 1

Last but not least, the Imperial Guard (Astra Militarum)

Those of you who have been following me for some time know how massive this force is.  It’s gigantic.  Again, everything listed comes with enough Battle Foam trays to fit it all in.  Click here to see details of it being built.   Here goes…

Please note that only offers over $5,500+P&H will be considered.  Expressions of interested can be made by messaging me though my Facebook page – click here

  • Please note, that ALL, yes ALL the infantry listed below have the Forge World Respirator upgarde kit attached (helmet and back pack upgrade)  ALL OF THEM….
  • 2 x Company Command squads with custom master of ordnance, fleet and astropath plus 2 x melta guns in each squad
  • 3 x wounded guardsman objectives
  • 3 x Ministorum Priests (with Eviscerator)
  • 3 x Commissar’s
  • 9 x 10 man Infantry Squads (two squads have radios and the sergeants have power weapons)
  • 3 x Platoon HQ’s – each has a radio operator
  • 3 x Mortar squads (thats 9 bases of mortars)
  • 3 x Heavy Bolter Squads (thats 9 bases of heavy bolters)
  • 3 x Missile Launcher Squads (thats 9 bases of missile launchers)
  • 1 x Auto Cannon Squad (3 bases of auto cannons)
  • 3 x Special Weapon squads with Sniper Rifles (18 guys in total) – think sniper sections
  • 3 X Special Weapon squads with flamers and demo charges (18 guys in total) – think assault pioneers
  • 10 x Armoured Sentinel’s with Auto Cannons (yep, 10)
  • 7 x Leman Russ – All have magnatised sponsons and weapons
  • 3 x Leman Russ vanquishers – All have magnatised sponsons and weapons
  • 4 x Valkyrie/Vendetta – All have the Forge World Vendetta upgrade kits that are magnatised and the standard Valkyrie weapon load out magnatised
  • 1 x Baneblade super heavy tank
  • 1 x Forge World Macharius Vanquisher – this tank also comes with the turret that makes up the Vulcan variant
  • 1 x Chimera
  • 3 x Chimera (part painted)
  • 1 x Forge World Medusa (part painted)
  • 1 x Forge World Manticore (part painted)
  • 9 x Forge World Guard with melta guns (unpainted)
  • 1 x Lord Castallan Creed (unpainted)
  • 1 x Colonel ‘Iron Hand’ Straken (unpainted)
  • 1 x Vindicare Assassin (unpainted)

IMG_2038IMG_0525 IMG_0806 IMG_0812 IMG_1123 IMG_1140 IMG_1147 IMG_0988 IMG_0994 IMG_1987 IMG_1990Now, as I mentioned, if you’re keen, message me though my Facebook page – click here

I accept that the market for these armies is pretty small at these price points, however it would be nice to sell them whole, rather than breaking them up on eBay.  Hence this is my first port of call.  They all represent excellent value for money, as I’m only looking to recover the cost of the models, no time allowed for painting.  Also, please share this post on whatever other pages you visit.  Like I said, it’d really like these armies to go whole.

On a different topic, I have been painting.  Lots and lots of World Eaters as a matter of fact.  So hopefully you’ll see some posts on them soon.  However with Uni, moving house and end of semester exams (plus a trip to New York for a month at the end of the year coming up) I’m pretty flat strap.

Thanks for dropping in,

John Sutton.

Welcome back to another Anphelion Base update.  Things are getting pretty serious now!  The models been cleaned and assembled (years of therapy ahead over that one).  It’s been based and undercoated, then the interior was painted.  Its now time to mask the interior and begin to paint the exterior.

First up, masking

IMG_345710

The photos of this stage will be fairly self explanatory, so I’ll dispense with the commentary

IMG_345811

IMG_345912

IMG_346013

IMG_346215

IMG_346416

IMG_346517

A pretty light on post.  I didn’t want to spend too much time describing what is essentially sticking tape to a model then spraying it.  However what I will say is that the model isn’t going to be brown.  This is the undercoat.  I’ll be using the hairspray technique as one of the weathering stages of this model.  But that will be in the next post…

Until then, thanks for dropping in

John

Hello everyone,

This is a post I’ve been thinking about for some time.  Two things have prompted me into action.  The first one is recently I’ve had a few people actually send me questions that more or less fall into this category.   I thought I could help a little by just putting down a few ideas on getting started rather than answering all the questions individually.  That way there will be something to refer to in the future.  I’ve also made a shopping list PDF that you can download at the end of the article.

The second reason is how much positive feedback I’ve had from my How to buy an Airbrush setup post.  When I wrote that I never thought it would have gotten as much air time as it has.  It seems some people thought my ideas were helpful.  Maybe my ideas on painting area setup will be too.

So I’ve actually been on a pretty hardcore (coffee fuelled) modelling bender for the last few weeks.  The fruits of which you’re seeing now, plus a few others to come.  I actually finished off what I was working on a few weeks ago now and its given me pause to consider what I’d like to work on.  I’ve still got plenty of World Eaters to paint, plus another project I’m going to start in the not too distant future which I haven’t announced yet.  However in the mean time, before getting back into painting, I thought I’d share some of my thoughts on setting up a painting area.

This post is mainly aimed at the beginner, so its a very basic guide.  Getting into this hobby can be initially quite overwhelming.  There are the rules to get your head around, all of the amazingly detailed models available and of course seeing the exceptionally aspirational painting that accompany those models can be quite daunting.  Especially after you have your first  go at painting one yourself.  Finally, some of the starter kits and painting area accessories commonly available are not, in my opinion, very good.

So I’ll break the areas that I think need attention down into four categories.

1.  Painting space

2.  Painting space setup

3.  Painting Accessories

4.  Paints, Brushes and extras

So lets begin with the first area, the painting space.  The most important aspect to your painting space is it needs to be permanent.  It doesn’t have to be big, expensive or even new.  Just somewhere that you don’t have to pack up and pull down every time you paint.  Mine is actually in my garage!  A space of 1200mm x 600mm is more than enough.  In Australia you can buy this desk for $78.  I actually saw a desk at K-Mart the other day for $29! How the hell they do that is anyones guess.

Officeworks desk

This desk will be more than adequate for your needs and won’t take up a lot of space either.  What it does mean though is that you can have your painting space set up and projects laid out.  You’ll know that if the urge to paint comes along, you can just sit down and get stuck into it.  No sitting down at the dining room or coffee table, setting up, getting disturbed etc.

Forget those portable painting stations that sit in your lap.  Not only are they a woefully  inadequate in terms of workspace, but they also promote terrible ergonomics.  Seriously, they’re crap.

Next up is Painting Space Setup.  This is the area where I see most guys come unstuck.  What to have besides paint and brushes at their table.  The first thing you must get (besides a permanent space) is a lamp.  I can not emphasise this enough.  Get a lamp, and one with a daylight globe.  Having proper task lighting is absolutely critical.  Not only does it mean that you can paint day or night.  There are also a few other reasons that this can not be over looked.  The first (and most important) is your eyesight.  Painting models in sub-optimal lighting will ruin your eyesight, and by the time your in the late 30’s you’ll be in serious trouble.  Thats not cool.  Even if you paint in broad daylight next to a window in your bedroom, you’re damaging your eyes.  Count on it.  If you really doubt what I’m saying, speak to an optometrist.

The other reason a lamp with a daylight globe is necessary is colour perception.  Colour and how we perceive it is a massive topic that is far outside the scope of this post.  All you really need to know is that the globe you put into your lamp need to be daylight globes (5000k) and ideally from a non incandescent source.  This just means that the globes don’t get hot when you use them, thus drying your paint prematurely.   Don’t use fluorescent lamps or straight warm or cool house globes.  They’ll severely distort the look of the colours you’re putting on the model.    There are several specific types of lamps now made for hobbyist, some using LED as the light source and have built in magnifiers.

Desk lamp 1This one commonly available from modelling stores for around $60.  I personally do not like them as I find the magnifier difficult and impractical plus they get in my painting space because of their size and lack of adjustably.    I use on my table three (3) commonly available desk lamps that I buy from a large retail hardware chain here in Australia.  I use three for several reasons. First is to get enough task light for my subject, and the second is contrast.  By having light coming from three different directions, I avoid shadows and ‘flat’ areas in my lighting.

Daylight lamp Lamp 2

This is the lamp and globe I use.  The lamps cost about $20 each and the globes are about $5 each.  So I have three set up, one in the centre, one on the top left and right hand side of the painting area.

Next up is a cutting matt.  There are many different types available now, I get mine from a craft store, its A3 in size and  cost about $20.  These just proved a nice surface to cut on so you don’t damage the desk or the blade you’re cutting with.

cutting mattThe final item you need is a storage container.  I use Sistema 7 litre storage containers.  Get one or two of these so that between painting sessions your models wont get dust on them etc.  Sounds finicky but is well worth it.  Sometimes I may not paint for a month or two.  Think about how dusty your house gets if you don’t clean it regularly.  Well, that dust will end up on your models if you don’t protect them.  We recently had some summer bush fires about 100km from where I live.  The amount of airborne particles increased dramatically.  If I didn’t keep my unpainted models in an airtight container that ash would have settled on them.  These are about $15 each.

7L Sistema container

Now lets move onto Painting Accessories.  This is basically two organisational aids.  The first is a paint carousel.  Now, there are many paint organisers on the market.  Most not commercially available are the tier variety, or paint stadium as I like to call them.  The reason I don’t like these is that they take up too much space compared to the amount of paint they hold.  They take up valuable real estate on your desk.  This is the one I use.  It holds 80 paints and is very economical.  It costs about $70.  It’s also capable of storing many different brands of paint too.  I got mine from here

Carrousel paint holder

The other item I have on my desk is this rotary tray.  For basically the same reason as the paint carousel, except this is where I keep my brushes, clippers, knives, tweezers etc.  I got it from the same place.  It costs about $30.

Rotary Tray

Finally its Paints, Brushes and extras.  We’ll start with paints.  I use the Citadel range.  I’ve been using the Citadel range of paints for close to 20yrs.  Until they changed their range recently, I would never have swapped.  However I’m not completely happy with some aspects of the new range, so I may change in the future.  So, what to buy?  To start off with all you need to do is buy a neutral red, blue and yellow, plus a black and white.  You may also want to get a bone colour, brown and finally a cool and warm grey.  The last three suggestions are actually difficult to mix, so its easier to just buy them.  Get a light and dark metallic silver and gold too.  Finally, get a red, blue, yellow, black and brown ink (Siena).

Brushes.  You can spend a fortune in this area.  I do not claim to be an expert on brushes either (or anything else for that matter!)  However I know what I like brush wise.  I like to get Winson & Newton Water Colour Sceptor 101 Brushes  What I like about them is they’re readily available and good value.  I typically use a #0, #1 & #3.  Looking after brushes is very important.  This is especially true when using acrylics.  At the beginning of every paint session make sure you have fresh water for washing your brushes out with.  Also, if you’re going to be using one colour for a prolonged period, wash it out very regularly.  Brushes work on capillary action.   Make sure paint doesn’t dry around the region when the ferrule and brush meet.  This will spell disaster for the brush.  So keep it clean and free from dried paint building up and your brushes will last you a long time.

I also like to buy some super cheap brushes that you get in the $1 shop.  I like to get them for just random jobs like putting PVA glue onto a base or whatever.  It means that my good painting brushes only get used to paint with and not trashed.

SCEP-BRU-101-Round-Brushes_0644100

Winsor & Newton Sceptre Water Colour Brushes. They have a distinctive red handle

Extras.  Here is a short list of other things I think everyone who’s starting out should get their hands on.  The first item is some stackable storage containers.  I use these to keep basing materials in.  I don’t buy basing kits, I just make my own.  Far more interesting and cost effective.  So one container I keep sand in, the other some kitty litter, the other some random model bits and the last one bits of cork, skulls, slate and whatever.  I pick these up from an automotive store for about $2 each.  Very handy

Stack Containers

Painting palettes.  I get these from the $1 store (while I get my cheap brushes).  They’re $1 each and much cheaper than the brand name option.  Get a couple, they come in handy.

Paint Palette

Last but not least, a hobby knife with a #11 blade, some good quality side cutters, a small pot of PVA glue and some tubes of Super Glue.  I actually get these from the $1 store too.  The clippers are meant for ladies manicures and the hobby knife is located generally not too far from the cheap brushes and palettes.  Again, don’t buy the Brand name option.  

Well, thats it folks.  I know getting into this hobby can be daunting.  There are so many things to think about, however having a permeant work space with good lighting is essential.  I can not overstate how important a good task like is.  Then just get a few basics that will serve you for years to come.  Now, this shopping list runs about about $440-ish.  However remember, these are largely one off purchases.  So don’t get overwhelmed by it.

If you like this hobby, these items will be used countless times and the cost will pale into insignificance compared to the value they’ll bring.  Plus, they are a solid foundation for expanding what you may want to get in the future.  Like an Air Brush

If you’d like to download the list as a PDF, click here

I hope this beginners guide to setting up has helped.  If you have any questions, please post them in the comments section and I’ll be happy to respond to them.

Thanks for dropping in

John

2013 in review

Posted: December 31, 2013 in Uncategorized

In case anyone is interested…

Here’s an excerpt:

The Louvre Museum has 8.5 million visitors per year. This blog was viewed about 130,000 times in 2013. If it were an exhibit at the Louvre Museum, it would take about 6 days for that many people to see it.

Click here to see the complete report.

Ok, I know what you’re thinking…. ‘not another Angron’

I agree, this model has been really hammered since its release.  With good reason.  It’s AMAZING.  The amount of detail, the pose and the facial expression of this model are sublime.

I’ve actually just finished reading ‘Betrayer’ by the man, Aaron Dembski-Bowden.  If you haven’t checked it out, its well worth a look.  ADB’s books are always superb.  This book really goes into the personality of this Primarch, and its a lot more disturbed than I’d imagined.  This is one tortured soul, not only because of the nails, but also because of his enslavement and the deep wound left by the Emperor as a result of his ‘recuse’.  Towards the end of the book is a very interesting dialogue between Angron and the Primarch of the Ultramarines, Guilliman.  This dialogue provides a very telling insight into this Primarchs’ inner daemons, and why it was so easy for Lorgar to turn him.  Suffice to say, its a great book.

So the model… here are the pics.

OLYMPUS DIGITAL CAMERA
Angron back

Angron faceAs far as I’m concerned, Simon Egan is a genius.  He has given us so many magnificent models over the years, Inquisitor Hector Rex comes to mind, and more recent triumphs such as Angron and Ferrus Manus are to name but a few.

I have to say though, the face of Angron is simply amazing.  It’s very hard to paint because of how its positioned on the model, however it looks just like how I’d imagined him to look.  The only thing I wish I’d done differently now is painted his teeth silver.  Angron had his lips removed, his teeth replaced with ‘iron’ ones, face tattooed and Butchers Nails implanted into his brain by the Gladiator masters.

In game terms, this guy is a hardcore badass.  Basically unstoppable.  On the board he’s like a shark swimming through a school of bait fish.  Everything just tries to get away from him (often unsuccessfully)  You can actually take him in a 2000pt game.  On that scale of game, he really owns the table.

Ok, I hope you’ve enjoyed the pictures.

Until next time, thanks for dropping in.

John

Reaver Titan WIP

Posted: September 23, 2012 in Uncategorized

Did some work on the Reaver over the weekend between playing in Titans of War and trying to get a few other things done.  So Friday I spent most of the afternoon cleaning the kit.  It was a massive job and one I wouldn’t recommend if you don’t own a dremmel with cutting wheel, a good quality dust mask and dust extractor.  It took me about 3hrs of cutting, grinding, sanding, slicing, drilling, heating, cooling and filing to get the kit cleaned up.  It was epic.  I’d pitty the fool who tries to clean this kit if they only have a saw, clippers and a hobby knife.

So the next step was to start working on how I wanted it to be posed, although I wont be getting to the legs for some time, as I’m going to be painting the interior first.  For me getting the pose of this Titan right is really important.  Just to get it right in my mind and to give me something to look forward to as I know the interior is going to be a long tedious road.

As I know that this is going to be a seriously top heavy kit, I cut about 15 of these 2mm spring steal rods to insert into the kit at all the important joints to help make the it strong.  I’ll also drill shallow 2mm holes in the male and female connectors of each joint as well so that the expoxy resin that I’ll use to assemble the kit with will be able to grip into the holes to provide mechanical rigidity as well.

I then set about getting the pose sorted out.  One thing thats really important is to get the centre of gravity right.  Which is keeping the bulk of its weight over the centre of the kit.  Basically you know if you’ve done this right is if the kit stays up without any support. This photo shows the Titan held together with on the steal pins keeping it together.

As you can see, this is a seriously big kit.  Hopefully this can give you an idea of how I want it to look.  It’ll be pointing its left hand weapon system (right hand side of the pic) at a target while the other arms weapon system will be relaxed.

So next stage was to start working on getting the interior ready for paint.  I must have spent about 2hrs checking the way this rather complicated piece of the kit went together.  Test fitting the various components together to ensure that when its all painted it will go together hassle free.  This was actually a lot more complicated that it seemed at the start.  Many of the components had to have very minor trimming done and also the odd bit of heat gun action to ensure a smooth fit.  So after finally getting through this, I got everything ready for under coating and painting…

I then started to get all the base colours sorted out and thats about as far as I got

Next up well be developing the details and painting the servitors.  Then it’ll be cutting in a few areas with shading and then applying oils and start weathering…

Ok, thats it.  I aim to do some more work on it this week but we’ll see how we go

Comments always welcome

John


Adepticon 17-22 April 2013

Posted: September 21, 2012 in Uncategorized

Hey everyone, I’ve got the details for an Australian contingent to attend Adepticon 17-22 April 2013.

So I’ve put together a package for those interested in attending. Heres what it includes
1. Return airfares ex Brisbane
2. Entry to Adepticon and pre-registration with a very important gamer (VIG) pass
3. Twin share accommodation at the Venue (venue and hotel are co-located)
4. Airport transfers from Chicago to the Hotel (Westin Lombard)
5. Attendance to Adepticon welcome dinner.
6. Adepticon shirt and cup
7. Day of activities prior to Adepticon at a local theme park

The cost is a $1,199 deposit and 5 x $395 monthly payments (starting October 2012)

If your keen and want more details flick me an email at thepaintingbunker at gmail dot com

To get all this going we’ll need to have deposits sorted out by 30 September 2012

This is an awesome opportunity and it’d be great to get an Australian contingent to attend Adepticon 2013 as I’m sure many good times will be had.

Cheers

John

So yesterday I had the bright idea to do a video post for a change… 12hrs later I had over an hr of edited footage and only half a clue on how to actually post it… so at about 1am this morning I gave up and went to bed… close to an answer but my caffeine addled, sleep deprived brain couldn’t quite put the last few pieces together… until now!

So I’ve now created a YouTube channel called… you guess it ThePaintingBunker 

This idea came from 3 Land Speeders I brought last week when I won Armies on Parade.  I thought that making a set of tutorials on everything from preparation, magnetisation, sub-assemblies, preparing for undercoating, undercoating, decals, weathering and other topics could be covered with this build and may help some modellers out there navigate their way through these process a bit more successfully.

So I spent most of last night stumbling through the editing process and trying to upload these first 5 tutorials.  It was an interesting experience.   Because I don’t have a self hosted site, to see the tutorial you’ll just have to go to my YouTube Channel and watch them from there, if I get enough views and positive feedback on the video and feel that its worth the expense to self host, I’ll make the upgrade then so you’ll be able to watch them from my page. I hope you enjoy the tutorials I have made and find it helpful.  I’m just going through uploading the other 4 so they’ll be featured in other posts shortly.

Thanks

John

Hello fine people,

Well, I did this tonight in a vein attempt to have my a army ready for a tournament I’m playing in tomorrow… oh well…

Anyways, with the game now changed quite a bit from 5th ed, I figured that having one of these is a good investment…

I’m pretty sure this (with its cyclone that is about to be added) will ruin any flyers day pretty quickly.

nice.

such an awesome model.

I also tried (again in vein) to add a 5 man assault squad with power sword and two plasma pistols… this is how far I got…

One thing I really like about the Carcharodons is that they have bits of all the MK’s of armour in their squads.  It makes for an interesting looking army/unit

Ok, I’m off to get some sleep.

Enjoy

John