Hello everyone,

Yesterday afternoon I was going through my messages on The Painting Bunkers Facebook page looking for some information when I came across a message I got some months ago asking me if I’d like my Warhound Titans featured in an online magazine called Animation Carnival. I must admit I know little about CGI but the site seems to be a community forum dedicated to featuring and developing the talents of freelance CGI artists.

When I was asked if I’d like my model featured in their publication I went and checked it out and after seeing how high quality it was I agreed, sent an email to them with some model pictures, a mug shot of me and a brief bio. I then quickly forgot about it and got on with my life.

So it was quite a shock yesterday when I went back to the site to find that my Warhounds were featured in their September issue of Animation Carnival. Although the publication is dedicated to CGI, in this issue there were a few mecha scale models featured also. Below are some pics from the publication.

20121204-090851.jpg

20121204-091008.jpg

20121204-091024.jpg
If you want to down load the publication you can by going to the Animation Carnival website, however it does require you to register. If you don’t want to register you can view a copy in my Scribd account. It’s a pretty interesting publication full of some petty amazing CGI, worth a look no doubt.

It never ceases to amaze me where some of my model pictures have found themselves, and it was great to have them featured in this great, high quality online publication. The artists behind it are clearly very dedicated and passionate about their field.

John

Hello everyone,

As many of you know, FW recently released the 1st book in the Horus Heresy series : Betrayal. Like many, it’s really captured my imagination and the models that FW have released to date are nothing short of exceptional. Aside from the models the actual book has really raised the bar on so many levels for a FW publication. It’s well written, thorough, beautifully presented and the accompanying stand alone rules set and campaign are nothing short of amazing.

Over the past few months I have been steadily reading through this epic tome and every time I’ve found myself thinking of what I could paint next. World Eaters seems interesting with their amazing Primarch model or do I do a Death Guard army? But one thing keeps bothering me and has done for some time. I have these really great looking Imperial Armies that I’ve been collecting for several years now, however I don’t really have a gaming table that is up to the standard that they are painted to.

I have to admit, the thought of building and painting a gaming table isn’t a new one to me. However painting other armies and models has just been a higher priority. Additionally, the table that I’ve always wanted to create has been difficult for me to visualise and justify the cost, let alone the complexity involved in creating it. The table that I’ve always wanted to do is a ruined Imperial city. But done properly, not just a bunch of disparate ruined buildings chucked onto a 6″x4″ board with a few craters and other debris thrown on for effect. I wanted my board to have city streets, cat walks, ruined buildings and even city precincts. The thought of creating this had been quite overwhelming. Until recently.

As some of you know, my armies on parade entry featured a FW board section. I was thoroughly impressed with this section. It had great levels of detail and could provide some great narrative opportunities if I wanted to incorporate it into a regular game. So I knew that the FW gaming board sections were good quality and had many opportunities for gaming with. Then when I saw the newly released realm of battle cityscape sectors I couldn’t stop myself from thinking of some of the possibilities that were available, but still the thought of painting another army was strong.

What I really like about the board sections is that they have “foundations” for you to put your own buildings on and also feature streets etc to give the boards context when arranged together. In addition to that, each board is a mini precinct within itself. So arranged together they can tell an interesting narrative.

So after a lot if thinking and consideration, looking up reference material online and drawing inspiration from some of the amazing cities created in the 6th ed rule book I went online and ordered 2 of the 4 tile packs and a few boxes of the GW ruined imperial sectors that have become available again. Fortunately for me I used mostly price money to buy the plastic GW kits.

20121203-103530.jpg

20121203-103552.jpg

With any luck the boards will arrive before Xmas however I’m not holding my breath, I can imagine that is a pretty busy time of year for FW.

My plan is to create 2 x 4″x4″ city boards for smaller games and one themed 6″x4″ board for larger battles and obviously a 8″x4″ board for something a bit different.

I’ve got some really good ideas on how I’m going to approach this, with a massive cathedral and city square as the feature of the the 6″x4″ board, with a commerce district and small manufacturing precinct featured also.

I can’t wait to get started on this project and wish the board sections had arrived already so I can start building! This is going to be an interesting modelling project and I feel it’s really going to stretch me as a modeller which I’m looking forward to. Plus it’ll be great to finally have a great looking gaming table to play on with my armies and some of the amazingly painted armies my mates have.

Ok, that’s me for now. Thanks for dropping in

John

Hello everyone!

Its been a while between posts and not a lot of painting since finishing the Reaver a few weeks ago.  However I’m still here, just taking a bit of a (well deserved)breather and planning my next project, but also working on a few other things too.  Like putting together a 4hr painting tutorial for people who want to learn how to paint tanks better….. let me explain..

For the past few years now, the Australian Defence Force Wargaming Association (ADFWGA) holds their annual wargaming Championships in December each year.  This is a Tri-Service wargaming event (Army, Navy & Airforce) for current and ex Defence members to participate in, the games on offer this year are 40k, WHFB, Flames of War, and Malifaux.  Apart from determining who is the best Wargamer in the ADF and spending a weekend talking hobby, smack & general laughs, its also an opportunity for the ADFWGA and members of the community to help raise funds for Legacy.

Legacy is a charity providing services to Australian families suffering financially and socially after the incapacitation or death of a spouse or parent, during or after their defence force service.  It is a charity that is close to the hearts of many service people and their families and does a lot of good both within the Defence community and the general community at large.

To make my (The Painting Bunker’s) contribution to not only the ADF Wargaming community, but to also assist in raising funds for Legacy, I have offered to the organisers of this years event, being held in Townsville, to do a 4hr intensive tank painting tutorial for 10 participants at $40 per head with all funds raised going directly to Legacy.  When the painting tutorial event was announced on the ADFWGA Facebook page, the places were quickly snapped up which was a great relief and testament to the communities willingness to not only improve their painting skills, but raise money for a very worthy cause.

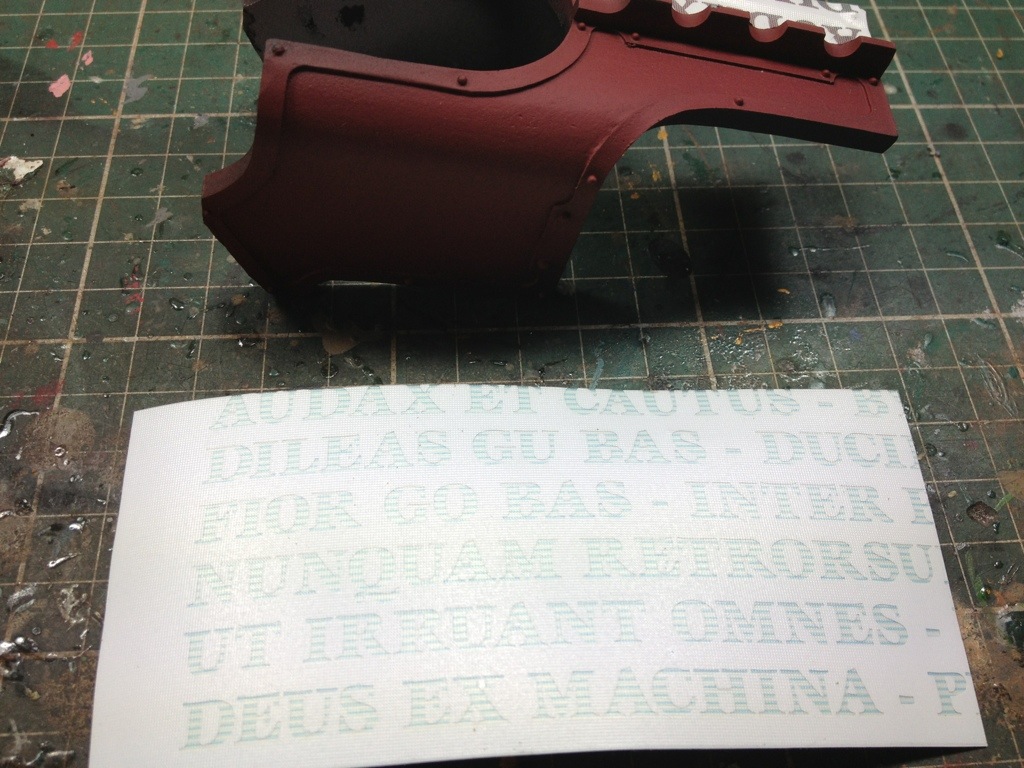
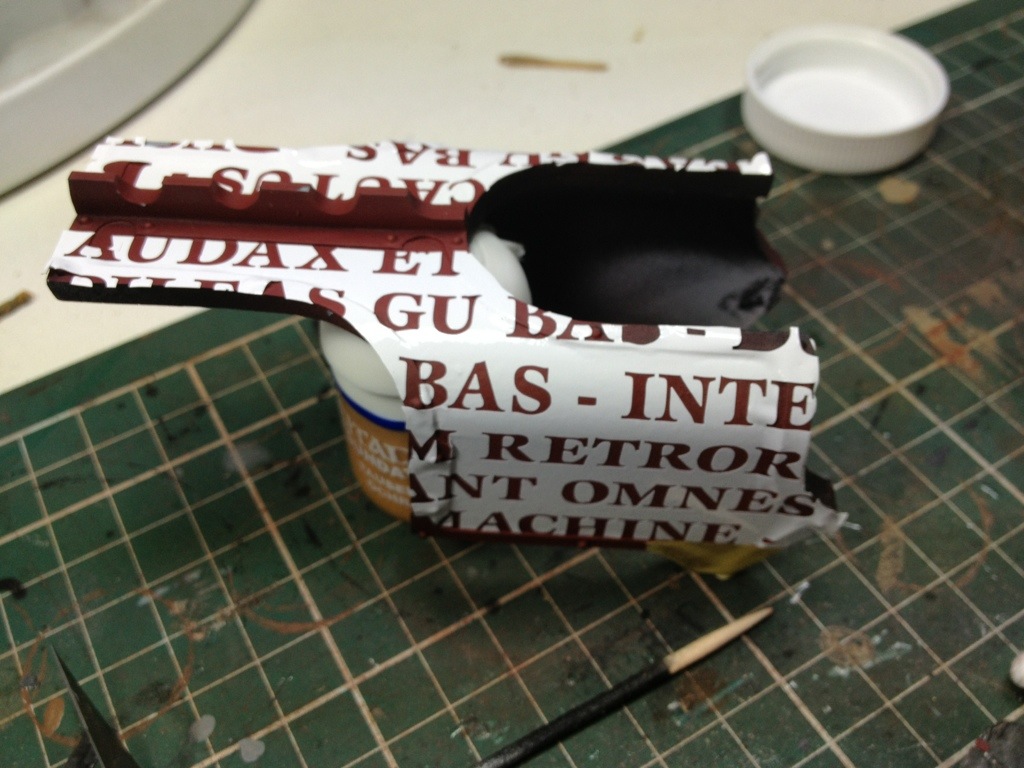
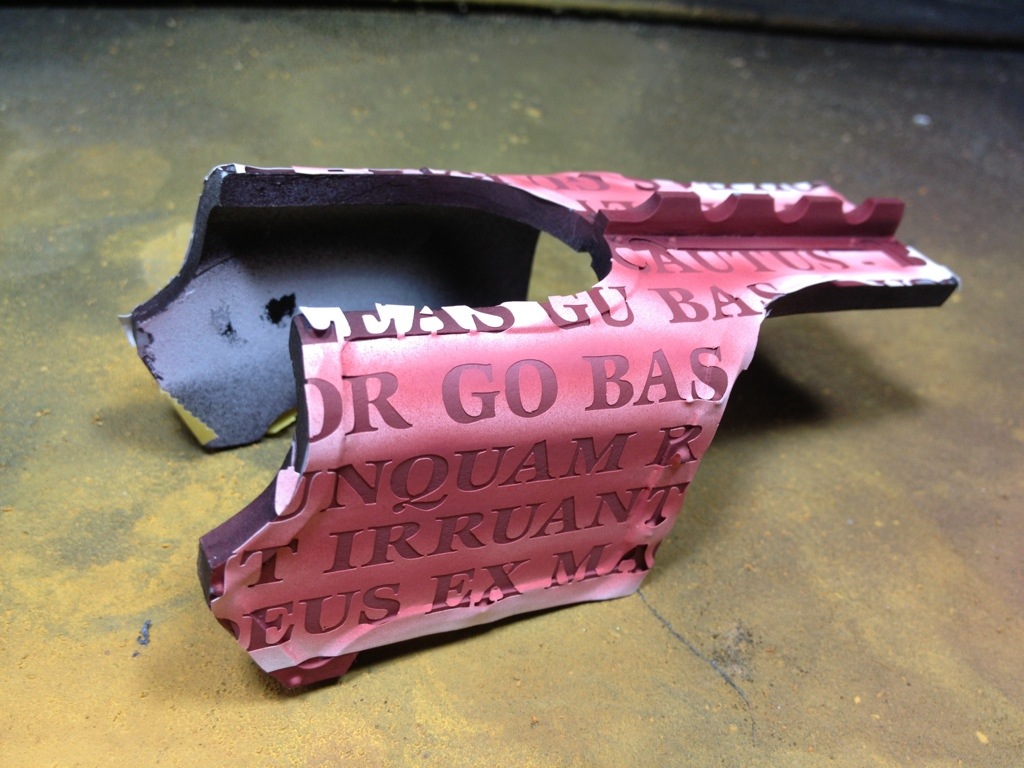
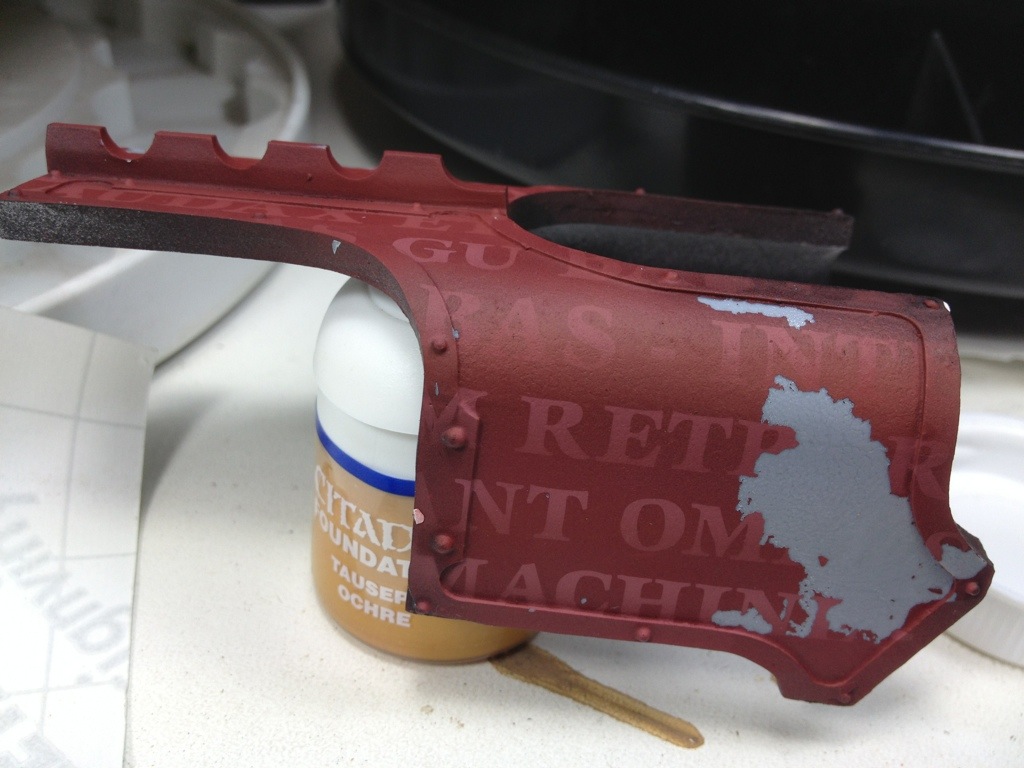
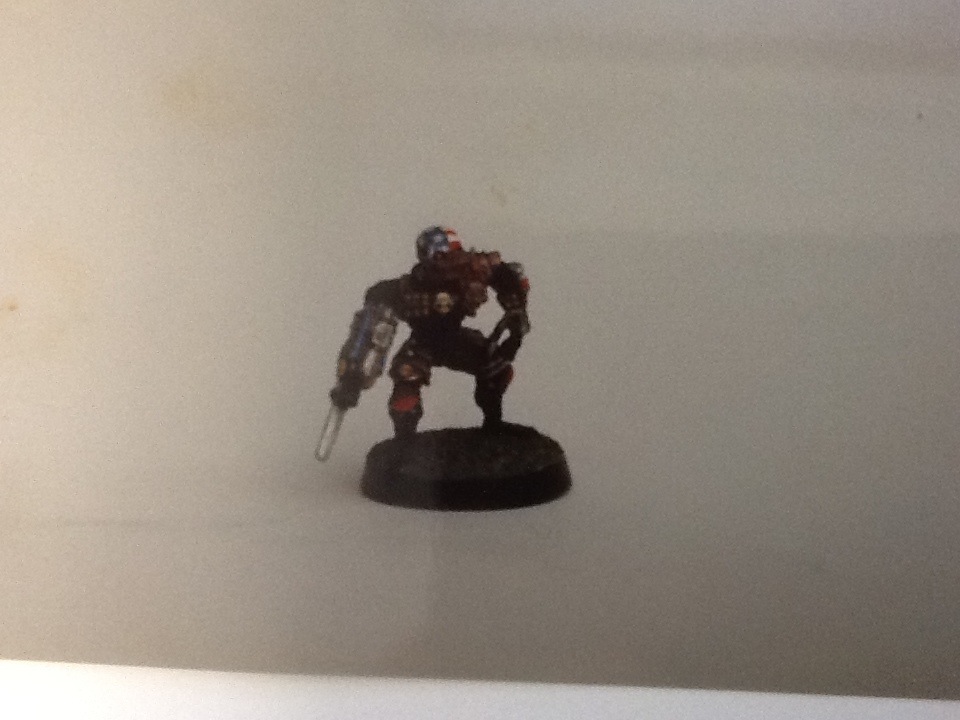
The aim of the tutorial is to provide the participants with the principals they’ll need to paint tanks effectively, some of the topics that I’ll be covering will be Air Brushing, applying camouflage patterns, weathering with oils, weathering with pigments, stencilling & decal application, amongst other things.  Basically what I’m going to be doing is taking the participants through how to turn this…
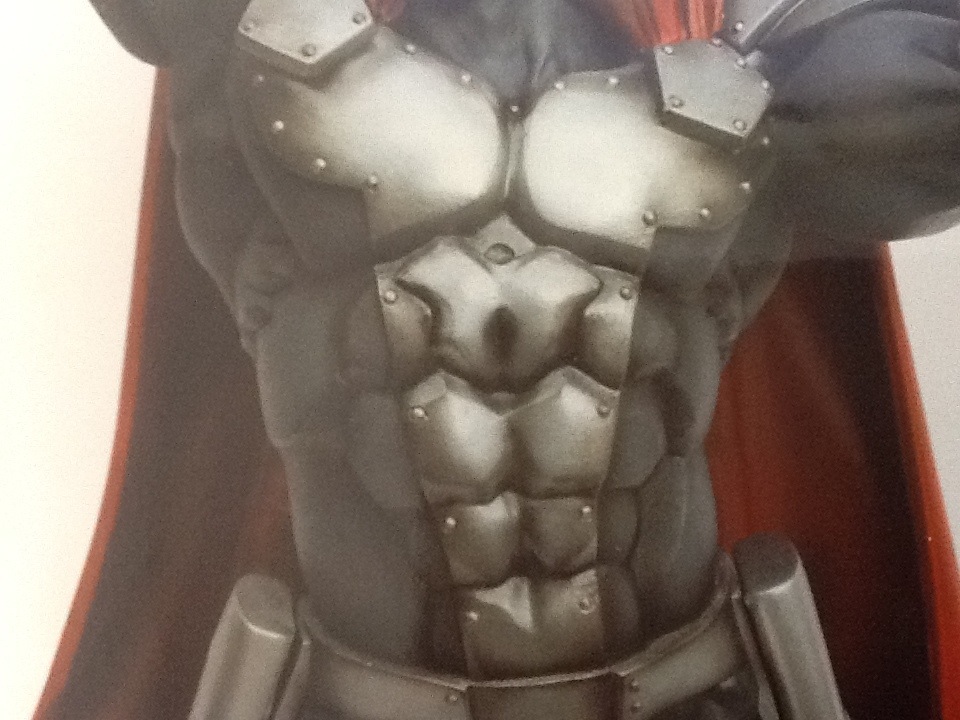
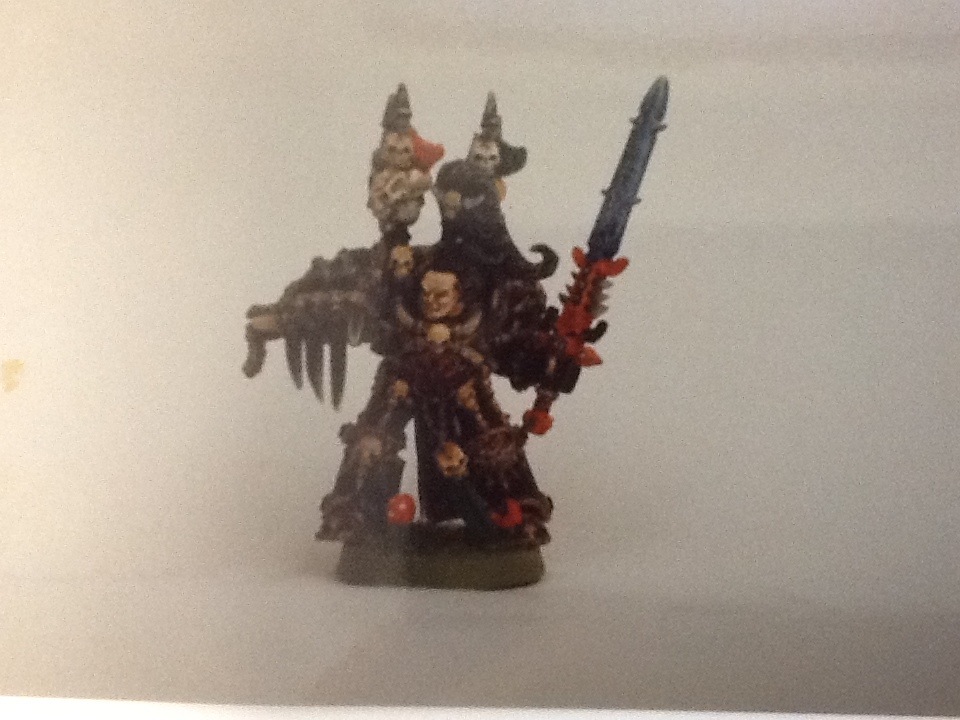
IMG_0736

into this….

IMG_0756

Its been an interesting journey organising this as painting for 1 (me) is pretty straight forward, try organising it for 10 people… 10 brushes, 10 sets of tweezers, 10… well, you get the picture.  Luckily for me a few local Brisbane business have helped out in providing me with what I’ll need to do the tutorials.

When I asked Nathan Jurgs, the owner of Battlestation Ipswich (technically not Brisbane :-P) if he could help out, he has very generously supplied all the Citadel paints (over 36)  that we’ll need to paint our project.  I’ve only known Nathan for a few months now, however I’ve been thoroughly impressed firstly with his business, easily the best, and I mean BEST, independently owned games business I’ve ever seen, but also with his passion for gaming and the community as a whole.  When I asked if he could help out he didn’t hesitate and was quick to support the fund raising effort for Legacy.  Go check out his Facebook page too!

The other locally owned business that has been extremely generous and eager to support is Hobbyrama in Stafford, Brisbane.  Hobbyrama is easily the largest, longest running hobby shop in Brisbane and I’ve been shopping their for well over 10 years now.  When I discussed what I was doing for Legacy and ADFWGA, they were very eager to help out, and have provided 5 very high quality gravity feed, dual action air brushes (complete kits) and a mountain of finishing products to assist with the tutorials.  They even ordered in some items from their suppliers express especially so that I could make timings for my trip upto Townsville (a two day drive from where I live).

So this is shaping up to be a great weekend, and I’m keen to not only play (I’m taking the Carcharodons in the 40k event) but also to hopefully pass on some of my skills to others so that we can raise the standard of army presentation in the community.

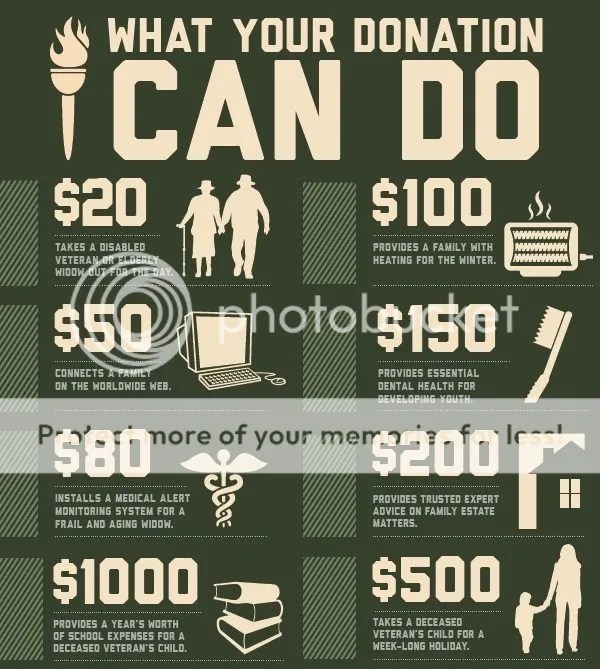
So, if you’ve made it this far, thanks for taking the time to read this post.  I’d like to finish up and ask you if you could make a small donation to Legacy via the ADFWGA’s donation portal, everyday hero.   It take about 2 minutes, its painless and your contribution will make a difference.  To help put what your donation will do into perspective, have a look at this…

https://i0.wp.com/i417.photobucket.com/albums/pp259/violence_8/Legacy.jpg

So take a few moments to help out, and if you live in the area then please visit Battlestation & Hobbyrama and show your support to these awesome local business by giving them your custom.

So, thats it for me thanks for stopping in and keep an eye out for the soon to follow posts on all of the fun and good times that will come out of the 2012 ADFWGA Championships.

Comments welcome

John

Hello everyone,

On the weekend I participated in an 8000pt Apoc tournament and placed 3rd overall, and also won “Best Painted”  It was a great tournament, with 4 games being held over the two days.  It was a smoothly run Tournament which would be expected when the steady hand of Jeremy from GW Chermside was at the helm.  As you would have seen if you like my FB page, there were some pretty amazing armies present.  In particular a pretty striking Eldar army, with an amazing Phantom Titan (which whipped my ass)

So the breakdown of the games went like this.

Game 1.  Me Vs Matt.

Matt had a rather large Salamander Space Marine force being supported by two Warhound Titan.  Luckly for me, I smoked the two Warhounds straight away.  Major Victory to me

Game 2.  Me Vs Tony’s Eldar

Phantom Titans are tough to hurt, let alone kill.  That is all – Major loss to me

Game 3.  Me Vs Reds Imperial Guard

My Titans really gave Red’s guard a hammering.  The Reaver was killing super heavy tanks at will, and due to a rather unfortunate deployment roll for Red, meant that the blast templates from my Titans were laying hammer blows everytime they shot.  Major Victory to Me

Game 4.  Me Vs Steve’s Imperial Guard

My opponent conceded half way though my 1st turn.  It was pretty ugly for the Guard.  Major Victory to Me

Apoc 2

Apoc1

The Titans were really fun to play with.  In games of Apoc they seriously come into their own.  It takes a concerted and determined effort to destroy one, let alone 3 (unless your a Eldar Phantom Titan).  The fire power they dish out is astonishing too.  It was very pleasing to see them on the Battlefield, and to get best painted was a rewarding achievement after so many months of painting these 3 massive projects.

Thanks for stopping in

John

Well, today is a good day.

I’ve finally finished the Reaver Titan I started in September.  It’s been a massive project and I have to admit I’m grateful for the experience I gained from building the two Warhounds when I set out on this massive endeavour.  I pitty anyone who would attempt to build a Reaver without having first built a Warhound.  I thought the Warhounds were complicated, the Reaver makes them look like a lego man by comparison.  Anyways, I’ll cut to the pics so everyone can enjoy the massive!

Behold the God Machine!

Forge World Reaver Titan 1 via www.thepaintingbunker.com Forge World Reaver Titan 9 via www.thepaintingbunker.com Forge World Reaver Titan 8 via www.thepaintingbunker.com Forge World Reaver Titan 7 via www.thepaintingbunker.com Forge World Reaver Titan 6 via www.thepaintingbunker.com Forge World Reaver Titan 5 via www.thepaintingbunker.com Forge World Reaver Titan 4 via www.thepaintingbunker.com Forge World Reaver Titan 3 via www.thepaintingbunker.com Forge World Reaver Titan 2 via www.thepaintingbunker.com

I can’t wait til the final? book of the Forge World Horus Heresy book comes out that deals with the assault on the Imperial Palace on Terra.  The Fire Wasps take a big part in the defence.

Reaver WIP – kinda

Posted: October 30, 2012 in Titans

Hey everyone,

This post is coming to from my iPhone which should be interesting, if not brief cos typing on this tiny key pad blows.

So I really gave a lot of thought as to weather or not to put this post up as I was hoping that what it’s going to be about would have been about a great success, however it’s more about an idea I had for the Titan that didn’t work out so I’ve decided to abandon it. Sad face.

However after have a long chat with a mate of mine on Skype last night he urged me to post it so that maybe others can learn from my learn or possibly inspire someone to achieve a good result and advance the hobby.

So the idea is relatively simple. It involves stencils and adding some interest to the large flat areas of the Reavers carapace. Some of you may remember an Iron Hands Landraider I didn’t a few months ago where I added some scripting to the front of the hull? Well this is basically what I wanted to do for the Reaver, however instead of having the scripting in white, use the air brush to just create a monochromatic outline if the words instead. So that it would be a bit more subtle.

Problems began for this idea when I spoke to my stencil person about the idea. There was a big technical challenge that the letters couldn’t be made as small as I wanted them, around 2mm high. Instead the smallest they could be made was around 5mm. I decided to go ahead anyway as I thought it’d be worth experimenting as the possible upside of the result would far out weigh the downside of it not appearing exactly as it did in my minds eye.

The second technical challenge I faced, which I knew about was the stencil film taking paint off when I removed it. I had a similar problem with my digi cam on the Carcharodons display board. I thought I’d learnt enough from that experience to overcome this challenge. I gave the kit a very thorough washing before assembly and used a special Tamiya undercoat that is meant to bond with the resin before applying the black undercoat. I felt confident that these measures would overcome the lack of “low tac” that the stencil material has. The stencil film is not meant to be easily removed so its not low tac like most modeling masking tapes.

So lets look at some pics of how it all panned out.

20121030-084707.jpg

Here is the stencil cut to size ready for application.

20121030-084816.jpg

A rough application of the stencil. I used a heat gun to the stencil better conform to the contours of the carapace.

20121030-084943.jpg

The stencil applied and trimmed. Ready for air brushing.

20121030-085025.jpg

I begin outlining the stencil. All good so far.

20121030-085106.jpg

I’m feeling pretty pleased with myself at this stage. And despite the size of the letters I’m willing to make a concession as the effect will look awesome.

20121030-085250.jpg

And yeah. Very disappointed at this stage. The thought of this happening to the main areas of the carapace was too much to bear so I abandoned the idea. Back to the drawing board…. I feel that the size of the letters and the lifting of the base colour meant that I just wasn’t prepared to persevere with this idea.

I’ll give it another attempt in the future however for the time being I’m going to give it a rest.

On a brighter note. I got the Reaver and Manticore undercoat end yesterday and plan to apply their various base colours this afternoon.

Thanks for stopping in

John

The Painting Bunker is BACK!

Posted: October 28, 2012 in Titans
Tags: , , ,


Hello Everyone!

Well, its been a while since my last post… It’s been a bit of an epic journey for me lately.  As you may know I moved house, had a few demanding weeks socially and had my birthday, which was epic! (if you have the means I highly recommend the Surfers Paradise Hilton)

This weekend was the 1st weekend I’ve actually had to do with as I please and to be honest with the move and a few other things, I’d really lost my painting mojo.  However it returned with a vengeance yesterday afternoon and I’ve been on an epic painting bender ever since.  So strap yourself in for some hardcore O.G. ungreased man dolly ACTION!

So my focus has been firmly on the Reaver Titan.  I am actually aiming to have this bad boy finished in time for an 8000pt Apoc tourney at the end of November.  Up until yesterday I thought it was just a pipe dream, however after the weekends progress I am feeling confident that I may just reach that ambitious goal.  We’ll see.  I also have to paint several other things including… ahem… a Thunderhawk Gunship too… but hey, if you don’t aim high and all that….  Then I have the ADFWGA championships up in Townsville in early December too, which I’ll be taking my badest of badass Imperial Guard (seems appropriate) which I need to paint a Hydra, Manticore and several single minis for the army list I’ve prepared.  So I’ve got a lot of painting ahead of me in the next month so we’ll see if my painting mojo can stick around.  Lucky for me I got a coffee machine for my birthday, so I’m sure this will help….

So to the pics….

This post is really about masking of the Reaver in preparation to get all the iron work ready.  Being such a massive model, this has been a very time consuming process and also very masking tape consuming process too!  I’ve used the Tamiya 12mm tape on the Reaver as on the two warhounds I used 19mm, and I thought the 12mm would be a nice contrast for this model.

As you can see, there are lots of hazard stripes on this kit.  It was a huge job just getting this far.  Next came cutting in the black

Also after I cut the black in I added a slight highlight along the seem line.  This looks quite effective once the masking tape is removed.  Once this was done I had to mask all it up, as well as all the red that is on the model too.  This was epic

I also added all the pistons and hoses onto tooth picks ready for undercoating too.


Everything is now ready for undercoating.  I’ll knock that over tomorrow after work and if I’m really inspired get a start on the iron work too.  I expect to have quite a few posts coming up in the next few weeks.  Lets hope I can get everything painted I am too.  Its a big job, and painting all the gold trimming on the carapace is a HUGE job.  Probably the most time consuming aspect of the Titan, oh and the Imperial Eagle crest that is on the main carapace of this Titan.  So yeah, quite a bit to do.

BTW, the Thunderhawk has been ordered and I expect it in the next two weeks or so.  I am reasonably confident about getting this kit painted in time as I dont plan on painting the interior.  So it’s basically going to be a massive black model.  However I could be a little too ambitious as almost every person I’ve ever spoken to about this kit and every blog I’ve ever followed about this kit tells me that the assembly is a muther fucker.   So I may yet have to yet alter my apoc list.

Ok, thats me, I hope you’ve enjoyed this post.

See you all soon

John

Hello everyone!

For the record, moving house is the pits. If it wasn’t for a bunch of good friends of mine helping me out I would have been smoked. So Jodi, Matt, Colin, Tom & Ben (who I doubt read this blog) a big thank you for your assistance last week and over the weekend moving.

I’m a bit of a hoarder (but haven’t always been) and during the move I found some pictures of minis I painted/build from wwwaaaaaayyyyy back in the day. Circa 95-97. I was really excited when I found the pictures (old 6″x4″ photos) because I thought I’d lost them. The pics are not amazing as I had no idea how to use a camera back then, nor how to photograph small items like a miniature. Who knows where the minis are now, but the pics are ok (all things considered). So let’s now sit back and take a trip down memory lane together. For some of you you’ll be nodding sagely at what your about to see having possibly painted these minis before, and for others you’ll be seeing minis that you have never set your eyes upon before… So here we go….

First up we have Horizon Models 1/5 scale vinyl Terminator. This was the second release of this kit and depicts the T800 played by Arnold Schwarzenegger. I used to really love painting these kits and at one stage had about 10 or so of them. The quality is amazing and they made great show pieces.

20121009-092444.jpg

20121009-092529.jpg

20121009-092550.jpg

As I said, the quality of the pics isn’t great, but. You get the general idea.

Next lets visit another Horizon kit. This time it’s Steel. It’s a great looking kit with some awesome detail

20121009-092746.jpg

20121009-092912.jpg

20121009-092945.jpg

Now the next lot of minis some of you may remember. It was from the wargame Warzone released by Heart breaker games. Originally Warzone was an RPG, but Heart Breaker made it into a wargame and had some great success. Unfortunately their minis were not as good as their art work, but they improved somewhat over time. This game has some very interesting fluff and was a creditable threat to 40k when it first hit the scene. Ok, let’s look at some minis

20121009-093302.jpg

This was a “Machanation” from the Cybertronic faction in Warzone. Cybertronic basically relied on AI technology to wage war. So all of there units bar a few were robots of some description.

20121009-093459.jpg

20121009-093621.jpg

And lastly this is a crew member for a piece if artillery that an enemy force used. I just liked the mini

20121009-093717.jpg

Next up is a conversion I did of the old GW Assassin model. I never really liked its pose. As you can see its not very imaginative.

20121009-094005.jpg

So those of you that remember the old “Codex Imperialis” book that was in the 2nd ed box set may remember this pic (later to also be the inspiration for a Mike McVey diorama)

20121009-094242.jpg

So I converted the old assassin mini based in the pic and also decided to paint the head the same as the killer cyborgs head from the classic horror/sci-fi movie M.A.R.K. 13 I was young and impressionable and this was one bad ass cyborg.

20121009-094554.jpg

Back in the day it was fashionable to give the assassin a vortex grenade, power fist and displaced field. Nasty

Ok, next cab off the rank is our old friend Abaddon. Not much to say here really. Still a bad ass mini after all these years. Jes Goodwin is the man.

20121009-094725.jpg

20121009-094743.jpg

Lastly is a piece of scenery I made out of a piece of cardboard tube and some plastic card.

20121009-094936.jpg

20121009-094951.jpg

20121009-095003.jpg

Ok. That’s it for now. I just wanted to share these pics with all of you. Hope you enjoyed them. I’m still unpacking so I doubt I’ll have any post for you soon on the Titan. I am playing in Ork-toberfest this weekend so you’ll probable see some pics from that on FB

Comments always welcome

John

Hello Everyone!

This will be a super quick post just to fill you all in on where I’m at on the Reaver Titan.  So after I finished putting the body together I moved onto masking it all up ready for paint.  This is always a fiddly aspect of a kit build and needs to be done very carefully and thoroughly using the right materials otherwise you’ll get over spray on your nicely painted work, or when you remove the mask the paint will come off with it.  So as tedious as it is, I spent a fair bit of time on this part of the build.  As you can see from the pics, there is a lot of work done here.

So now that most of the heavy lifting has been done in respect to the body, its now time to move onto assembling all of the main sub-assemblies for preparing to paint.  As will the body, structural integrity is a very important aspect of this build for me.  I take a lot of time considering how the kit will stand up when its complete and remain that way for a long time.  Thats why I use 2mm steel rod, 2 part epoxy resin and drill shallow holes in the male and female parts of a joint to increase surface tension and provide something for the glue to grab.  Finally, when I set the joints, I always use a large clamp to hold the parts together so that the bond is set firm with minimal gap between the two parts. As I’d already spent a fair bit of time getting the pose of the Titan correct, this process was mostly straight forward.  Just time consuming waiting for the epoxy resin to harden enough so that I could handle the parts…

Although the toes are not structural I do want them to be firmly fixed to the foot.  So I still drilled 2 x 2mm holes in the male and female knuckle and also had a 1mm brass rod joiner.  You’ll see why in a minute.

To ensure the toes are flat I clamped down the foot while the resin was setting…  yes, thats my coffee table.  The grand final was on so I had to move locations so I could watch it…

The legs now fully assembled and standing on their own two feet.  So to speak..

So lastly, I started with getting the base sorted out.  I wanted to get the positioning of the feet right before it was painted.

So I simply traced around each foot then marked out where I wanted each screw to be positioned then drilled a hole.  The base is a 300mm dia 3mm thick piece of clear acrylic.  The same size I used for the Warhounds.  I originally had a 450mm dia one made for the Reaver, however it turns out thats too big.  Perhaps I’ll save it for the Warlord….

As you can see from the picture below, I am using 4 x 20mm screws for the toes, and 1 x 40mm screw for the foot.  This will ensure that the foot and ankle joint are joined even more.

And this is a dodgy as photo just to give you an indication of the size of the Reaver.  Its massive.  That is a Baneblade super heavy tank and one of the Reaver’s weapon systems laying beside it…. Remember too that the Reaver has a carapace weapon mounted on it too…

Just to tie of this post, thanks to everyone who offered to get me some Iayden Darksun paint!  really appreciate everyones offers!  However much respect goes out to Cal who got me a nice new pot of it today.  So I’ll now be able to get on with business.  I also spoke to Tegan today from Maybe Jane about some stencils I’m getting made for this bad boy.  I’m not going to let on too much about what I’ve got planned here, but its going to be pretty awesome if I can get my idea to work.  It’ll be tricky but its worth trying so stay tuned for that one.  I should know in the next 48hrs or so if Tegan can produce what I’m after.

Ok, got packing to do now.

Comments always welcome, and thanks for looking.

John

Reaver Titan WIP

Posted: October 1, 2012 in Titans
Tags: , , ,

Hello everyone,

Its been a long weekend here and I’ve spent the last two days working on the Titan. I wanted to get as much as I can in this weekend, as next weekend I’m moving house and I still don’t know if I’ll be able to do as much painting as I’d like to in the new place as its not as big as my current one. Whatever, so I hit it pretty hard this weekend and made a pretty big dent in it until I ran out of Iayden Darksun and tried to get the new GW substitute and its a very poor match, so I’ve had to use the bro network to try and find a replacement, and until it arrives, there will be no more painting. Sad face.

As I spent most of Sunday (8am til about 11pm) painting and building, and most of Monday morning working on the Reaver, this is going to be a pretty big post, so go grab a coffee or something….

Ok to the pics!

First up I had to get the interior finished before I could move onto any other area of the build. The interior of this kit is pretty amazing, so much detail. Sadly though, a lot of it is obscured from view. However its still important to me that attention is paid to it as its worth doing. So I began with under coating all the areas that were going to form the interior structure of the kit (previous post)

Then I started adding weathering to the kit. As most of these machines are ancient (particularly from this legion) I went pretty heavy on the weathering techniques.

Next was assembling the body of the Reaver. This was going to be a massive job that needed to be done right. So I used a lot of clamps and drilling holes in the parts for the glue to grab. Note I used epoxy resin to glue this kit together, not super glue

To get the right bond with the parts for this build, I had to use clamps to hold the parts together while the resin was setting. This involved glueing one part together at a time. Very slow process, however it yields the best results as each part has been clamped together while the resin sets, creating a very firm bond.

Gluing the main bulkhead into the main body.

attaching the weapon system “controls” to the main body

attaching the reactor and other weapon control panel into place

Finally, adding the final part of the main body…

I think at this stage I’ll put this post up and have a part two cos this one is getting a bit out of hand and there is still a long way to go. In the next part I begin masking up all of the interior sections and then begin assembling the legs and begin painting. So until my next post, thanks for looking.

Comments welcome

John